
1. Introduction
Thank you for choosing the YULED S1-B 1-Channel Wireless AC Triac Dimmer. This compact dimmer is designed for precise brightness control of single-color LED light sources. It operates on a reliable 2.4GHz wireless frequency and features a convenient Push-DIM function for easy operation. The Triac dimming technology ensures smooth, flicker-free light adjustment. This manual provides essential information for safe installation, operation, and maintenance of your device.
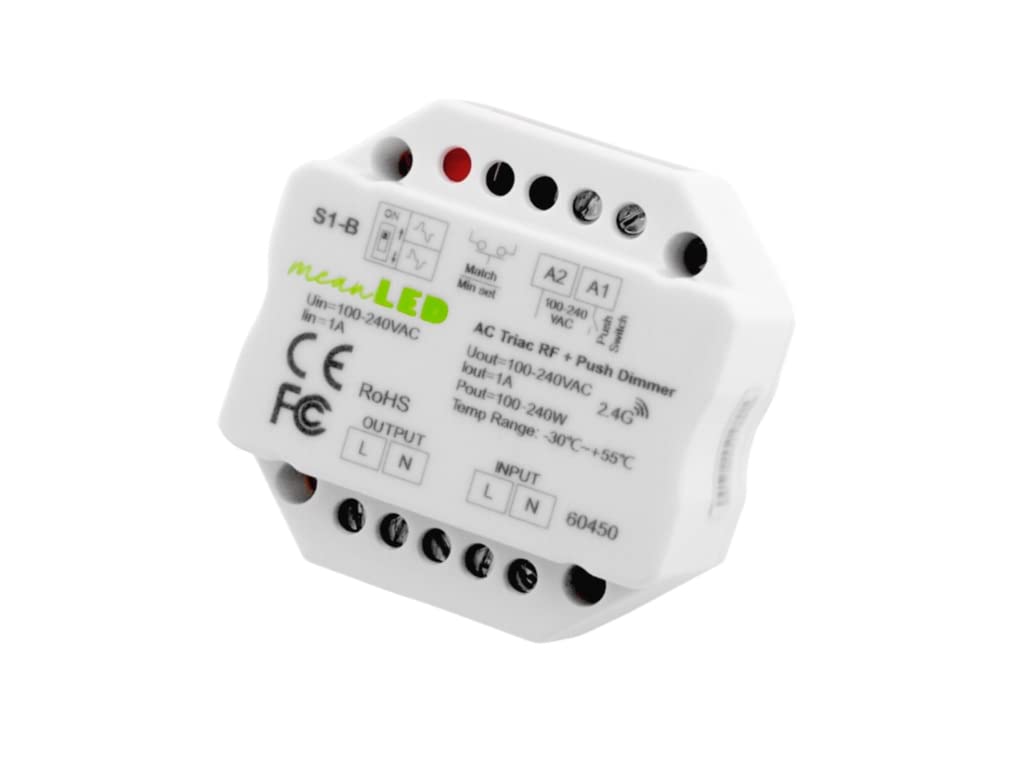
Image 1.1: Front view of the YULED S1-B 1-Channel Wireless AC Triac Dimmer, showing input/output terminals and control switches.
2. Safety Information
Please read this section carefully before installation and use. Failure to follow these instructions may result in electric shock, fire, or other hazards.
- Installation should only be performed by a qualified electrician.
- Ensure the power supply is disconnected before any installation or maintenance work.
- Do not expose the device to moisture or extreme temperatures.
- Verify that the input voltage and load current are within the specified limits.
- This device is designed for indoor use only.
- Do not attempt to repair or modify the device yourself. Contact qualified personnel for service.
3. Product Overview
3.1 Key Features
- Compact 1-Channel Dimmer: Specifically designed for single-color light sources, allowing precise brightness control.
- 2.4GHz Wireless Frequency: Ensures stable and secure communication with compatible devices.
- Push-DIM Function: Enables easy on/off switching and brightness adjustment with a simple button press.
- Triac Dimmable: Utilizes Triac dimming technology for smooth, flicker-free dimming without unwanted effects.
- High Compatibility: Compatible with all meanLED R-series remote controls for seamless integration into existing lighting systems.
3.2 Components
The YULED S1-B dimmer features input and output terminals, a match button, and a minimum dimming level adjustment switch.

Image 3.1: Top view of the YULED S1-B Dimmer, highlighting the input (L, N) and output (L, N) terminals, Match button, and Min Set switch.

Image 3.2: Side view of the YULED S1-B Dimmer, illustrating the wiring connections for input and output.
4. Specifications
| Feature | Specification |
|---|---|
| Brand | YULED |
| Model Number | S1-B (60450) |
| Input Voltage | 100-240V AC |
| Output Voltage | 100-240V AC |
| Output Current | Max 1A |
| Output Power | Max 240W |
| Dimming Type | Triac (Phase-cut) |
| Wireless Frequency | 2.4GHz |
| Control Method | RF Wireless, Push-DIM |
| Operating Temperature | -30°C to +55°C |
| Dimensions (L x W x H) | 5.2 x 5.2 x 2.6 cm |
| Weight | 90 g |
| Mounting Type | Wall Mount |
5. Installation (Setup)
Important: Ensure the main power supply is switched off before commencing any wiring. Incorrect wiring can cause damage to the device or connected lighting.
5.1 Wiring Diagram
The S1-B dimmer can be wired in two primary configurations: directly to a dimmable LED light or to a dimmable LED power supply (driver) which then connects to the LED light.

Image 5.1: Wiring diagrams for the S1-B dimmer. The left diagram shows direct connection to a dimmable LED light. The right diagram shows connection to a dimmable LED power supply (driver) which then connects to the LED light. Both diagrams illustrate input (L, N) and output (L, N) connections, as well as connections for external push switches (A1, A2).
5.2 Connection Steps
- Disconnect Power: Turn off the main power supply at the circuit breaker before starting.
- Input Wiring: Connect the AC power input (Live 'L' and Neutral 'N') to the "INPUT" terminals of the S1-B dimmer.
- Output Wiring: Connect the dimmable LED light or dimmable LED power supply to the "OUTPUT" terminals (Live 'L' and Neutral 'N') of the S1-B dimmer.
- Push Switch (Optional): If using an external push switch for Push-DIM functionality, connect it to the A1 and A2 terminals.
- Secure Connections: Ensure all wire connections are secure and properly insulated.
- Restore Power: Once all connections are verified, restore power to the circuit.
6. Operation
6.1 Push-DIM Function
The Push-DIM function allows for basic control using a standard momentary push switch connected to the A1 and A2 terminals.
- Short Press: A quick press and release of the push switch will turn the light ON or OFF.
- Long Press: Press and hold the push switch to gradually increase or decrease the brightness. Release the switch to set the desired brightness level.
6.2 Wireless Control (2.4GHz RF)
The S1-B dimmer can be paired with compatible meanLED R-series 2.4GHz RF remote controls for wireless dimming.
6.2.1 Pairing with a Remote Control
- Power Cycle: Turn off the power to the S1-B dimmer.
- Restore Power: Turn the power back on.
- Initiate Pairing: Within 5 seconds of restoring power, quickly press the "Match" button on the S1-B dimmer (or the corresponding ON/OFF button on your meanLED R-series remote control) 3 times.
- Confirmation: The connected light will flash 3 times to indicate successful pairing.
6.2.2 Unpairing from a Remote Control
- Power Cycle: Turn off the power to the S1-B dimmer.
- Restore Power: Turn the power back on.
- Initiate Unpairing: Within 5 seconds of restoring power, quickly press the "Match" button on the S1-B dimmer (or the corresponding ON/OFF button on your meanLED R-series remote control) 5 times.
- Confirmation: The connected light will flash 5 times to indicate successful unpairing.
6.3 Minimum Dimming Level Adjustment
The S1-B dimmer includes a "Min Set" switch (often a small potentiometer or switch) to adjust the minimum dimming level. This can help prevent flickering or instability at very low brightness settings, especially with certain types of LED lights.
- Adjusting: Use a small screwdriver to carefully turn the "Min Set" adjustment. Test the dimming range after each adjustment until the desired stable minimum brightness is achieved.
7. Maintenance
The YULED S1-B dimmer requires minimal maintenance.
- Cleaning: Ensure power is off before cleaning. Wipe the device with a soft, dry cloth. Do not use liquid cleaners or abrasive materials.
- Inspection: Periodically check wiring connections for tightness and signs of wear or damage.
- Environment: Keep the device in a dry environment, away from direct sunlight and heat sources.
8. Troubleshooting
| Problem | Possible Cause | Solution |
|---|---|---|
| Light does not turn on. | No power supply, incorrect wiring, faulty light source, dimmer not paired. | Check power connections. Verify wiring according to diagram. Test light source. Attempt to re-pair the dimmer with the remote. |
| Light flickers or dims unevenly. | Incompatible light source, minimum dimming level too low, loose connection. | Ensure light source is Triac dimmable. Adjust the "Min Set" switch. Check all wiring connections. |
| Remote control does not work. | Remote not paired, remote battery low, remote out of range. | Re-pair the remote control. Replace remote battery. Ensure remote is within 30m range of the dimmer. |
| Push-DIM function not working. | Incorrect push switch wiring, faulty push switch. | Verify push switch wiring to A1/A2 terminals. Test the push switch for functionality. |
9. Recycling and Disposal Information
This product contains electronic components and should not be disposed of with general household waste. Please follow local regulations for the recycling of electronic waste. Proper disposal helps prevent potential negative consequences for the environment and human health.
For information on recycling lamps and disposal of broken or damaged lamps, please refer to local guidelines or contact your municipal waste management authority.
10. Warranty and Support
For warranty information or technical support, please contact your retailer or the manufacturer directly. Keep your purchase receipt as proof of purchase.
Manufacturer: YULED