1. Introduction
This manual provides essential information for the safe and efficient operation of your CREWORKS 1100W 220 x 750 MM Mini Metal Lathe, Model MLM-0930. This mini metal lathe is designed for precision metalworking tasks, including turning, drilling, threading, and cutting, suitable for both woodworking and metalworking projects.
Please read this manual thoroughly before initial use and retain it for future reference. Proper understanding of the machine's functions and safety procedures is crucial for optimal performance and user safety.

Figure 1: Overview of the CREWORKS 1100W 220 x 750 MM Mini Metal Lathe.
2. Safety Instructions
Always prioritize safety when operating machinery. Failure to follow these instructions may result in serious injury or damage to the equipment.
- Read the Manual: Thoroughly read and understand all instructions and warnings in this manual before operating the lathe.
- Personal Protective Equipment (PPE): Always wear safety glasses or a face shield, hearing protection, and appropriate work clothing. Avoid loose clothing, jewelry, and long hair that could get caught in moving parts.
- Work Area: Ensure your work area is clean, well-lit, and free from clutter. Keep children and bystanders at a safe distance.
- Machine Stability: Securely mount the lathe to a sturdy workbench to prevent movement during operation.
- Emergency Stop: Familiarize yourself with the location and operation of the emergency stop button.
- Chuck Guard: Always ensure the transparent chuck guard is in place during operation to protect against flying debris.
- Workpiece Security: Ensure the workpiece is securely clamped in the chuck or between centers before starting the lathe.
- Tooling: Use only sharp, correctly ground cutting tools. Ensure tools are properly secured in the tool post.
- Speed Control: Adjust the spindle speed according to the material and operation being performed. Start at lower speeds and gradually increase as needed.
- Maintenance: Disconnect power before performing any maintenance, adjustments, or cleaning.

Figure 2: Emergency stop button for immediate machine shutdown.
3. Setup
Proper setup is crucial for the accuracy and safety of your lathe operations. Follow these steps for initial assembly and preparation.
3.1 Unboxing and Placement
- Carefully remove the lathe and all accessories from its packaging. Inspect for any shipping damage.
- Place the lathe on a stable, level workbench capable of supporting its weight (approximately 75 kg). Secure it using appropriate fasteners.
Video 1: General setup and installation guide for a CREWORKS mini metal lathe, including unboxing, chuck, tool post, and gear installation.
3.2 Chuck Installation
- Ensure the chuck is clean and free of debris.
- Align the chuck with the spindle and carefully thread it on. Use the chuck key to tighten it securely.
- Install the chuck jaws as required for your workpiece. The lathe includes a 3-jaw chuck suitable for both square and round workpieces.

Figure 3: Installing the 3-jaw chuck onto the spindle.

Figure 4: Adjusting the tailstock for workpiece support.
3.3 Tool Post Setup
- Mount the tool post onto the compound slide.
- Insert the desired cutting tool into the tool holder and secure it firmly. Ensure the tool tip is aligned with the center height of the workpiece.

Figure 5: Setting up the 4-way tool post.
3.4 Gear Installation (for Threading)
- Refer to the threading chart on the machine for the correct gear combination for your desired thread pitch.
- Install the appropriate gears onto the lead screw and spindle, ensuring they mesh correctly.
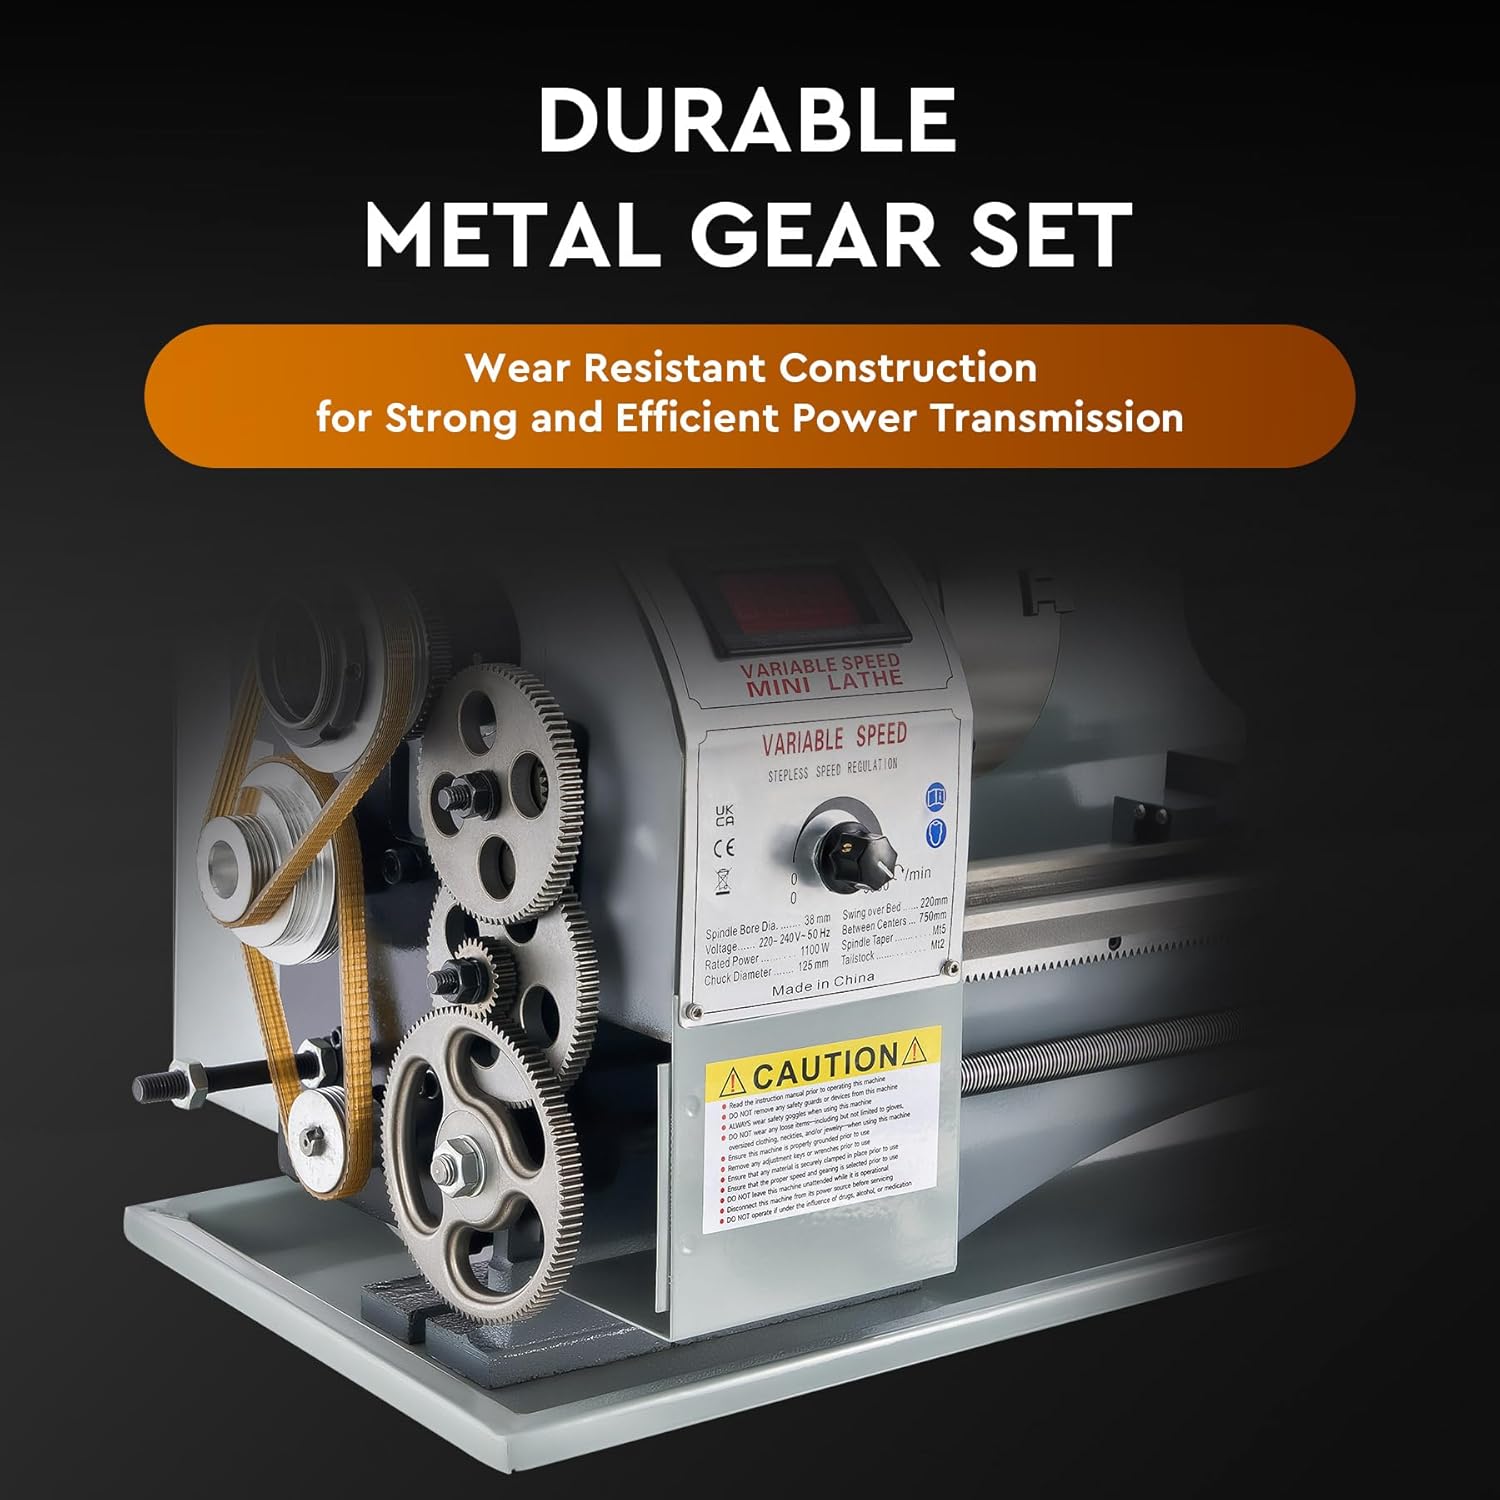
Figure 6: Durable metal gear set for precise power transmission, used for threading operations.
4. Operating Instructions
This section details the general procedures for operating your mini metal lathe.
4.1 Power On and Speed Adjustment
- Connect the lathe to a suitable power supply.
- Turn on the main power switch.
- Use the speed control knob to adjust the spindle RPM. The digital display will show the current speed. The lathe offers a speed range of 50 to 2250 RPM.
- Select the appropriate direction (forward/reverse) using the direction switch.
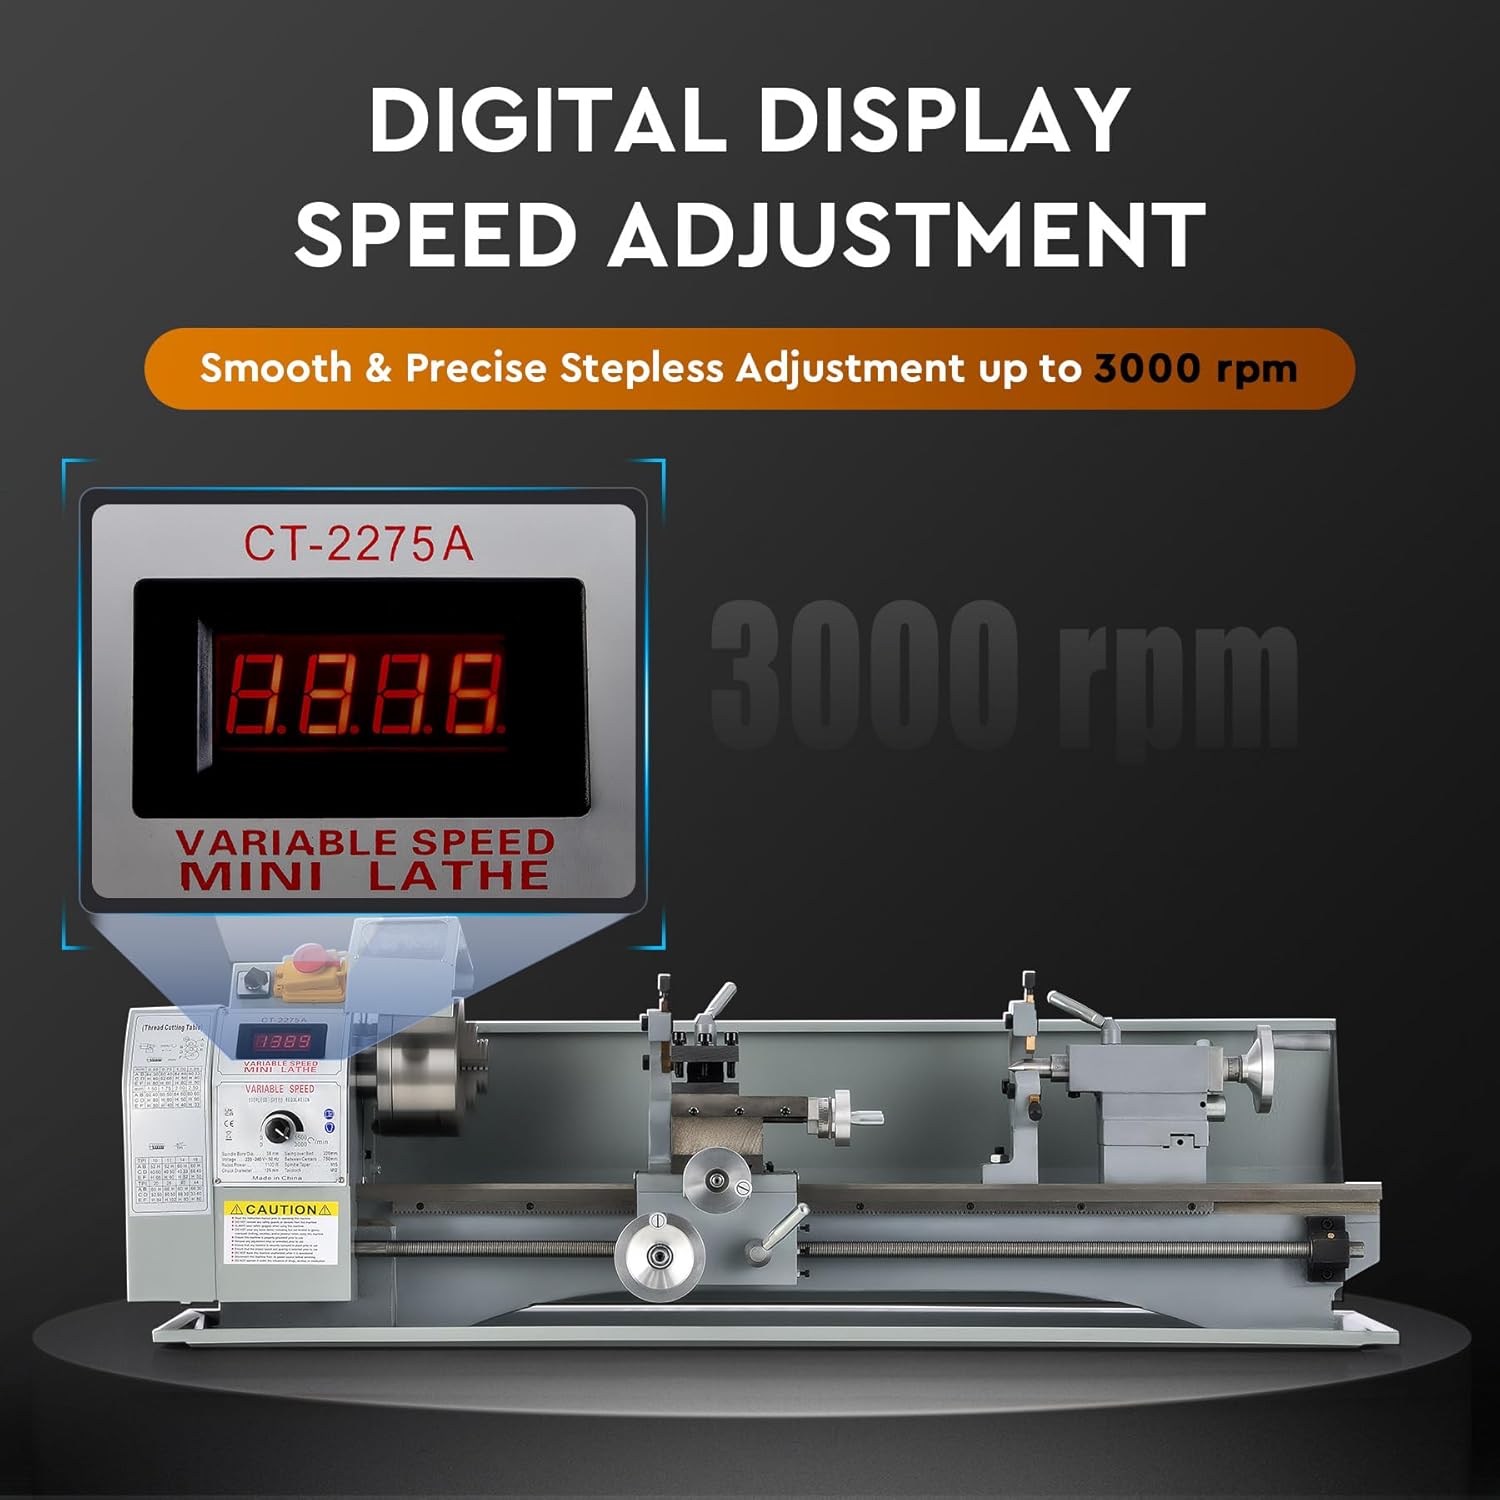
Figure 7: Digital display for monitoring spindle speed and continuous control knob.
4.2 Workpiece Mounting
- Securely mount your workpiece in the 3-jaw chuck. Ensure it is centered and clamped tightly to prevent slippage during operation.
- For longer workpieces, use the tailstock for additional support.
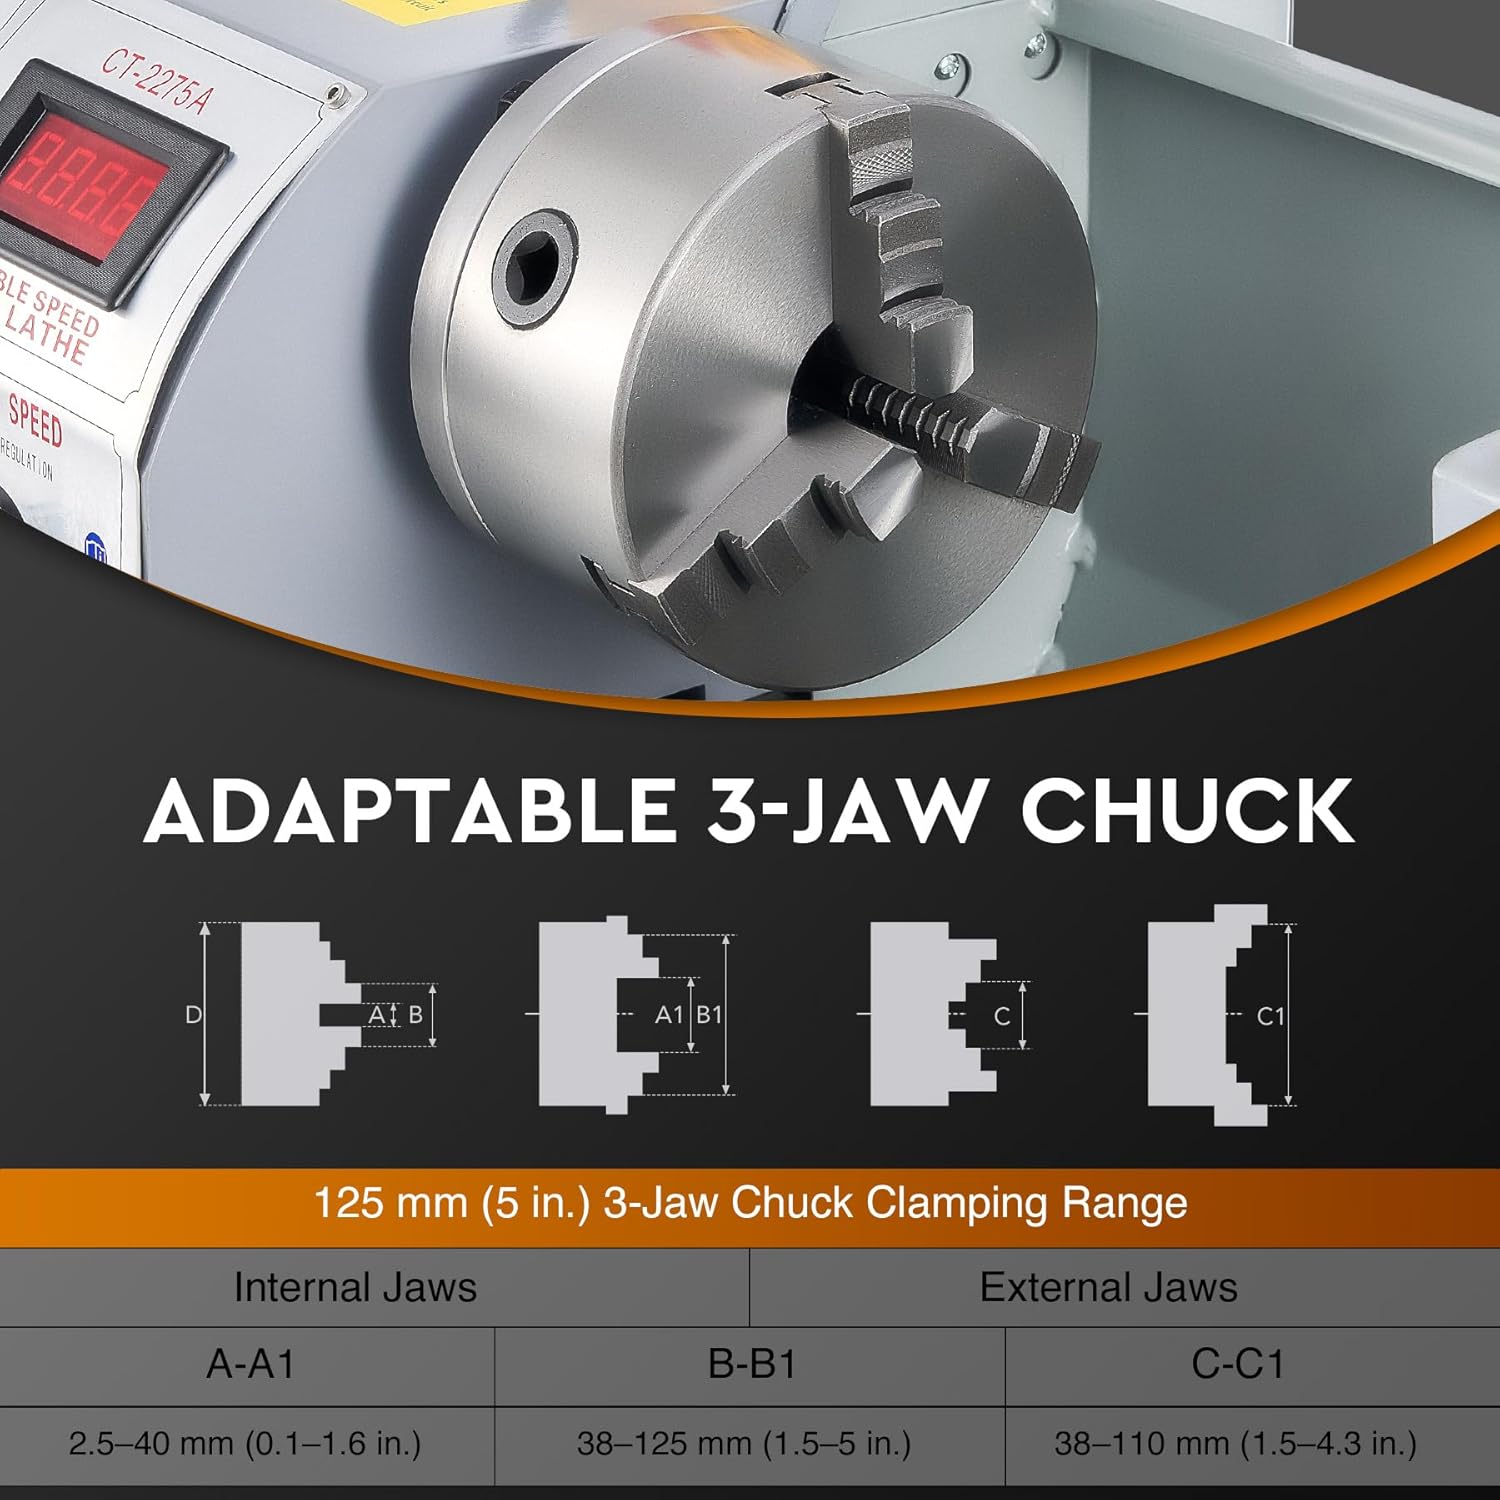
Figure 8: The adaptable 3-jaw chuck securely holds various workpiece shapes.
4.3 Cutting Operations
- Position the cutting tool close to the workpiece.
- Engage the automatic feed or use the handwheels for manual control of the carriage and cross slide.
- Gradually advance the tool into the workpiece, taking light cuts to avoid overloading the machine or damaging the tool.
- Monitor the cutting process and adjust speed or feed rate as necessary.

Figure 9: Detailed view of the precision handwheels for carriage, cross slide, and compound control.

Figure 10: Dual V-shaped guide rails ensure smooth and precise movement of the carriage.
5. Maintenance
Regular maintenance ensures the longevity and optimal performance of your lathe.
- Cleaning: After each use, clean the lathe thoroughly, removing all chips and debris. Use a brush or vacuum; never use compressed air directly on moving parts as it can force debris into bearings.
- Lubrication: Regularly lubricate all moving parts, including the lead screw, cross slide, compound slide, and tailstock quill, with appropriate machine oil. Refer to the lubrication points indicated in the machine diagram.
- Inspection: Periodically inspect all belts, gears, and electrical connections for wear or damage. Replace worn components immediately.
- Chuck Maintenance: Keep the chuck jaws and scroll plate clean and lightly oiled to ensure smooth operation and accurate gripping.
- Storage: When not in use, cover the lathe to protect it from dust and moisture.
6. Troubleshooting
This section addresses common issues you might encounter and their potential solutions.
| Problem | Possible Cause | Solution |
|---|---|---|
| Lathe does not power on. | No power supply, emergency stop engaged, tripped circuit breaker. | Check power connection, release emergency stop, reset circuit breaker. |
| Spindle not rotating. | Motor issue, belt slippage, chuck guard not closed. | Inspect motor, check belt tension, ensure chuck guard is securely closed. |
| Excessive vibration or noise. | Unbalanced workpiece, loose mounting, worn bearings, dull cutting tool. | Balance workpiece, tighten mounting bolts, inspect bearings, sharpen or replace tool. |
| Inaccurate cuts. | Loose tool post, worn slides, improper tool height, dull tool. | Tighten tool post, adjust gibs on slides, set correct tool height, sharpen tool. |
7. Specifications
Key technical specifications for the CREWORKS 1100W 220 x 750 MM Mini Metal Lathe (Model MLM-0930):
- Model Number: MLM-0930
- Material: Steel
- Rated Power: 1.5 HP (1100W)
- Swing Over Bed: 220 mm (8.7 in.)
- Distance Between Centers: 750 mm (29.5 in.)
- Spindle Bore: 38 mm (1.5 in.)
- Spindle Taper: MT#5
- Tailstock Taper: MT#2
- Chuck Diameter: 125 mm (5 in.)
- Metric Thread Range: 0.5–3 mm
- Inch Thread Range: 8–44 tpi
- Max. Spindle Speed: 3000 rpm (Adjustable range: 50-2250 RPM)
- Net Weight: 75 kg (165.3 lb.)
- Dimensions: 220 x 750 mm

Figure 11: Diagram illustrating key dimensions and specifications of the lathe.
8. Warranty and Support
For warranty information, technical support, or service inquiries, please refer to the documentation included with your product or contact CREWORKS customer service directly. Keep your purchase receipt as proof of purchase for any warranty claims.


