1. Introduction
The Sonic Blast Digital Alarm Clock with Projection is designed to provide a reliable and effective wake-up experience, especially for heavy sleepers. It combines an extra-loud alarm with a bright strobe light, time projection, Bluetooth audio, and a USB charging port. This manual will guide you through the setup, operation, and maintenance of your device.

Image 1.1: The Sonic Blast Digital Alarm Clock with Projection, showing its display, time projection, and USB charging capability.
2. Safety Information
- Read all instructions before operating the device.
- Keep the device away from water or excessive moisture.
- Do not expose the device to extreme temperatures or direct sunlight.
- Use only the provided power adapter.
- Do not attempt to disassemble or repair the device yourself. Refer all servicing to qualified personnel.
- Ensure proper ventilation around the device.
3. Package Contents
- Sonic Blast Digital Alarm Clock with Projection (Model SB775B)
- Power Adapter
- User Manual
4. Product Overview: Controls and Indicators
Familiarize yourself with the various buttons, ports, and indicators on your Sonic Blast alarm clock.

Image 4.1: Front view of the Sonic Blast alarm clock highlighting display and feature icons.
Front Panel
- LED Display: Shows current time, alarm status (AL1, AL2), PM indicator, and Bluetooth (BT) status.
- Strobe Light: Flashes during alarm.
Top Panel

Image 4.2: Top panel controls, including the SNOOZE/DIMMER button.
- POWER Button: Turns the unit on/off.
- VOL- / VOL+ Buttons: Adjust volume.
- AL.SET Button: Used to set alarms.
- DIMMER Button: Adjusts display brightness (5 levels).
- HOUR / MIN Buttons: Adjust time and alarm settings.
- SNOOZE Button: Activates snooze function.
- BUZZER/TONE Switch: Selects alarm sound type.
- ALM1 / ALM2 / VIB Switch: Selects alarm mode (Alarm 1, Alarm 2, or Vibration).
- PROJECTION IMAGE ON/OFF / ROTATE Button: Controls the projection feature.
- FOCUSING Wheel: Adjusts the clarity of the projected time.
Rear Panel

Image 4.3: Rear view of the Sonic Blast alarm clock, showing USB and AUX ports.
- DC IN Jack: For connecting the power adapter.
- USB Charging Port: For charging external devices.
- AUX IN Jack: For connecting external audio sources.
- VIBRATOR Jack: For connecting an optional bed shaker (sold separately).
5. Setup
5.1 Power Connection
- Plug the power adapter into the DC IN jack on the rear of the alarm clock.
- Plug the other end of the adapter into a standard wall outlet.
- The clock display will illuminate.
5.2 Battery Backup Installation
A CR2032 lithium battery (not included) can be installed to maintain time and alarm settings during a power outage.

Image 5.1: Illustration of the CR2032 battery for backup power.
- Locate the battery compartment on the bottom of the unit.
- Open the battery compartment cover.
- Insert one CR2032 lithium battery, ensuring the correct polarity (+/-).
- Close the battery compartment cover securely.
5.3 Setting the Time
- Press and hold the TIME button until the display flashes.
- Use the HOUR and MIN buttons to set the current hour and minute.
- Press the TIME button again to confirm the setting.
6. Operating Instructions
6.1 Setting Alarms (Alarm 1 and Alarm 2)
The clock supports two independent alarms.

Image 6.1: The Sonic Blast alarm clock supporting dual alarms.
- Press and hold the AL.SET button. AL1 will flash on the display.
- Use the HOUR and MIN buttons to set the desired alarm time for Alarm 1.
- Press AL.SET again to set Alarm 2, repeating the process.
- After setting both alarms, press AL.SET one more time to exit alarm setting mode.
- To activate an alarm, slide the ALM1 / ALM2 / VIB switch to the desired alarm (AL1 or AL2). The corresponding indicator will light up.
- To select the alarm sound, slide the BUZZER/TONE switch to BUZZER or TONE.
6.2 Snooze Function
When the alarm sounds, press the SNOOZE button to temporarily silence the alarm for a preset duration.

Image 6.2: Adjustable snooze feature for customized wake-up delays.
- The snooze duration is adjustable. Refer to the full manual for specific steps to adjust snooze time.
6.3 Adjusting Volume and Tone
Customize your alarm sound to your preference.

Image 6.3: Graphic illustrating the adjustable volume feature.
- Use the VOL- and VOL+ buttons to adjust the alarm volume.
- Slide the BUZZER/TONE switch to select between a standard buzzer or an adjustable tone.

Image 6.4: Close-up of the tone adjustment controls.
6.4 Projection Feature
Project the time onto your ceiling or wall for easy viewing.
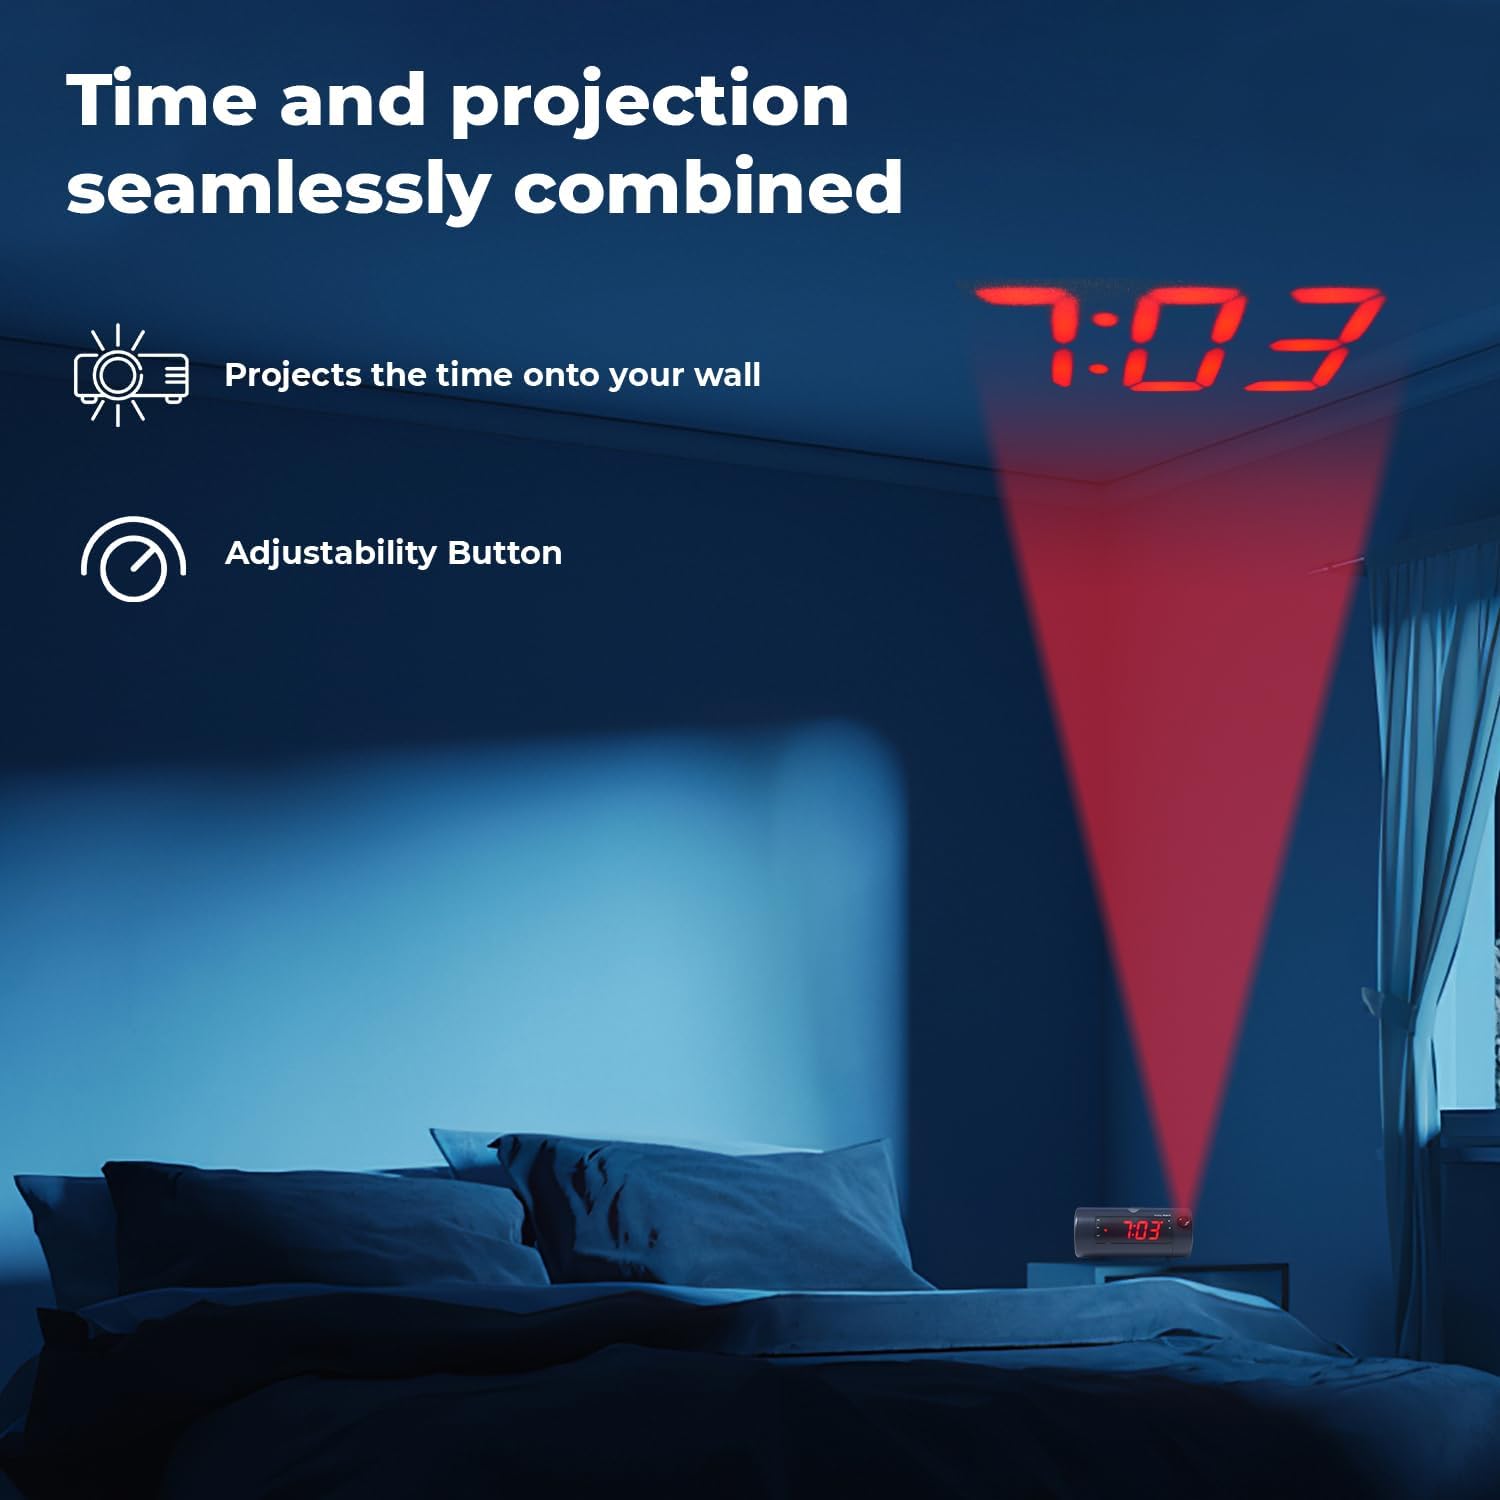
Image 6.5: Time projected onto a bedroom wall.
- Press the PROJECTION IMAGE ON/OFF button to turn the projection on or off.
- Use the FOCUSING wheel to adjust the clarity of the projected image.
- Press and hold the PROJECTION IMAGE ROTATE button to rotate the projected time to the desired orientation.

Image 6.6: Close-up of the projection focus, on/off, and rotation controls.
6.5 Bluetooth Speaker Pairing
Connect your smartphone or tablet to play audio through the alarm clock's speaker.
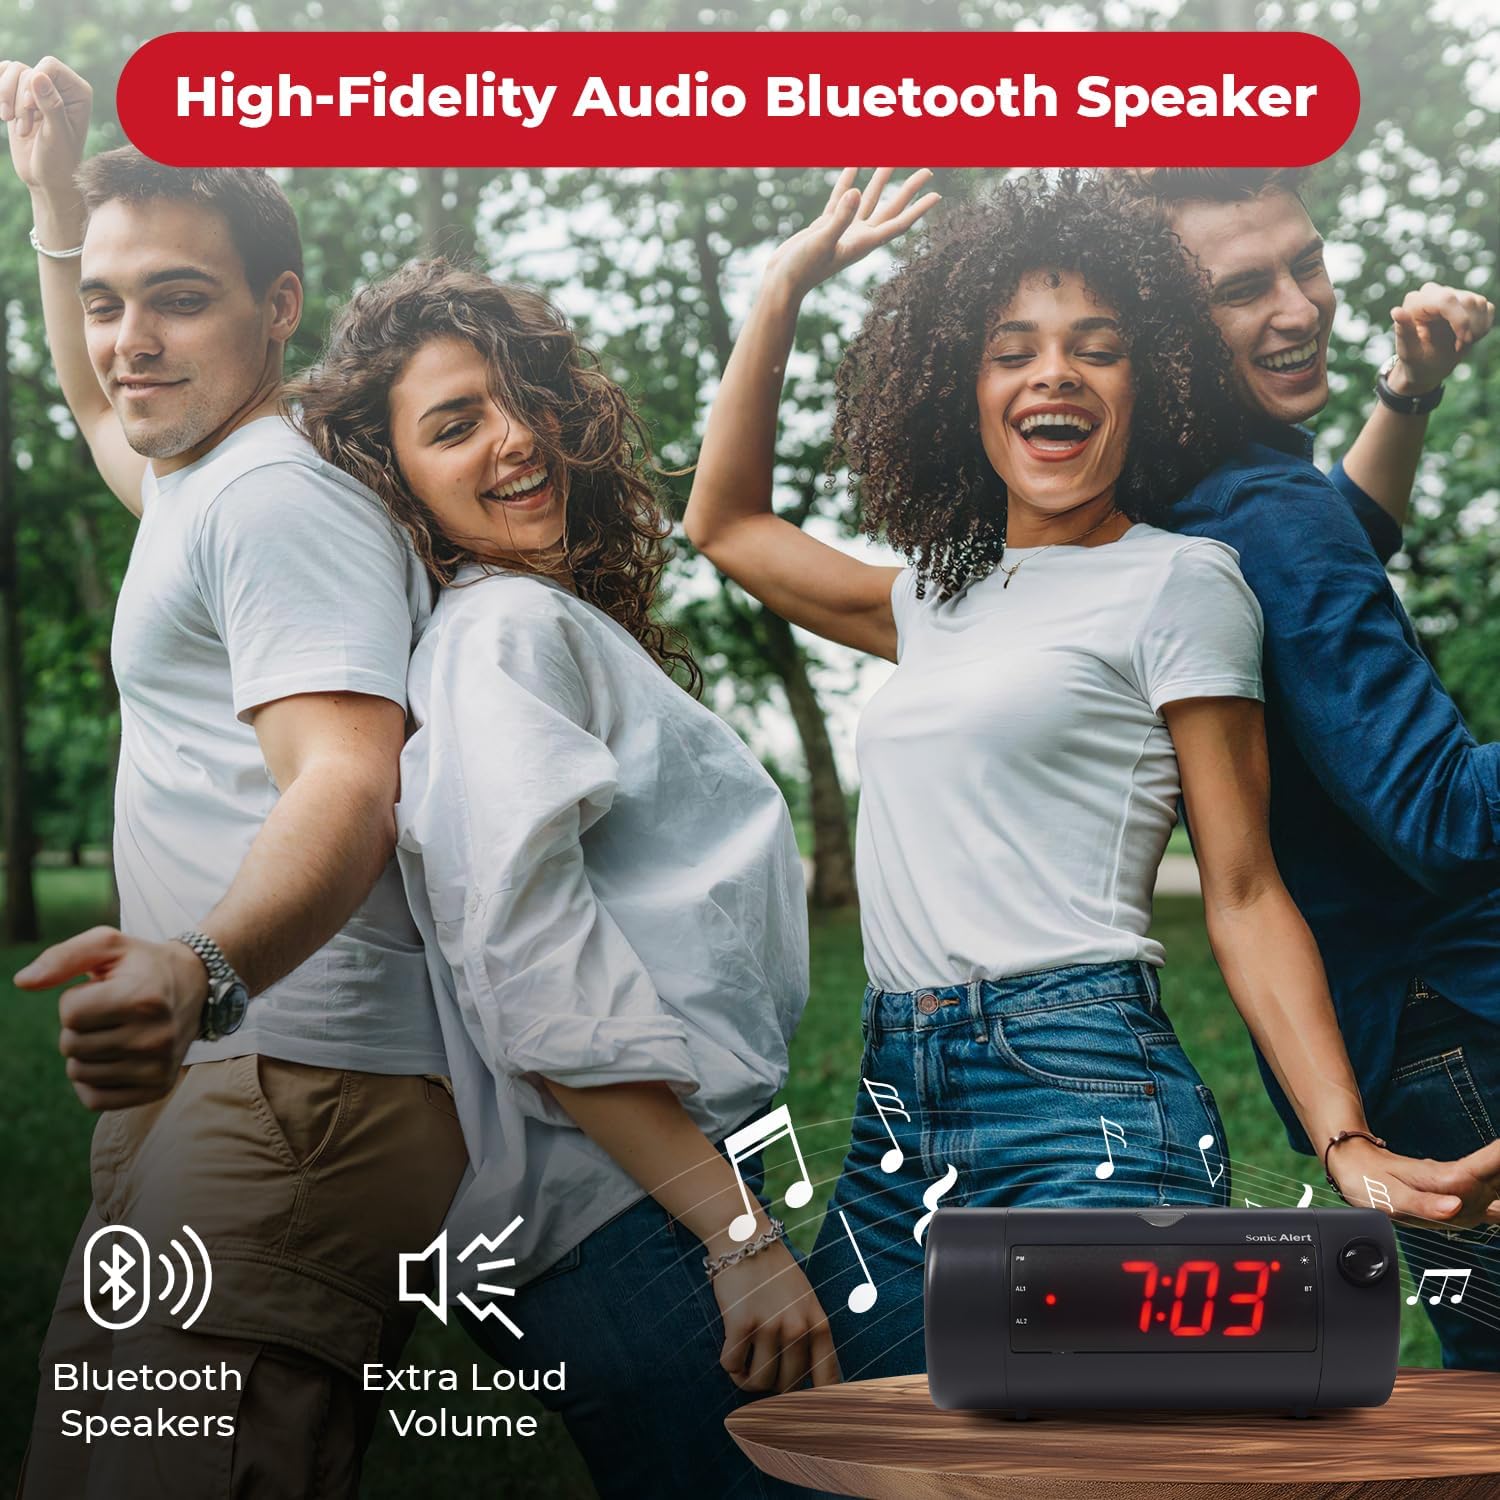
Image 6.7: The Sonic Blast alarm clock functioning as a Bluetooth speaker.
- Ensure the alarm clock is powered on.
- Activate Bluetooth on your mobile device.
- Search for "Sonic Blast" in your device's Bluetooth settings and select it to pair.
- The "BT" indicator on the clock display will illuminate when successfully paired.
6.6 USB Charging Port Usage
Use the built-in USB port to charge your compatible devices.

Image 6.8: Smartphone charging via the alarm clock's USB port.
- Connect your device's USB charging cable to the USB port on the rear of the alarm clock.
- The alarm clock must be connected to power for the USB charging port to function.
6.7 Recordable Alarm
The Sonic Blast allows you to record a custom alarm message.

Image 6.9: The recordable alarm feature in use.
- Refer to the detailed instructions in the full manual for recording and setting your custom alarm message.
6.8 12/24 Hour Display
- To switch between 12-hour and 24-hour time format, press the TIME button briefly while the time is displayed.
7. Maintenance
- Clean the device with a soft, dry cloth. Do not use liquid cleaners or abrasive materials.
- Keep the device free from dust and debris.
- If the battery backup is used, replace the CR2032 battery annually or when the low battery indicator appears.
8. Troubleshooting
| Problem | Solution |
|---|---|
| Clock display is off. | Ensure the power adapter is securely connected. Check the wall outlet. Press the POWER button to turn the unit on. |
| Alarm does not sound. | Verify that the alarm is activated (AL1 or AL2 indicator is on). Check alarm volume. Ensure the correct alarm mode (BUZZER/TONE) is selected. |
| Projection is blurry or not visible. | Adjust the FOCUSING wheel. Ensure the projection is turned on. Check the distance to the projection surface. |
| Bluetooth device cannot pair. | Ensure Bluetooth is enabled on your device and the alarm clock. Move devices closer. Try restarting both devices. |
| USB charging is not working. | Ensure the alarm clock is connected to a power source. Check the USB cable and the device being charged. |
9. Specifications
| Feature | Detail |
|---|---|
| Model Number | SB775B |
| Brand | Sonic Alert |
| Alarm Volume | Up to 113 dB |
| Display Type | Digital LED with 5-level dimmer |
| Special Features | Adjustable Projection Clock, Bluetooth Wireless Audio, USB Charging Port, Dual Alarm, Bright Flashing Light, Adjustable Volume & Tone, Adjustable Snooze, Recordable Alarm, Vibrating Bed Shaker Port (for optional SS5V shaker) |
| Power Source | Corded Electric |
| Battery Backup | 1 x CR2032 Lithium Cell (not included) |
| Product Dimensions | Approximately 1"W x 1"H (Note: This dimension seems incorrect based on typical alarm clock sizes and product images. Please refer to product packaging for accurate dimensions.) |
| Item Weight | 1.39 pounds (0.63 Kilograms) |
10. Warranty and Support
For warranty information and customer support, please refer to the official Sonic Alert website or contact their customer service department. Keep your purchase receipt for warranty claims.
Contact Information: Please visit the Sonic Alert website for the most up-to-date contact details.


