
ASUS ROG MAXIMUS Z790 HERO
Contents
ASUS ROG Maximus Z790 Hero WiFi6E Motherboard Instruction Manual
This manual provides detailed instructions for the setup, operation, and maintenance of the ASUS ROG Maximus Z790 Hero WiFi6E LGA 1700 ATX gaming motherboard, designed for Intel 12th, 13th, and 14th Gen processors.
1. Introduction
The ASUS ROG Maximus Z790 Hero (WiFi 6E) is engineered for gaming enthusiasts and extreme overclockers, built to unleash the maximum performance of 12th, 13th, and 14th generation Intel Core processors. This motherboard continues to build on the legacy of its predecessors by packing upgraded power and high-speed connectivity under an all-new ROG ID design exterior, ready to take the helm of your high-end gaming build.

Figure 1.1: The ASUS ROG Maximus Z790 Hero WiFi6E motherboard and its packaging.
Video 1.1.1: An overview of the ASUS Z790 motherboard series, highlighting key design elements and features.
2. Key Features
- Intel LGA 1700 socket: Ready for 13th and 12th Gen Intel Core processors and Windows 11, supporting PCIe 5.0 and DDR5.
- Intelligent Control: ASUS-exclusive tools including AI Overclocking, AI Cooling II, AI Networking (GameFirst VI), and Two-Way AI Noise-Cancelation for easy configuration.
- Robust Power Solution: 20+1 teamed power stages rated for 90 A, ProCool II power connectors, MicroFine alloy chokes, and premium metallic capacitors.
- Optimized Thermal Design: VRM heatsinks plus integrated aluminum I/O cover, high-conductivity thermal pad, triple M.2 heatsinks and dual with embedded backplates, and ROG Water-Cooling Zone.
- High-performance Networking: Onboard WiFi 6E, Bluetooth V5.2, Intel 2.5Gb Ethernet, and ASUS LANGuard.
3. What's in the Box
The retail package for the ASUS ROG Maximus Z790 Hero WiFi6E motherboard typically includes the following components:

Figure 3.1: Contents of the ASUS ROG Maximus Z790 Hero WiFi6E retail box. This includes the motherboard, user manual, ROG USB drive, ROG stickers, ROG key chain, ROG Hyper M.2 card with heatsink, SATA cables, and a WiFi 6E antenna.
- ASUS ROG Maximus Z790 Hero WiFi6E Motherboard
- User Manual
- ROG USB Drive
- ROG Stickers
- ROG Key Chain
- ROG Hyper M.2 Card with Heatsink
- SATA Cables
- WiFi 6E Antenna
4. Setup
4.1. CPU Installation
The motherboard features an LGA 1700 socket, compatible with 12th, 13th, and 14th Generation Intel Core processors. Ensure proper alignment of the CPU with the socket's triangular marker before lowering the retention arm. Handle the CPU by its edges to avoid touching the contacts.
4.2. RAM Installation
This motherboard supports DDR5 RAM. Locate the four DIMM slots. Open the clips on both ends of the slot, align the RAM module's notch with the slot's key, and press down firmly until the clips snap into place. For dual-channel performance, install RAM modules into the recommended slots as indicated in the motherboard manual.

Figure 4.2.1: Close-up view of the DDR5 RAM slots on the motherboard, highlighting their design and placement.
4.3. Storage Installation
The motherboard provides multiple M.2 slots for NVMe SSDs and SATA 6Gb/s ports for traditional hard drives or SSDs. The M.2 slots feature heatsinks for optimal performance. To install an M.2 SSD, remove the heatsink, insert the SSD into the slot, and secure it with the provided latch or screw, then reattach the heatsink.

Figure 4.3.1: The motherboard features triple M.2 heatsinks and backplates for efficient cooling of NVMe SSDs.
4.4. Graphics Card Installation
Insert your PCIe 5.0 graphics card into the reinforced PCIe 5.0 x16 slot. Ensure it is seated correctly and secured with the retention clip. Connect any necessary PCIe power cables from your power supply to the graphics card.
4.5. Power Connections
Connect the 24-pin ATX power connector and the 8-pin CPU power connectors (ProCool II) from your power supply to the motherboard. The motherboard features 20+1 teamed power stages for stable power delivery to the CPU.
4.6. Cooling System Setup
Utilize the VRM heatsinks, integrated aluminum I/O cover, and M.2 heatsinks for passive cooling. For advanced cooling, connect your liquid cooling solution to the ROG Water-Cooling Zone headers. Ensure all fan headers are connected to appropriate fans for optimal airflow.

Figure 4.6.1: Visual representation of the motherboard's cooling architecture, including heatsinks and water-cooling headers.
5. Operating Instructions
5.1. BIOS/UEFI Utility
Access the UEFI BIOS Utility by pressing the DEL or F2 key during system startup. The BIOS provides extensive options for system configuration, including AI Overclocking, AI Cooling II, and AI Networking (GameFirst VI). These tools help optimize system performance and cooling efficiency automatically.

Figure 5.1.1: The UEFI BIOS Utility's Advanced Mode, specifically the Extreme Tweaker section, for fine-tuning system performance.
5.2. Connectivity
The motherboard offers a wide range of connectivity options:
- Wireless: Onboard WiFi 6E and Bluetooth V5.2 for high-speed wireless connections.
- Wired Network: Intel 2.5Gb Ethernet with ASUS LANGuard for stable and fast wired networking.
- USB Ports: Multiple USB ports, including Thunderbolt 4 ports (USB Type-C), USB 3.2 Gen 2x2, and other USB 3.2 Gen 1 ports.
- Display Output: HDMI port for integrated graphics output.
- Audio: SupremeFX audio codec with ESS ES9218 Quad DAC, 120 dB SNR stereo playback output, 113 dB SNR recording input, and gold-plated audio jacks.
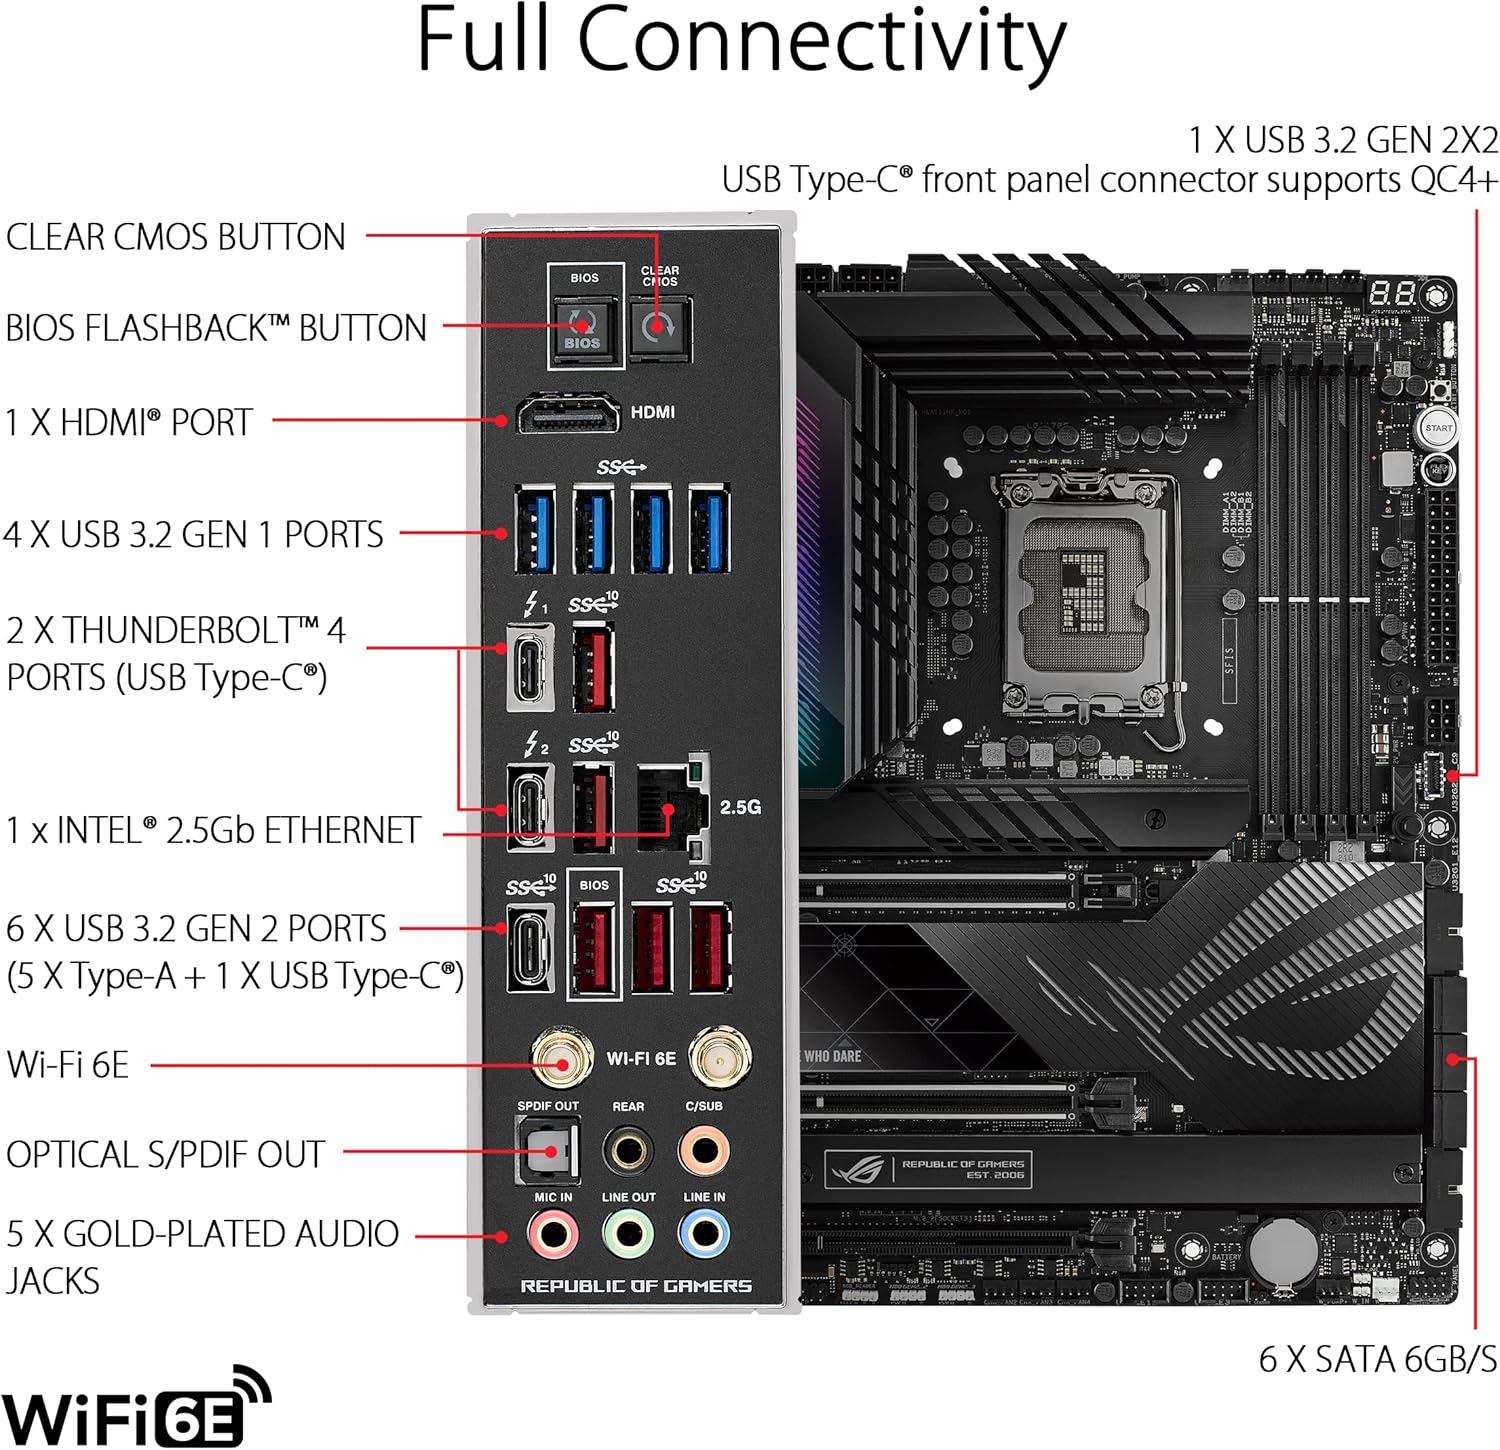
Figure 5.2.1: The rear I/O panel of the motherboard, illustrating the extensive connectivity options available.
6. Maintenance
- BIOS Updates: Regularly check the ASUS support website for the latest BIOS updates to ensure optimal performance, stability, and compatibility with new hardware. Use the BIOS Flashback button for convenient updates without a CPU or RAM.
- Driver Updates: Keep all system drivers (chipset, audio, LAN, WiFi, etc.) updated to their latest versions. These can typically be found on the ASUS support website.
- Cleaning: Periodically clean dust from the motherboard and cooling components using compressed air. Ensure the system is powered off and unplugged before cleaning.
- Thermal Paste: If replacing the CPU cooler, ensure to clean off old thermal paste and apply new thermal paste for efficient heat transfer.
7. Troubleshooting
- System Not Booting: Check all power connections, ensure RAM modules are properly seated, and verify CPU installation. Use the Q-LED indicators on the motherboard to diagnose boot issues.
- Clear CMOS: If experiencing instability or boot issues after changing BIOS settings, use the Clear CMOS button on the rear I/O panel to reset BIOS settings to default.
- BIOS Flashback: If a BIOS update fails or the system becomes unbootable due to BIOS corruption, use the BIOS Flashback feature with a USB drive to restore the BIOS.
- Network Issues: Ensure LAN cables are securely connected and WiFi antennas are attached. Check driver installations and network settings in the operating system.
8. Specifications
| Feature | Specification |
|---|---|
| Brand | ASUS |
| Series | ROG MAXIMUS Z790 HERO |
| Item Model Number | ROG MAXIMUS Z790 HERO |
| CPU Socket | LGA 1700 |
| Compatible Processors | 12th, 13th & 14th Gen Intel Core |
| Chipset Type | Intel Z790 |
| RAM Memory Technology | DDR5 |
| Memory Speed | 7000 MHz |
| Memory Storage Capacity | 128 GB |
| Wireless Type | 802.11a/b/g/n/ac, 802.11ax (WiFi 6E) |
| Operating System | Windows 11, Windows 10 64-bit |
| Product Dimensions | 12.2 x 4.5 x 14.6 inches |
| Item Weight | 9.3 pounds |
9. Warranty and Support
For detailed warranty information, please refer to the official ASUS website or the warranty card included with your product. ASUS provides technical support and resources for troubleshooting and assistance.
You can visit the official ASUS support page for drivers, manuals, and FAQs: https://www.asus.com/support/
Ask a question about this manual
Ask about setup, troubleshooting, compatibility, parts, safety, or missing instructions. Manuals+ will review the question and use this page’s manual context to help answer it.