1. Introduction
Thank you for purchasing the OLIGHT Array 2 Pro Headlamp. This manual provides detailed instructions for the safe and effective use of your new headlamp. Please read this manual thoroughly before operation and retain it for future reference.
2. Product Overview
2.1 Components
The OLIGHT Array 2 Pro package includes the following items:
- Array 2 Pro Headlamp x 1
- Charging Cable x 1 (USB-C)
- User Manual x 1

Figure 2.1: Package Contents
2.2 Key Features
- Higher Performance: Built-in high efficiency LEDs with a serious output of 1500 lumens, capable of vividly lighting up your immediate vicinity even in total darkness.
- Multiple Light Options: Offers white LED floodlight, combined floodlight and spotlight, or spotlight modes, as well as a red LED light mode for outstanding versatility.
- Effortless to Operate: Dual control system allows operation via the switch on top of the headlamp or by waving your hand over the sensor area.
- Emergency Signaling: Features an SOS mode for distress signaling or attracting attention.
- User-Friendly Design: Adjustable, sweatproof, and removable headband. 60° tilting mount design for clear visibility.

Figure 2.2: High Performance Headlamp

Figure 2.3: Versatile Lighting Modes
3. Setup
3.1 Initial Charging
Before first use, fully charge the headlamp. The Array 2 Pro is equipped with a 3350mAh USB-C rechargeable battery pack.
- Locate the USB-C charging port on the battery pack at the rear of the headlamp.
- Connect the provided USB-C charging cable to the port and plug the other end into a compatible USB power source.
- The red indicator lights on the battery pack will illuminate sequentially to show charging status.
- Charging is complete when all indicator lights are solid.

Figure 3.1: Battery Pack and Charging Port
3.2 Adjusting the Headband
The adjustable headband ensures a comfortable and secure fit for various head sizes.
- Place the headlamp on your head.
- Adjust the elastic straps using the buckles until the headlamp feels snug but not too tight.
- The headband is sweatproof and removable for cleaning.

Figure 3.2: Tilting Mount Design
4. Operating Instructions
4.1 Power Button Control
The single button on top of the headlamp controls all functions.

Figure 4.1: One Button Control
- Turn On/Off: Single click the button to turn the headlamp on or off.
- Change Modes (Floodlight, Red Light, Flood+Spotlight): Double-click the button to cycle through the main light modes.
- Adjust Brightness: When a mode is active, press and hold the button to cycle through brightness levels (Low, Medium, High). Release the button at your desired brightness.
- SOS Mode: Triple-click the button to activate SOS mode for emergency signaling.
- Lockout Function: To prevent accidental activation, press and hold the button for approximately 2 seconds until the light briefly flashes, indicating it's locked. Repeat to unlock.
4.2 Smart Motion Sensor Control
The motion sensor allows for hands-free operation, ideal when your hands are occupied.
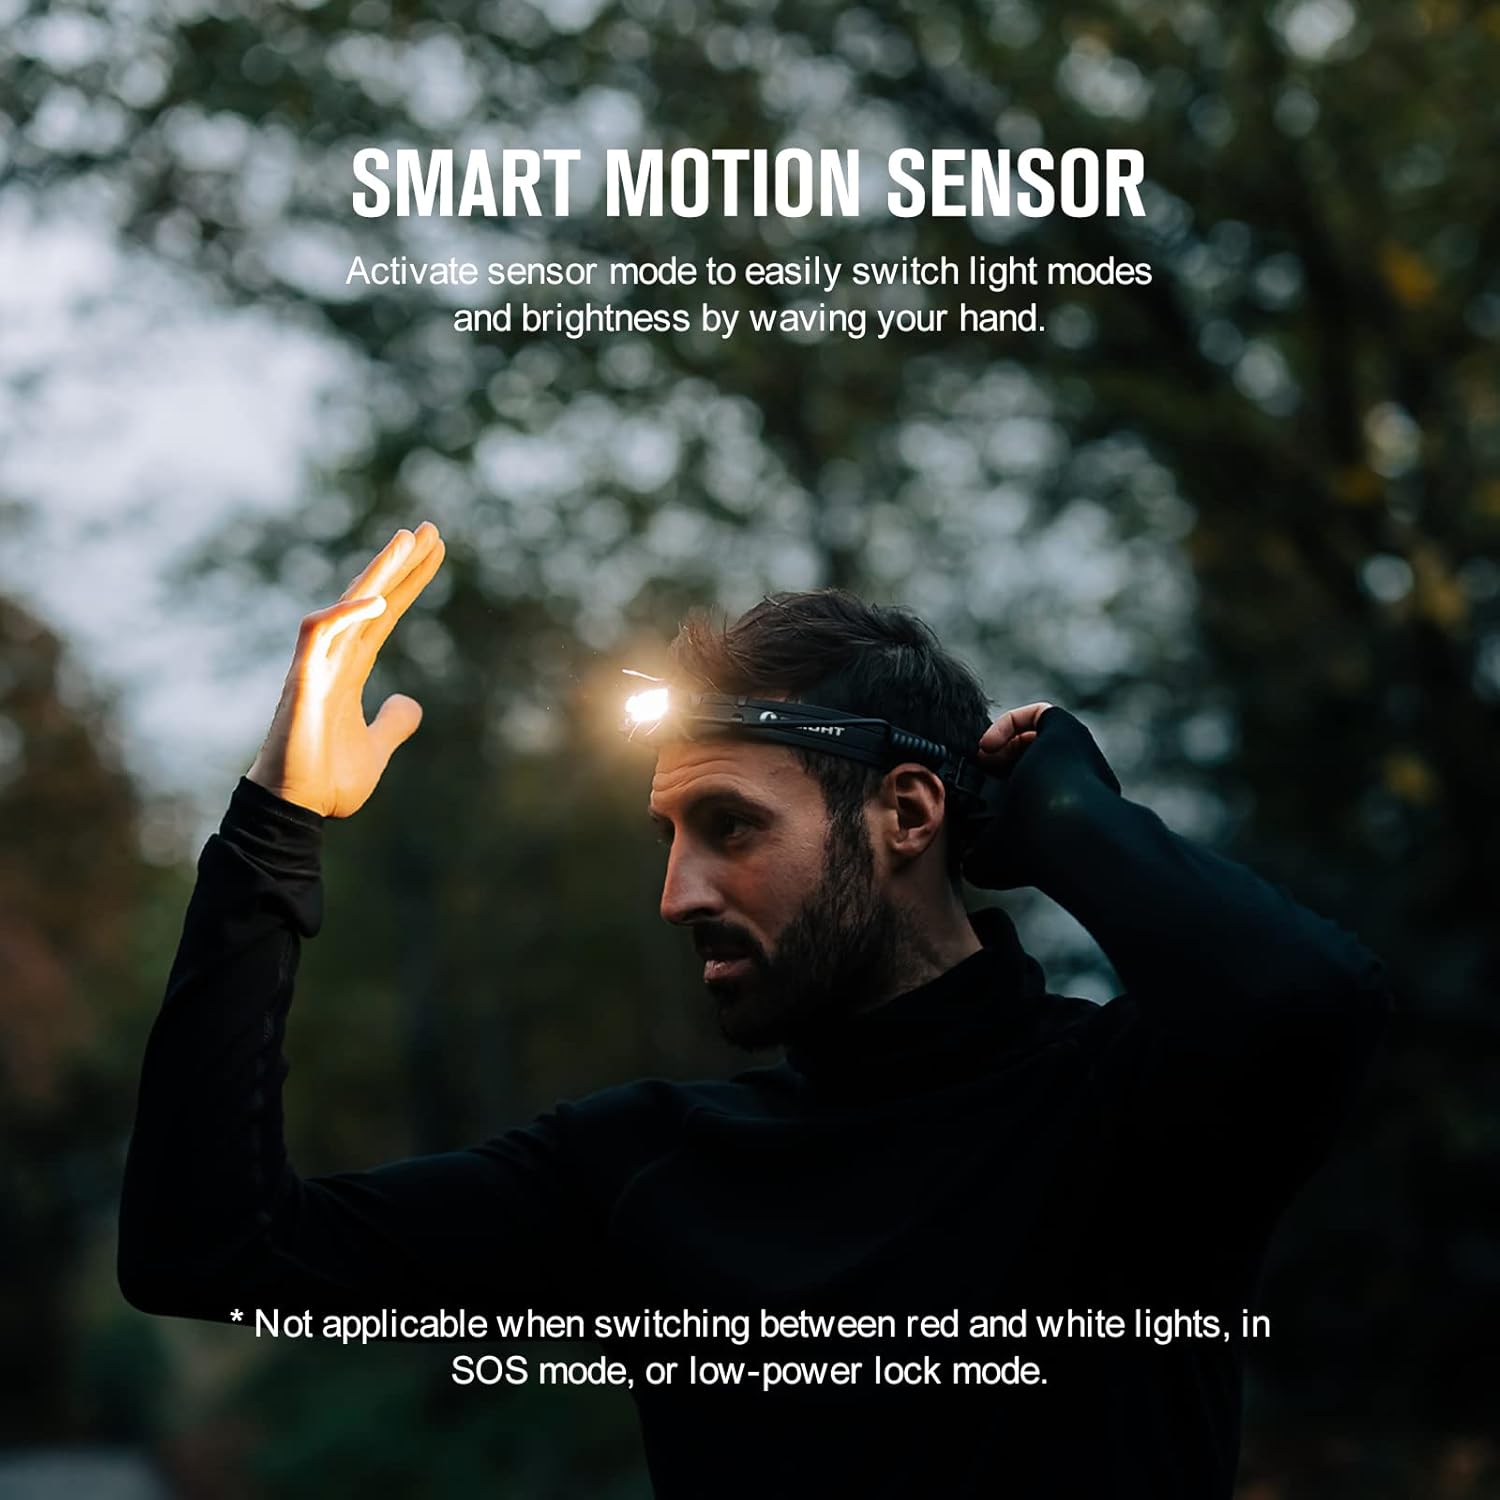
Figure 4.2: Smart Motion Sensor in Use
- Activate Sensor Mode: Ensure the headlamp is on. Wave your hand over the sensor area in the front of the headlamp to switch light modes and/or brightness.
- Note: Motion sensor control is not applicable when switching between red and white lights, in SOS mode, or low-power lock mode.
4.3 Light Mode Overview
The following table summarizes the available light modes and their approximate runtimes:

Figure 4.3: Light Mode and Runtime Table
5. Maintenance
- Cleaning: The headband is removable and can be cleaned with mild soap and water. Ensure the headlamp unit is dry before reattaching the headband.
- Battery Care: To prolong battery life, avoid fully discharging the battery frequently. Recharge the headlamp regularly, especially if it will be stored for extended periods.
- Storage: Store the headlamp in a cool, dry place away from direct sunlight and extreme temperatures.
- Water Resistance: The headlamp has an IPX4 water resistance rating, meaning it is resistant to splashing water from any direction. Do not submerge the headlamp.
6. Troubleshooting
| Problem | Possible Cause | Solution |
|---|---|---|
| Headlamp does not turn on. | Low battery; Lockout mode activated. | Charge the battery; Press and hold the button for ~2 seconds to unlock. |
| Light output is dim or inconsistent. | Low battery; Headlamp overheating. | Recharge the battery; Allow the headlamp to cool down. Reduce brightness if operating in high temperatures. |
| Motion sensor not responding. | Not in compatible mode (e.g., red light, SOS, lockout); Obstruction of sensor. | Ensure headlamp is in a white light mode; Clear any obstructions from the sensor area. |
| Battery pack gets hot during prolonged use. | Normal operation at high output levels. | This is expected behavior for high-lumen devices. If discomfort occurs, reduce brightness or take breaks. |
7. Specifications
| Feature | Detail |
|---|---|
| Max Output | 1500 Lumens |
| Max Runtime | 27 hours (Low Floodlight Mode) |
| Max Throw | 150 meters |
| Power Source | Rechargeable Lithium Ion Battery (3350mAh) |
| Light Source Type | LED (White & Red) |
| Material | Aluminum |
| Water Resistance Level | IPX4 (Waterproof) |
| Product Dimensions | 2.4"D x 1.22"W x 0.96"H |
| Item Weight | 4.76 Ounces |
8. Warranty & Support
OLIGHT provides a Lifetime Warranty for the Array 2 Pro Headlamp, ensuring quality and performance.
For additional support, detailed product information, or to explore other OLIGHT products, please visit the official OLIGHT store:
A digital version of this user manual is also available for download: User Manual (PDF)


