1. Introduction
Thank you for purchasing the Timloon TY02 Indoor Outdoor Digital Thermometer Hygrometer. This device is designed to provide accurate temperature and humidity readings for both indoor and up to three outdoor locations simultaneously. With its large LCD display, backlight function, and alarm capabilities, it helps you maintain optimal environmental conditions in your home, office, or other desired areas.
Package Contents:
- 1 x Main Display Unit
- 3 x Wireless Remote Sensors
- 1 x USB Power Cable (for main unit)
- 1 x User Manual

Figure 1.1: Main Display Unit and three Wireless Remote Sensors.
This image shows the central display unit with its integrated stand, alongside three compact wireless remote sensors. The display unit features a large screen for easy reading, while the sensors are designed for outdoor or remote indoor placement.
2. Safety Information
- Do not expose the main unit or sensors to extreme temperatures, direct sunlight, or excessive moisture.
- Avoid dropping the device or subjecting it to strong impacts.
- Do not attempt to disassemble or repair the unit yourself. Contact customer support for assistance.
- Keep batteries out of reach of children. Dispose of used batteries responsibly according to local regulations.
- Ensure proper battery polarity when inserting batteries.
- Remote sensors are designed for outdoor use but should be protected from direct rain and prolonged exposure to harsh weather conditions.
3. Product Features
- Large LCD Display: A 4.7-inch screen with large fonts for clear and easy reading of temperature and humidity data.
- Multi-Channel Monitoring: Simultaneously displays indoor temperature/humidity and data from up to three wireless remote sensors.
- Temperature & Humidity Trend Display: Indicates whether temperature and humidity are rising, falling, or remaining stable.
- Max/Min Records: Displays 24-hour maximum and minimum temperature and humidity readings.
- Date & Time Display: Includes current date and time for convenience.
- Wide Measuring Range:
- Indoor Temperature: 0°C to 50°C (32°F to 122°F)
- Outdoor Temperature: -50°C to 70°C (-58°F to 158°F)
- Humidity: 20% to 99% RH
- High Accuracy: Temperature accuracy within ±1°C (±2°F), Humidity accuracy within ±5% RH.
- Dual Power Supply (Main Unit): Operates with 3 AAA batteries or via USB cable.
- Backlight Function: Provides illumination for easy viewing in low-light conditions. Backlight automatically turns off after 5 seconds on battery power; remains on when powered by USB.
- Alarm Function: Audible and visual (backlight color change) alerts when temperature or humidity exceeds preset upper or lower limits.
- Long Transmission Distance: Up to 100 meters (328 feet) in open areas, or 30 meters (98 feet) with some obstacles.
- Comfort Level Indicator: Displays an icon indicating dry, comfortable, or wet conditions based on humidity levels.

Figure 3.1: Main Display Unit Layout and Functions.
This diagram illustrates the various sections of the main display unit, including indoor temperature/humidity, sensor channels (1, 2, 3), signal trend indicators, comfort level, calendar, time, and button functions such as TIME SET, CHANNEL, ALERT, UP/MAX/MIN, and DOWN/°C/°F.
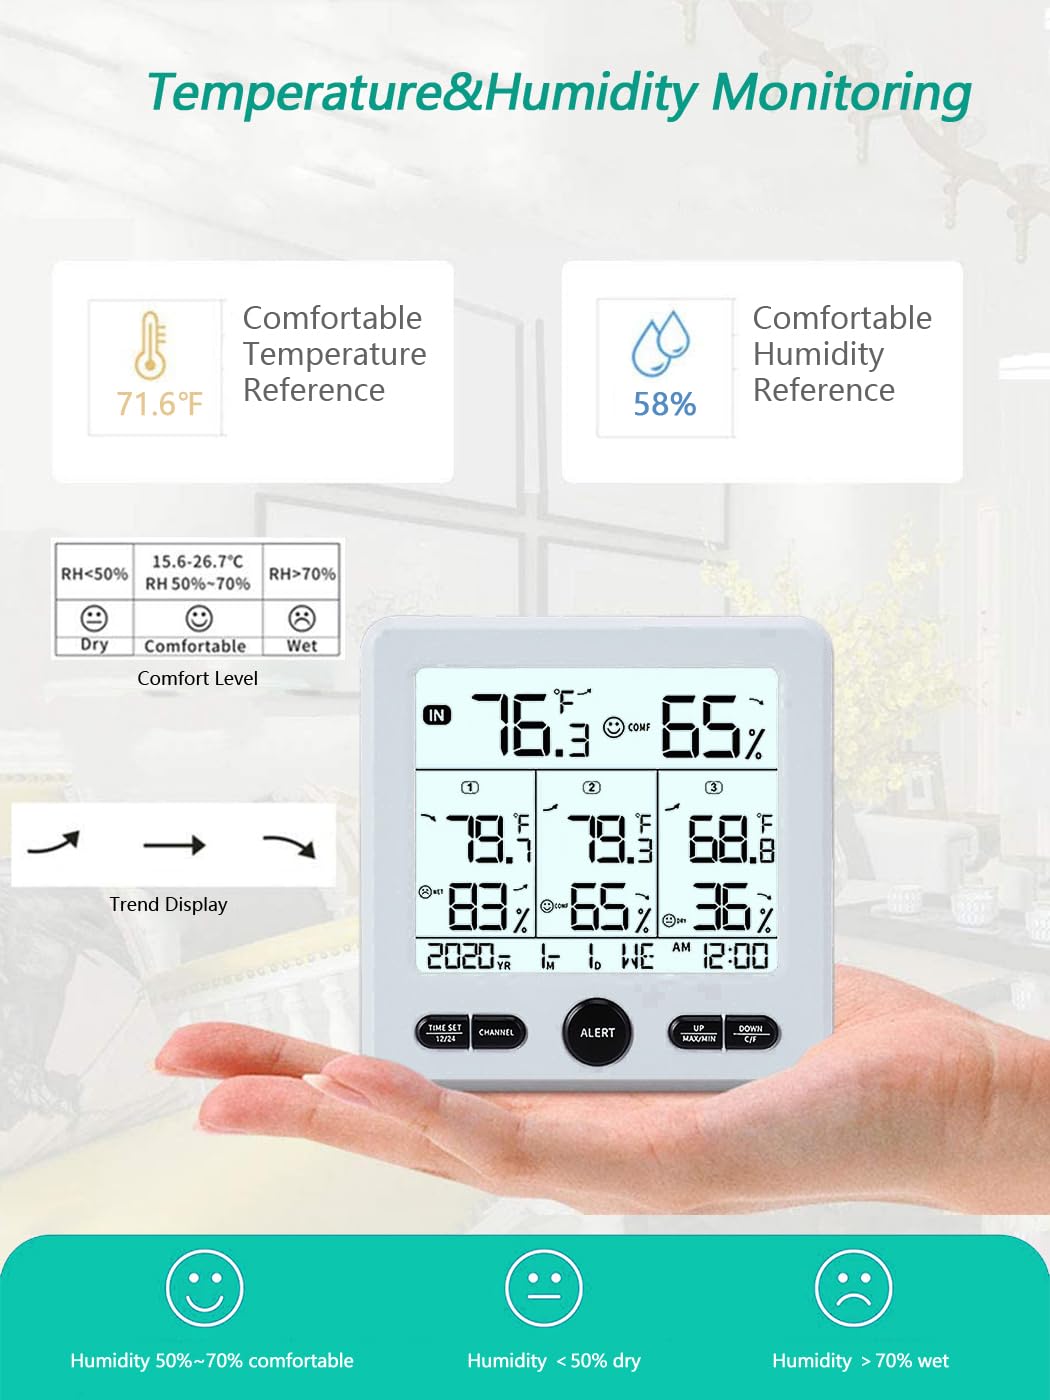
Figure 3.2: Comfort Level Indicators.
This image explains the comfort level icons: a smiling face for comfortable humidity (50%-70% RH), a neutral face for dry conditions (RH < 50%), and a frowning face for wet conditions (RH > 70%). It also shows temperature and humidity trend arrows.
4. Setup
4.1. Battery Installation
For Remote Sensors (3 units):
- Open the battery compartment cover on the back of each remote sensor.
- Insert 2 x AAA batteries into each sensor, observing the correct polarity (+/-).
- Before closing the cover, select a channel (1, 2, or 3) for each sensor using the small switch inside the battery compartment. Ensure each sensor is set to a unique channel.
- Close the battery compartment cover securely.
For Main Display Unit:
- Open the battery compartment cover on the back of the main unit.
- Insert 3 x AAA batteries, observing the correct polarity (+/-).
- Alternatively, connect the provided USB power cable to the main unit and a suitable USB power adapter (not included).
- Close the battery compartment cover.
The main unit will power on automatically once batteries are inserted or USB power is connected.

Figure 4.1: Battery Installation for Main Unit and Remote Sensor.
This image displays the open battery compartments for both the main display unit (requiring 3 AAA batteries) and a remote sensor (requiring 2 AAA batteries). The channel select switch and °C/°F switch within the sensor's compartment are also visible. Product dimensions are indicated.
4.2. Sensor Pairing
Once the main unit is powered on and batteries are installed in the sensors, the main unit will automatically search for and connect to the remote sensors. This process may take a few minutes. Ensure sensors are within range of the main unit during initial setup.
- If a sensor does not connect, press the "CHANNEL" button on the main unit to cycle through channels or press and hold the "CHANNEL" button to initiate a new search for all sensors.
- Ensure each sensor is set to a unique channel (1, 2, or 3) using the switch inside its battery compartment.
4.3. Placement
Main Display Unit:
- Place the main unit indoors in a central location, away from direct sunlight, heat sources, or drafts that could affect readings.
- It can be placed on a tabletop using its integrated stand or mounted on a wall using the hanging hole on the back.
Remote Sensors:
- Place remote sensors in desired outdoor or indoor locations.
- For outdoor placement, choose a shaded area protected from direct rain and snow to ensure accuracy and prolong sensor life.
- Ensure sensors are within the effective transmission range of the main unit (up to 100m/328ft in open areas, 30m/98ft with obstacles).
- Each sensor can be placed on a flat surface or mounted to a wall using the provided base and hanging hole.

Figure 4.2: Installation Options for Main Unit and Sensors.
This image demonstrates two installation methods for the main display unit: tabletop placement using its kickstand and wall mounting. It also shows various placement examples for the remote sensors, including on a table, shelf, and mounted outdoors under an overhang, emphasizing protection from direct elements.

Figure 4.3: Optimal Sensor Placement.
This diagram illustrates the wireless communication between the main unit and three remote sensors placed in different outdoor locations around a house. It includes important notes to store sensors out of direct sunlight and away from rain for optimal performance and longevity.
5. Operating Instructions
5.1. Display Overview
The large LCD screen displays the following information:
- IN: Indoor temperature and humidity.
- 1, 2, 3: Temperature and humidity from remote sensors on channels 1, 2, and 3.
- Trend Arrows: Indicate rising, falling, or stable temperature/humidity.
- Comfort Level Icon: Shows dry, comfortable, or wet conditions.
- MAX/MIN: Maximum and minimum recorded values for the last 24 hours.
- Date & Time: Current calendar date and time.

Figure 5.1: Simultaneous Display of Multiple Sensor Data.
This image highlights the main display unit showing indoor readings ("IN") along with readings from three separate remote sensors (Channels 1, 2, and 3). This allows for monitoring of four distinct locations at a glance.
5.2. Button Functions
- TIME SET / 12/24:
- Press to switch between 12-hour and 24-hour time format.
- Press and hold to enter time and date setting mode.
- CHANNEL:
- Press to cycle through the display of individual remote sensor channels (1, 2, 3, or all channels cycling).
- Press and hold to manually search for and re-pair remote sensors.
- ALERT:
- Press to activate/deactivate the alarm function.
- Press and hold to enter alarm setting mode (set upper/lower limits for temperature/humidity).
- UP / MAX/MIN:
- In normal display mode, press to view 24-hour MAX/MIN temperature and humidity records. Press again to cycle through MAX, MIN, and current readings.
- In setting mode, press to increase values.
- DOWN / °C/°F:
- In normal display mode, press to switch between Celsius (°C) and Fahrenheit (°F) temperature units.
- In setting mode, press to decrease values.
5.3. Setting Time and Date
- Press and hold the "TIME SET" button for approximately 3 seconds. The year display will start flashing.
- Use the "UP" or "DOWN" buttons to adjust the year.
- Press "TIME SET" again to confirm and move to the next setting (Month, Day, Hour, Minute).
- Repeat steps 2 and 3 until all settings are complete.
- Press "TIME SET" one last time to exit the setting mode.
5.4. Setting Temperature/Humidity Alarms
The alarm function allows you to set upper and lower limits for temperature and humidity. When readings exceed these limits, the unit will sound an alarm and change the backlight color (orange for upper limit, red for lower limit).
- Press and hold the "ALERT" button for approximately 3 seconds. The upper temperature limit for the indoor channel will start flashing.
- Use the "UP" or "DOWN" buttons to adjust the upper temperature limit.
- Press "ALERT" to confirm and move to the lower temperature limit.
- Repeat steps 2 and 3 for indoor humidity upper/lower limits, then for each remote sensor channel (1, 2, 3) temperature and humidity limits.
- Press "ALERT" one last time to exit the setting mode.
- To activate or deactivate the alarm, simply press the "ALERT" button briefly in normal display mode. An alarm icon will appear/disappear on the display.
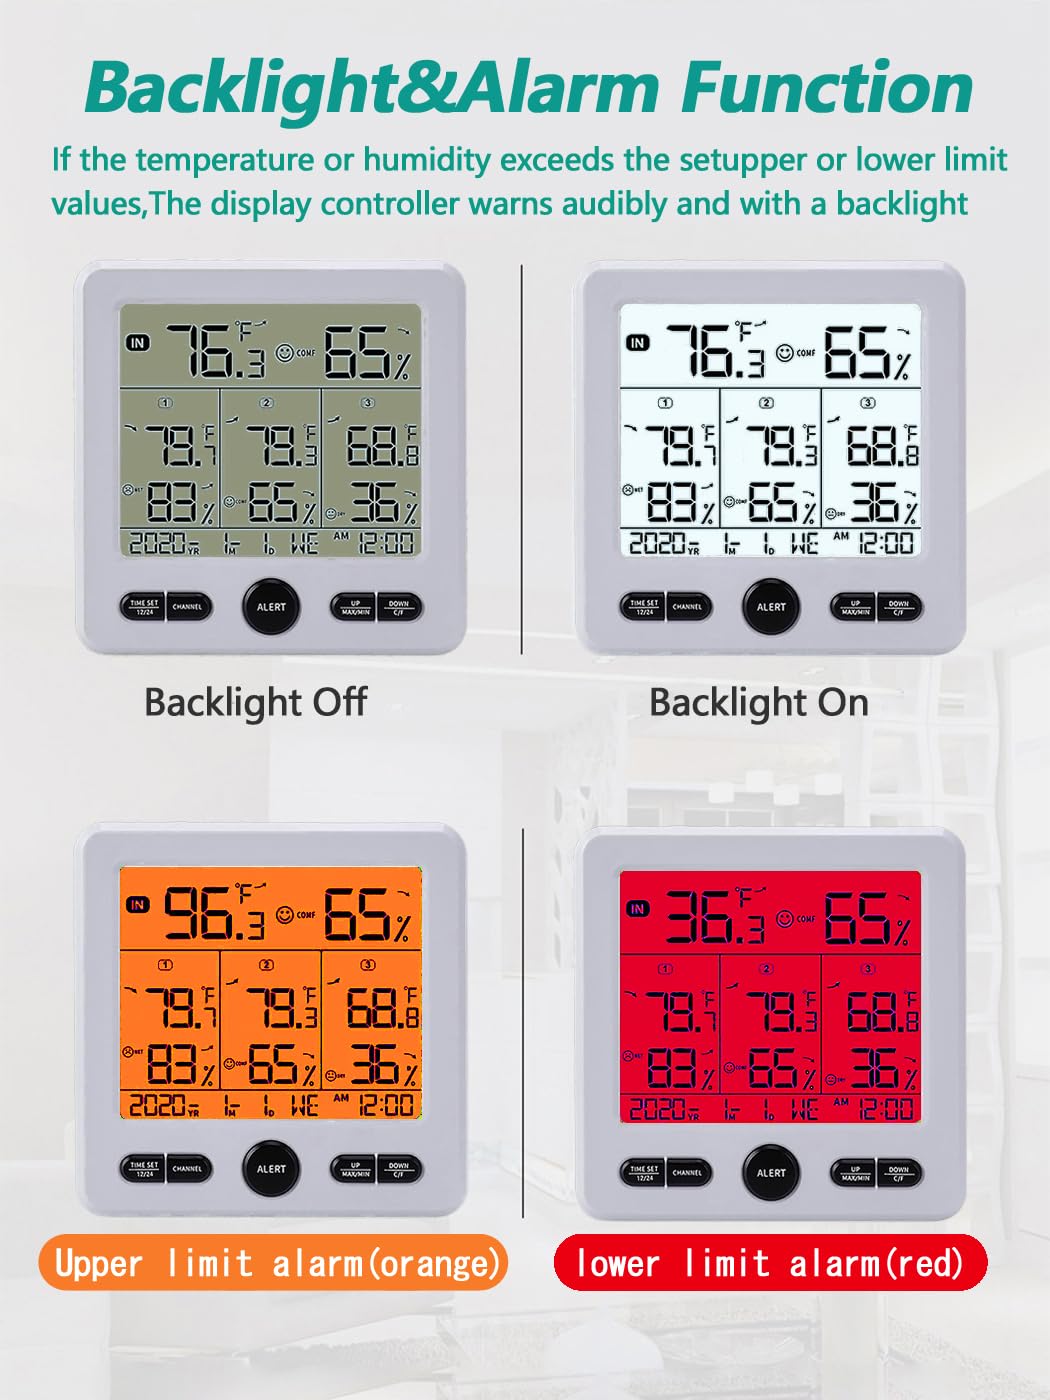
Figure 5.2: Backlight and Alarm Visuals.
This image demonstrates the backlight functionality and alarm indicators. It shows the display with the backlight off, backlight on (white), and then the backlight changing to orange for an upper limit alarm and red for a lower limit alarm, providing clear visual cues for critical conditions.
5.5. Backlight Operation
- When powered by batteries, the backlight will illuminate for 5 seconds after any button press and then automatically turn off to conserve power.
- When powered by the USB cable, the backlight will remain continuously on.
6. Maintenance
- Cleaning: Wipe the display unit and sensors with a soft, damp cloth. Do not use abrasive cleaners or solvents.
- Battery Replacement: Replace batteries in the main unit and sensors when the low battery indicator appears on the display. Ensure all batteries are replaced at the same time for optimal performance.
- Storage: If storing the device for an extended period, remove all batteries to prevent leakage.
7. Troubleshooting
| Problem | Possible Cause | Solution |
|---|---|---|
| No display on main unit. | Batteries are dead or incorrectly inserted. USB cable not connected or faulty. | Check battery polarity and replace with new AAA batteries. Ensure USB cable is securely connected to a working power source. |
| Remote sensor not displaying data or showing "--". | Sensor batteries are dead. Sensor is out of range. Interference. Sensor channel not set correctly. | Replace sensor batteries. Move sensor closer to the main unit. Avoid placing near large metal objects or electronics. Ensure each sensor has a unique channel (1, 2, or 3). Press and hold "CHANNEL" on main unit to re-pair. |
| Inaccurate readings. | Sensor/main unit exposed to direct sunlight, heat sources, or drafts. | Relocate the unit/sensor to a more stable environment, away from direct elements. Allow time for readings to stabilize. |
| Alarm not sounding. | Alarm function is deactivated. Alarm limits are set too wide. | Press the "ALERT" button to activate the alarm (alarm icon should appear). Review and adjust alarm upper/lower limits as needed. |
8. Specifications
| Feature | Detail |
|---|---|
| Model Number | TY02 |
| Indoor Temperature Range | 0°C to 50°C (32°F to 122°F) |
| Outdoor Temperature Range | -50°C to 70°C (-58°F to 158°F) |
| Humidity Range | 20% to 99% RH |
| Temperature Accuracy | ±1°C (±2°F) |
| Humidity Accuracy | ±5% RH |
| Wireless Transmission Range | Up to 100m (328ft) in open air; 30m (98ft) with obstacles |
| Main Unit Power Supply | 3 x AAA batteries or USB cable (DC 5V) |
| Remote Sensor Power Supply | 2 x AAA batteries per sensor |
| Display Size | 4.7 inches |
| Product Dimensions (Main Unit) | Approximately 12.5 x 12.5 x 2.0 cm (4.9 x 4.9 x 0.8 inches) |
| Product Weight | 372 g (Main unit and sensors combined) |

Figure 8.1: Measurement Ranges and Accuracy.
This image provides a visual summary of the indoor and outdoor temperature ranges, humidity range, and the accuracy specifications for both temperature and humidity. It also shows various application environments like bedrooms, offices, cellars, greenhouses, and incubators.
9. Warranty and Support
Timloon products are designed for reliability and performance. For specific warranty details, please refer to the warranty card included with your product or contact Timloon customer support.
If you encounter any issues or have questions regarding your Timloon TY02 Thermometer Hygrometer, please contact our customer support team for assistance. Contact information can typically be found on the product packaging or our official website.


