1. Introduction
The Weiser SmartCode Keyless Entry Door Lock provides a secure and convenient way to manage access to your home. This electronic deadbolt features a backlit keypad for easy code entry, a motorized locking mechanism, and the ability to store multiple user codes. With SmartKey re-key technology, you can easily re-key your lock without replacing the entire unit. This manual will guide you through the installation, setup, operation, and maintenance of your new SmartCode lock.
2. Safety Information
Please read all instructions completely before installing and operating the lock. Failure to follow these instructions could result in damage to the product, property damage, or personal injury.
- Do not use abrasive cleaners or chemicals on the lock.
- Ensure all components are securely fastened before use.
- Keep batteries out of reach of children.
- Dispose of batteries according to local regulations.
3. What's in the Box
Verify that all the following components are included in your package:
- Electronic Deadbolt (Interior/Exterior)
- Latch
- Strike Plate
- Mounting Plate
- Collar
- Hardware (Screws)
- 2 Keys
- SmartKey Tool
- Installation Manual (this document)

Image: All components included in the Weiser SmartCode Keyless Entry Door Lock package.
4. Features
The Weiser SmartCode Keyless Entry Door Lock offers a range of features designed for security and convenience:
- Modern Electronic Door Lock: Features a fast and quiet motorized deadbolt with one-touch motorized locking. ANSI Grade 2 certified for residential security.
- Keypad Operation: Gain entry by simply entering your personalized access code. The keypad is backlit for increased visibility at night and stays lit for 30 seconds after inactivity.
- Multiple User Access Codes: Supports up to 50 user codes and 1 master code option for flexible access management.
- SmartKey Security: Re-key your lock in seconds with SmartKey technology. This allows you to maintain key control and protect against lost, stolen, or unauthorized keys without removing the lock from your door.
- Auto-Lock Function: Automatically locks the deadbolt after a set period of inactivity, providing peace of mind.
- Weather Resistant: Designed to withstand various weather conditions for reliable outdoor use.

Image: The Weiser SmartCode Keyless Entry Door Lock, showing both the exterior keypad and interior deadbolt unit.

Image: The keypad of the SmartCode lock, highlighting its capacity for multiple user access codes.
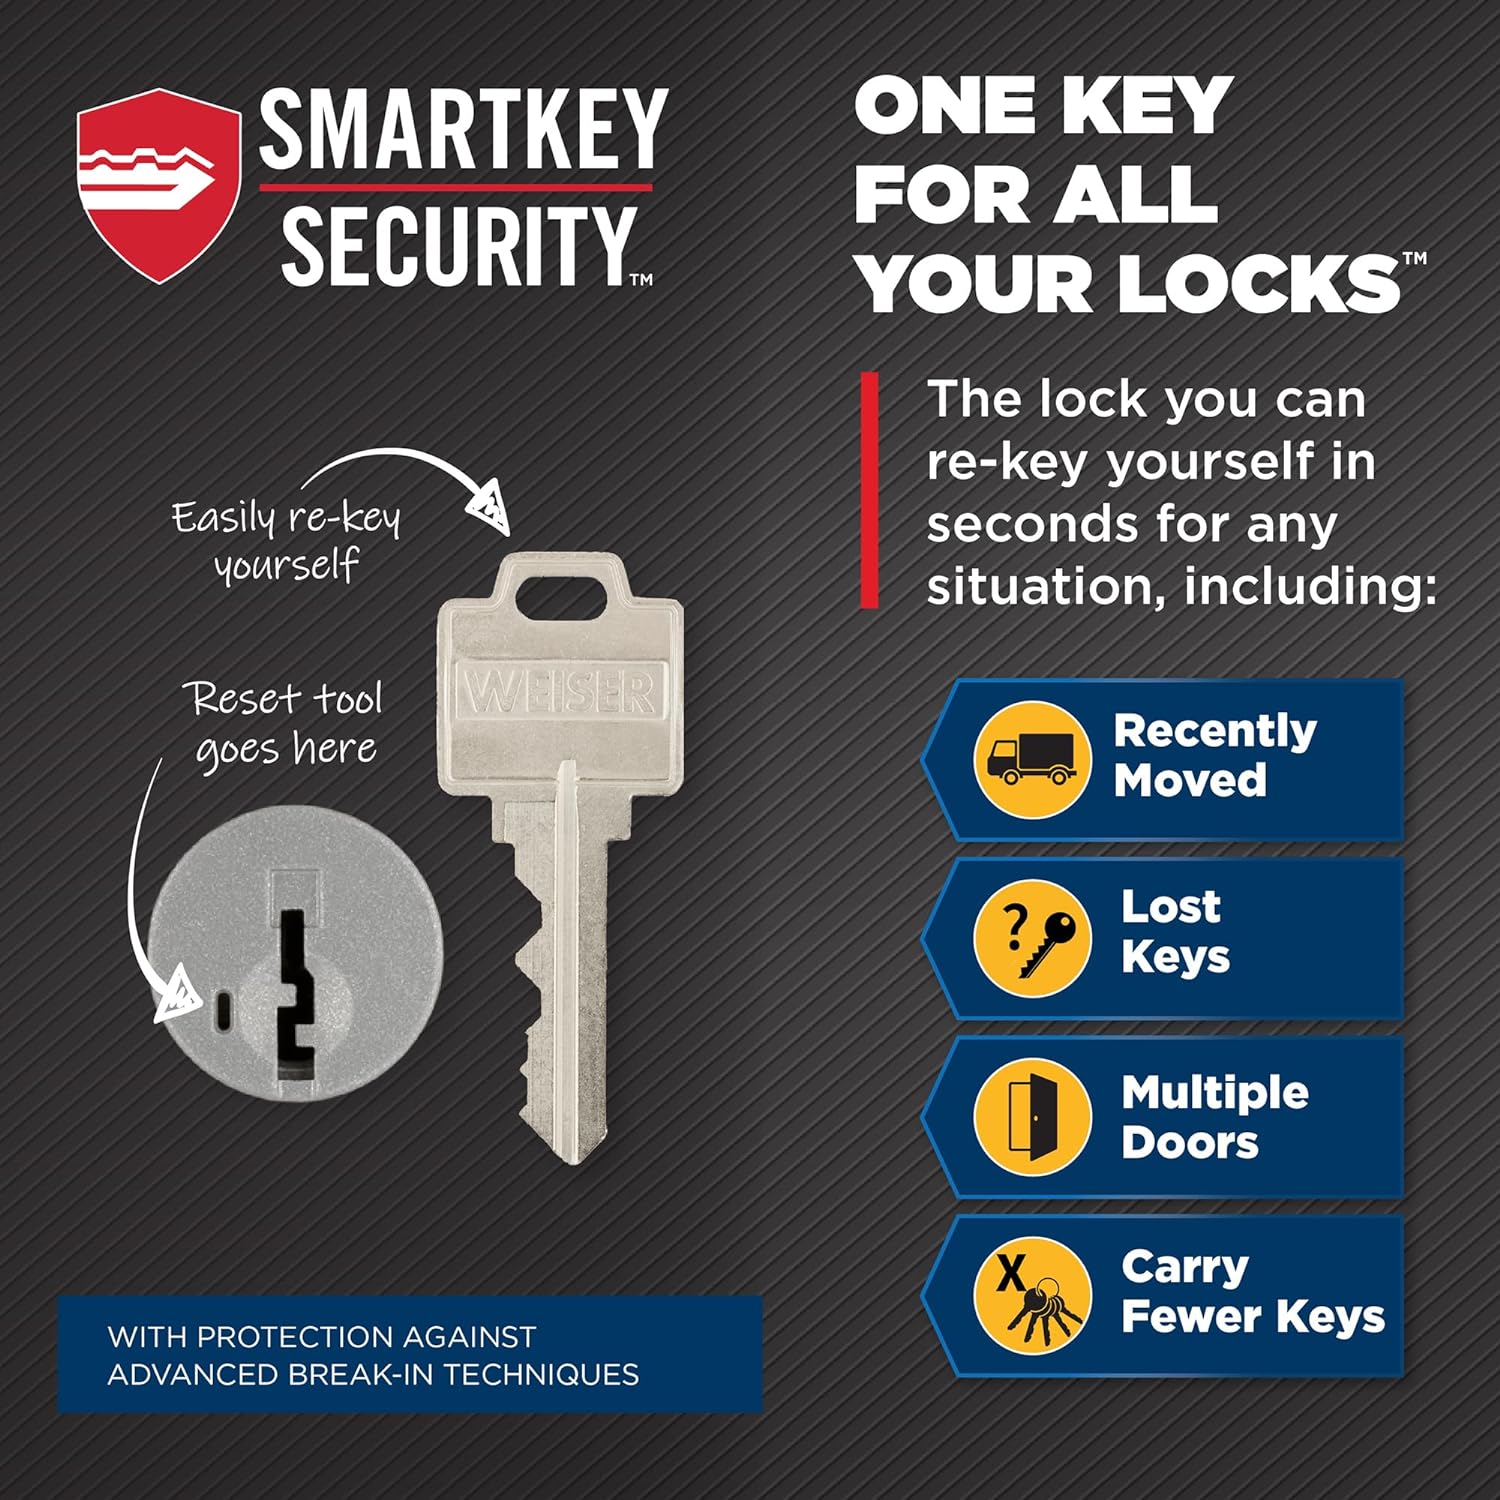
Image: Illustration of the SmartKey Security feature, demonstrating how to re-key the lock.

Image: The auto-lock feature in action, providing convenience and security.
5. Installation
The Weiser SmartCode lock is designed for easy installation. It fits standard doors 1-3/8" to 1-3/4" thick with an adjustable backset (2-3/8" or 2-3/4").
5.1 Pre-Installation Check
- Verify your door's thickness and backset measurement.
- Ensure the door frame is properly aligned and the existing strike plate is suitable.
5.2 Installation Steps
- Prepare the door: If replacing an existing lock, remove it. Ensure the bore hole and backset are correct.
- Install the latch: Insert the latch into the door edge, ensuring the correct backset is selected.
- Install the exterior keypad assembly: Feed the cable through the door and secure the keypad.
- Install the interior assembly: Connect the cable and secure the interior unit to the mounting plate.
- Install batteries: Insert 4 AA batteries (not included) into the battery pack.
- Perform door handing process: This calibrates the lock to your door. Follow the specific instructions in the included installation guide.
For detailed, step-by-step interactive 3D instructions with voice and video guidance, download the free BILT app on your smartphone or tablet.

Image: Dimensions of the SmartCode lock components and adjustable latch backset.
6. Setup and Programming
After installation, you will need to program your master code and user codes.
6.1 Programming the Master Code
The master code is used to add or delete user codes and to configure lock settings. It does not unlock the door.
- Open the battery cover on the interior unit.
- Press the Program button once.
- Enter a new 4-8 digit master code.
- Press the Lock button.
6.2 Programming User Codes
User codes are used to unlock the door. You can program up to 50 unique user codes.
- Enter your master code.
- Press the Lock button.
- Press the Program button once.
- Enter a new 4-8 digit user code.
- Press the Lock button.
6.3 Deleting User Codes
- Enter your master code.
- Press the Lock button.
- Press the Program button twice.
- Enter the user code you wish to delete.
- Press the Lock button.
6.4 Using SmartKey Re-key Technology
SmartKey allows you to re-key your lock to work with any other Weiser SmartKey key. This is useful if you move, lose a key, or want all your Weiser locks to use the same key.
- Insert your currently working key fully into the cylinder.
- Rotate the key 90 degrees clockwise to the horizontal position.
- Insert the SmartKey tool firmly and fully into the SmartKey hole.
- Remove the SmartKey tool.
- Remove the original key.
- Insert your new key fully into the cylinder.
- Rotate the new key 90 degrees counter-clockwise to the vertical position.
- Remove the new key. Your lock is now re-keyed.
Image: Detailed steps for using the SmartKey re-keying feature.
7. Operating the Lock
7.1 Locking the Door
- From the outside: Press the Lock button once. The deadbolt will extend automatically.
- From the inside: Rotate the turn piece to the vertical position.
7.2 Unlocking the Door
- Using a User Code: Enter your 4-8 digit user code on the keypad. The deadbolt will retract.
- Using a Key: Insert the key into the cylinder and turn it to unlock.
- From the inside: Rotate the turn piece to the horizontal position.
7.3 Auto-Lock Feature
The lock can be set to automatically re-lock after a short delay (typically 30 seconds) once it has been unlocked. Refer to your specific installation guide for instructions on enabling or disabling this feature.

Image: Demonstrating the keyless entry function of the SmartCode lock.

Image: The backlit keypad provides easy code entry even in low light conditions.
8. Maintenance
8.1 Battery Replacement
The lock operates on 4 AA batteries (not included). When the batteries are low, the lock will provide an audible and/or visual indicator. Replace all four batteries simultaneously with new, high-quality alkaline batteries.
8.2 Cleaning
Clean the lock with a soft, damp cloth. Avoid using abrasive cleaners, solvents, or harsh chemicals, as these can damage the finish and electronic components.
9. Troubleshooting
If you encounter issues with your Weiser SmartCode lock, try the following steps:
- Lock not responding: Check battery levels and replace if necessary. Ensure batteries are inserted with correct polarity.
- Keypad not lighting up: Verify battery power. The keypad backlight activates upon touch.
- Lock not locking/unlocking: Ensure the door is properly closed and aligned. Check for any obstructions in the door frame or deadbolt path. Re-perform the door handing process if the lock was recently installed or moved.
- Codes not working: Double-check that the correct master code and user codes are being entered. Try reprogramming the codes.
- Motor sounds weak: This is an indication of low batteries. Replace them immediately.
If problems persist after attempting these solutions, please contact Weiser customer support.
10. Specifications
| Feature | Specification |
|---|---|
| Model Number | 9GED92600-005 |
| Product Dimensions | 6.99 x 2.86 x 13.97 cm |
| Item Weight | 454 g |
| Color | Satin Chrome |
| Style | Contemporary |
| Finish | Brushed |
| Material | Metal |
| Lock Type | Deadbolt, Electronic |
| User Codes | Up to 50 |
| Master Code | 1 |
| Door Compatibility | 1-3/8" to 1-3/4" thick |
| Backset | Adjustable (2-3/8" or 2-3/4") |
| Power Source | 4 AA Batteries (not included) |
| Special Features | Anti-Bump, Auto-Lock, Back-Lit Keypad, One-Touch Lock, Weather Resistant |
11. Warranty and Support
11.1 Warranty Information
The Weiser SmartCode Keyless Entry Door Lock comes with a 1-year warranty from the date of purchase. Please retain your proof of purchase for warranty claims. The warranty covers manufacturing defects and malfunctions under normal use. It does not cover damage caused by misuse, improper installation, or unauthorized modifications.
11.2 Customer Support
For further assistance, technical support, or warranty inquiries, please visit the official Weiser brand store or contact their customer service department.


