Introduction
This manual provides detailed instructions for the installation, operation, and maintenance of your COMTEC HDR963GW dual camera dashcam. Please read this manual thoroughly before using the product to ensure correct and safe operation. Keep this manual for future reference.

Image: COMTEC HDR963GW Dashcam main unit and rear camera components.
Package Contents
Verify that all items listed below are included in your package:
- Front Camera Unit x 1
- Rear Camera Unit x 1
- Camera Cable (approx. 9m) x 1
- Front Camera Mounting Bracket x 1
- Front Camera Mounting Bracket Double-sided Tape x 1
- Rear Camera Mounting Bracket Double-sided Tape x 1
- Degreasing Cleaner x 1
- 12V Cigarette Lighter Power Cable (approx. 4m / 1A fuse built-in) x 1
- Sticker [HDROP-06] x 1
- Hex Wrench (for bracket angle adjustment) x 1
- Cable Clamps x 3
- microSD Card (32GB / Class 10) x 1
- SD Card Adapter x 1
- Instruction Manual (with warranty) x 1
Setup and Installation
1. Choosing an Installation Location
Select a location on the windshield for the front camera that does not obstruct the driver's view and is within the wiper's sweep area. For the rear camera, choose a location on the rear window that provides a clear view and does not interfere with the defroster lines.
2. Mounting the Front Camera
- Clean the chosen area on the windshield with the provided degreasing cleaner.
- Attach the double-sided tape to the front camera mounting bracket.
- Firmly press the bracket onto the cleaned area of the windshield.
- Attach the front camera unit to the bracket.
- Adjust the camera angle using the hex wrench to ensure a clear view of the road ahead.
3. Mounting the Rear Camera
- Clean the chosen area on the rear window with the provided degreasing cleaner.
- Attach the double-sided tape to the rear camera mounting bracket.
- Firmly press the bracket onto the cleaned area of the rear window.
- Attach the rear camera unit to the bracket.
- Adjust the camera angle to ensure a clear view of the road behind.
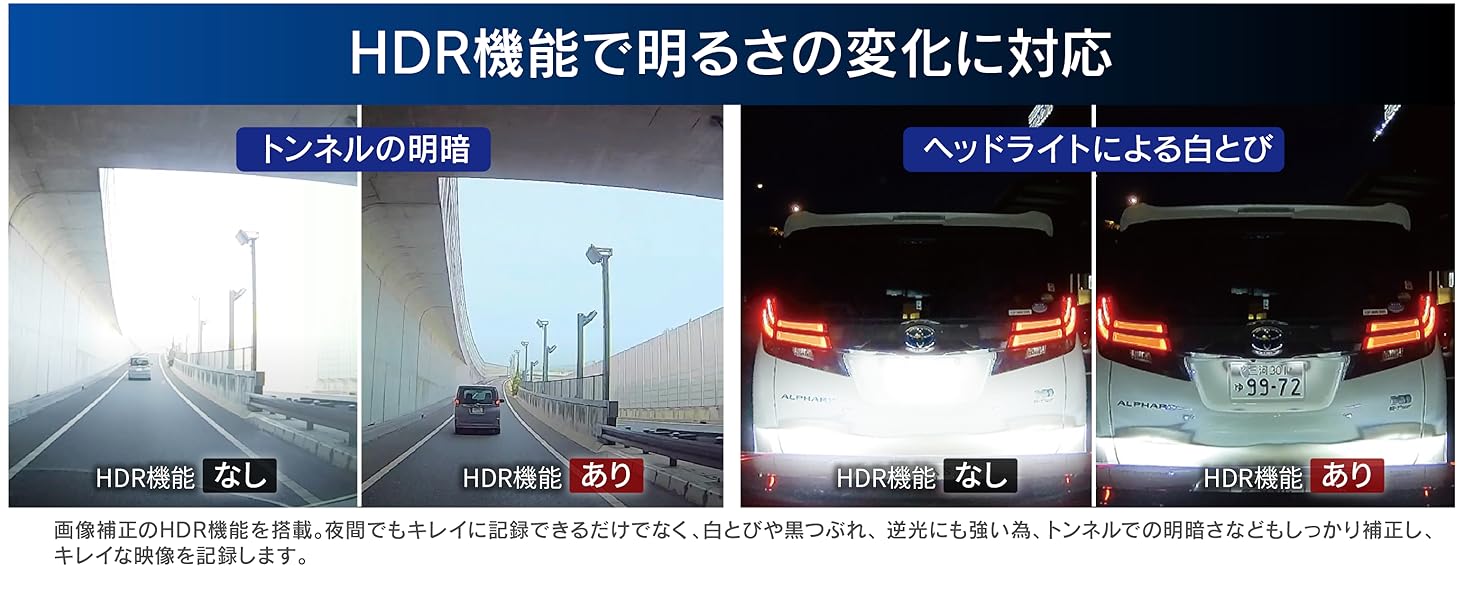
Image: Front and rear camera installation with 168-degree wide-angle views.
4. Wiring
- Connect the camera cable from the front camera unit to the rear camera unit. Route the cable along the vehicle's interior trim to conceal it. Use the provided cable clamps to secure the cable.
- Connect the 12V cigarette lighter power cable to the front camera unit.
- Insert the cigarette lighter plug into your vehicle's cigarette lighter socket.
- Ensure all cables are securely connected and do not interfere with vehicle operation.
5. Inserting the microSD Card
Insert the provided microSD card into the designated slot on the main unit. Ensure it is inserted correctly until it clicks into place.
Operating Instructions
Basic Recording
The HDR963GW automatically begins recording when the vehicle's ignition is turned on. Both front and rear cameras record simultaneously in Full HD (2 million pixels).
- Continuous Recording: Automatically records in a loop, overwriting the oldest files when the microSD card is full.
- Event Recording: If an impact is detected by the G-sensor, the footage before and after the event is saved as a protected file.
- Manual Recording: Press the designated button on the function switch to manually initiate an event recording.
Driving Support Functions
The device includes five driving support functions to enhance safety. These functions provide alerts based on real-time road conditions.
- Forward Vehicle Start Alert: Notifies you when the vehicle in front starts moving.
- Forward Vehicle Collision Warning: Alerts you if you are approaching the vehicle in front too quickly.
- Lane Departure Warning: Warns you if your vehicle drifts out of its lane.
- Drive Support Function: Detects and alerts for rapid acceleration, sudden deceleration, or abrupt steering.
- Speed Alarm Function: Notifies you if you exceed a preset speed limit.
Note: These safety driving support functions are aids and do not prevent accidents. Always drive safely and pay attention to actual traffic conditions. Some functions require a GPS signal to operate. Performance may vary based on environmental conditions, weather, and vehicle characteristics.
GPS Alert Functions
The HDR963GW provides various alerts to support safe driving based on pre-registered GPS data. This data can be updated for free.
- Wrong-Way Driving Alert: Warns when entering areas with a risk of wrong-way driving on highways (IC/JCT, SA/PA) or urban expressways.
- Accident Point Alert: Notifies you when approaching locations with a high incidence of past accidents.
- "Hiyari Hatto" Point Alert: Alerts you when approaching dangerous spots on highways, such as sharp curves or steep descents.
- Speed Camera Route Alert: Warns you when approaching automatic speed enforcement cameras installed nationwide.
Note: The registered data is current as of December 2019. Regular updates are recommended.
Parking Surveillance Function (Optional)
To use the parking surveillance function, the optional parking surveillance/direct wiring cord [HDROP-14] is required. This function allows the dashcam to monitor your vehicle even when parked.
- Impact Detection: Detects impacts while parked and records footage before and after the event.
- Continuous Recording: Can be set to continuously record while parked.
- Rear Camera Recording: Images from the rear camera are also recorded during parking surveillance.
- Dedicated Folder: Parking surveillance images are saved to a dedicated folder for easy review.
- One-Time Parking Surveillance Mode: Temporarily activates parking surveillance even if the function is normally off. Useful for specific parking situations.
- Parking Surveillance Mode Pass Function: Temporarily disables parking surveillance in environments prone to false triggers, such as mechanical parking lots or very windy conditions.
- Time-Lapse Recording: Records still images at 1-second intervals, compressing them into a short video for extended surveillance periods.

Image: Parking surveillance function diagram showing impact detection and recording areas.
Note: Recorded images may be overwritten depending on the main unit's settings and the capacity of the microSD card.
HDR/WDR for Clear Night Images
The HDR963GW is equipped with High Dynamic Range (HDR) and Wide Dynamic Range (WDR) functions to ensure clear image recording even in challenging lighting conditions.
- These functions effectively suppress "whiteout" (overexposure) and "black crush" (underexposure).
- Provides clear images even in strong backlight or scenes with significant brightness differences, such as tunnel exits.
Note: The rear camera supports HDR only.

Image: Comparison of night recording quality with and without HDR/WDR enabled.
Function Switch
The dedicated function switch allows for quick access to key operations:
- Playback: One-touch playback of recently recorded footage.
- Recording: Functions as a manual recording trigger.
- Audio Recording: Toggles audio recording ON/OFF with a single press.
Maintenance
microSD Card Management
The HDR963GW utilizes a proprietary file system designed to minimize data fragmentation, allowing for extended use without frequent formatting. However, for optimal performance and longevity of the microSD card, periodic formatting is recommended as microSD cards are consumable items.
- SD Card Check Function: Upon startup, the device checks the microSD card for damage. If an abnormality is detected, an alert is displayed on the LCD screen, preventing missed recordings.
Cleaning
Regularly clean the camera lenses and the main unit's screen with a soft, dry cloth. Avoid using abrasive cleaners or solvents.
Troubleshooting
If you encounter issues with your HDR963GW, refer to the following common problems and solutions:
| Problem | Possible Cause / Solution |
|---|---|
| Device does not power on. | Check the power cable connection to the cigarette lighter socket and the dashcam. Ensure the vehicle's ignition is on. |
| No recording is taking place. | Verify the microSD card is inserted correctly. Check if the SD card check function is displaying an error. Format the microSD card if necessary. |
| Images are unclear or blurry. | Clean the camera lenses. Ensure the protective film (if any) has been removed. Check if HDR/WDR settings are appropriate for the lighting conditions. |
| GPS functions are not working. | Ensure the vehicle is in an open area with a clear view of the sky to receive GPS signals. Some functions require a stable GPS signal. |
| Parking surveillance not activating. | Confirm that the optional HDROP-14 cable is installed. Check parking surveillance settings. Ensure the impact detection sensitivity is not set too low or OFF. |
| Important files are being overwritten. | Adjust the G-sensor sensitivity for event recording. Utilize the emergency recording stop function to prevent overwriting after a severe impact. |
Viewer Software
For detailed analysis of recorded data, download the dedicated viewer software from the official COMTEC website. This software allows you to review video, audio, and G-sensor information on your PC. You can also convert recorded data into video or still image files for saving.
Specifications
| Feature | Description |
|---|---|
| Manufacturer | COMTEC |
| Model Number | HDR963GW |
| Product Dimensions (D x W x H) | 27 x 90 x 56 mm |
| Product Weight | 560 g |
| Battery | 1 Lithium Metal Battery (included) |
| Position | Rear |
| Special Features | Built-in GPS |
| Color | Black |
| Connectivity Technology | Wired |
| Video Capture Resolution | 1080p (Full HD) |
| Mounting Type | Adhesive Mount |
| Field of View | 168 degrees |
| Control Method | Touch |
| Front Camera Image Sensor | 1/2.7 inch CMOS Sensor |
| Front Camera Effective Pixels | Max 2 million pixels |
| Front Camera Lens Angle | Horizontal 136°, Vertical 70° (Diagonal 168°) |
| Front Camera F-value | 2.0 |
| Front Camera Lens Material | Glass |
| Rear Camera Image Sensor | 1/2.7 inch CMOS Sensor |
| Rear Camera Effective Pixels | Max 2 million pixels |
| Rear Camera Lens Angle | Horizontal 136°, Vertical 70° (Diagonal 168°) |
| Rear Camera F-value | 2.0 |
| Rear Camera Lens Material | Glass |
Warranty and Support
Product Warranty
The main unit of this product is covered by a 3-year warranty from the date of purchase. Please retain your proof of purchase (e.g., delivery note) for warranty claims. Consumable parts such as the mounting bracket, cigarette lighter power cable, built-in battery, and microSD card are not covered by this warranty. The warranty is void if used outside Japan or without proof of purchase date.
Data Recovery Service
COMTEC offers a free data recovery service for one year from the date of purchase for this drive recorder. This service aims to restore recorded data that cannot be read due to damage to the main unit or the SD card. Please note that overwritten data or data from SD cards that have reached their end-of-life cannot be recovered. For detailed terms and conditions, please refer to the official COMTEC website.
Accident Compensation Service
This product includes an accident compensation service. In the event of an accident, COMTEC will pay a uniform compensation of 20,000 yen for one year from the date of registration. Registration must be completed within one month of purchase; failure to do so will void the service. The service is valid for one year from registration and can be renewed annually for a fee (up to a maximum of 3 years). However, if compensation has been received once, the service cannot be renewed. For detailed terms and conditions, please refer to the official COMTEC website.
Contact Information
For further assistance, please visit the official COMTEC website or contact their customer support.
Official COMTEC Website: https://www.comtec.co.jp/


