1. Introduction and Safety Information
This manual provides essential instructions for the safe assembly, operation, and maintenance of your PARKSIDE Universal Machine Stand PUG 1600 C3. Please read this manual thoroughly before initial use and keep it for future reference. Always adhere to all safety warnings and instructions to prevent injury and damage.
General Safety Warnings
- Work Area Safety: Keep the work area clean and well-lit. Cluttered or dark areas invite accidents. Do not operate power tools or stands in explosive atmospheres, such as in the presence of flammable liquids, gases, or dust.
- Personal Safety: Always wear appropriate personal protective equipment (PPE) such as safety glasses, hearing protection, and sturdy footwear. Do not overreach. Keep proper footing and balance at all times.
- Machine Stand Use and Care: Do not force the machine stand. Use the correct stand for your application. The correct stand will do the job better and safer at the rate for which it was designed. Store idle machine stands out of the reach of children and do not allow persons unfamiliar with the machine stand or these instructions to operate the machine stand.
- Stability: Ensure the stand is placed on a firm, level, and stable surface before attaching any machinery or beginning work. Uneven surfaces can cause instability and lead to accidents.
- Weight Capacity: Do not exceed the maximum weight capacity of the stand. Refer to the specifications section for details. Overloading can cause the stand to collapse, resulting in injury or damage.
- Maintenance: Maintain the machine stand. Check for misalignment or binding of moving parts, breakage of parts, and any other condition that may affect the machine stand’s operation. If damaged, have the machine stand repaired before use.
2. Setup and Assembly
2.1 Unpacking and Initial Inspection
Carefully remove all components from the packaging. Inspect all parts for any signs of damage. If any parts are damaged or missing, do not proceed with assembly. Contact customer support for assistance.
2.2 Assembling the Stand
Follow these steps to assemble the universal machine stand:
- Unfold the Legs: Place the main frame on a flat surface. Carefully unfold the four legs until they lock into their open position. Ensure all locking mechanisms are securely engaged.
- Attach Support Rollers: Insert the support rollers into the designated slots at each end of the main frame. Secure them using the provided knobs or fasteners. Ensure they are firmly attached and can rotate freely.
- Install Machine Mounting Rails: Attach the two machine mounting rails to the top of the main frame using the provided screws and nuts. These rails are designed to accommodate various power tools. Ensure they are aligned and tightened securely.

Figure 2.2.1: Fully assembled PARKSIDE Universal Machine Stand, ready for tool attachment.

Figure 2.2.2: The two machine mounting rails and associated hardware for securing power tools.

Figure 2.2.3: Detachable tool mounting brackets, showing the quick-release handles for easy tool attachment and removal.
2.3 Attaching a Machine to the Stand
To securely attach your power tool (e.g., miter saw, planer) to the stand:
- Ensure the machine's base is clean and free of debris.
- Align the mounting holes on your machine with the slots on the stand's mounting rails.
- Use appropriate bolts, washers, and nuts (often supplied with the power tool or stand) to secure the machine firmly to the rails. Tighten all fasteners securely.
- Verify that the machine is stable and does not wobble before operation.
3. Operating Instructions
3.1 Adjusting Support Rollers
The support rollers are designed to provide additional stability and support for long workpieces. To adjust their height:
- Loosen the locking knob on each roller assembly.
- Adjust the roller height to match the height of your machine's work surface.
- Tighten the locking knob firmly to secure the roller in position.
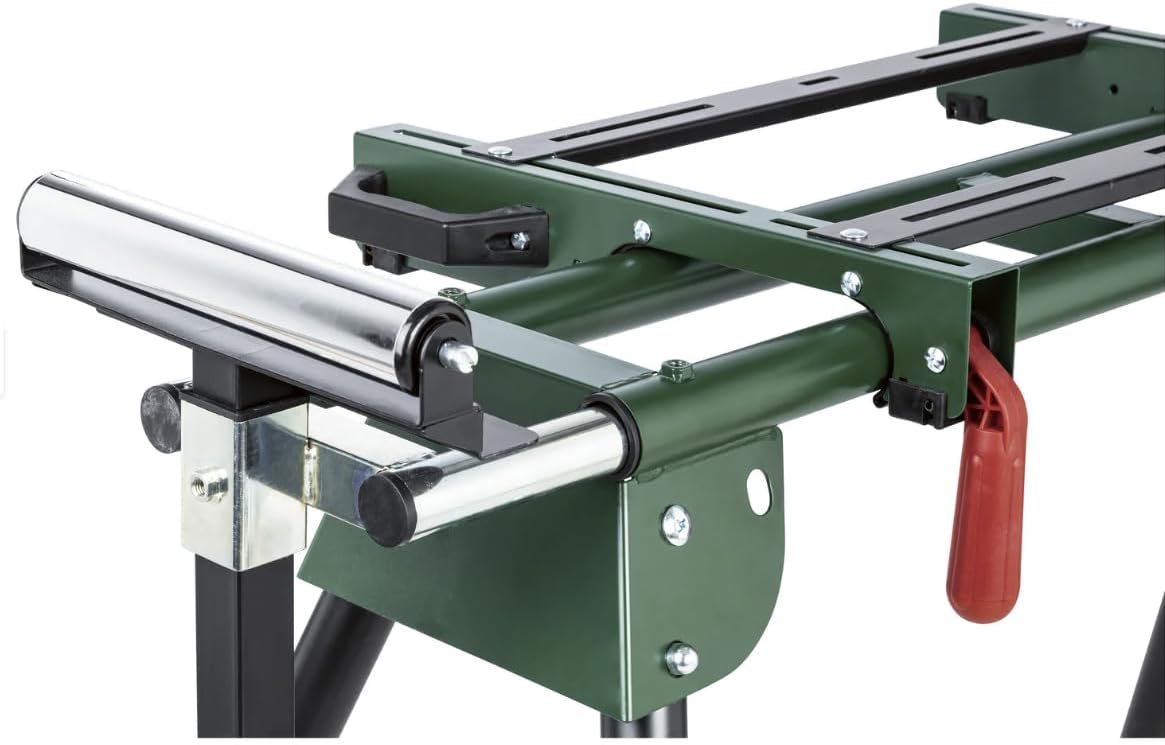
Figure 3.1.1: Detail of the adjustable support roller, showing the mechanism for height adjustment and the red locking knob.
3.2 Folding and Storing the Stand
For convenient storage and transport, the stand can be folded:
- Remove Machine: Always remove any attached power tools before folding the stand.
- Fold Legs: Release the leg locking mechanisms and fold the legs inwards towards the main frame. Ensure they are securely latched in the folded position.
- Collapse Rollers: If adjustable, lower the support rollers to their lowest position or remove them if necessary for compact storage.

Figure 3.2.1: The machine stand in its folded configuration, demonstrating its compact design for storage or transport.

Figure 3.2.2: Another view of the folded stand, highlighting the integrated handles for easy carrying.
4. Maintenance
Regular maintenance ensures the longevity and safe operation of your machine stand.
- Cleaning: After each use, wipe down the stand with a dry or slightly damp cloth to remove dust, sawdust, and debris. Avoid using harsh chemicals or abrasive cleaners.
- Inspection: Periodically inspect all bolts, nuts, and fasteners for tightness. Tighten any loose connections. Check for any signs of wear, damage, or corrosion on the frame, legs, and rollers.
- Lubrication: Lightly lubricate moving parts, such as leg hinges and roller mechanisms, with a suitable lubricant to ensure smooth operation.
- Storage: Store the folded stand in a dry, clean environment, away from direct sunlight and extreme temperatures.
5. Troubleshooting
This section addresses common issues you might encounter with your machine stand.
| Problem | Possible Cause | Solution |
|---|---|---|
| Stand is unstable or wobbly. | Uneven surface; loose leg locks; machine not securely attached. | Move stand to a level surface. Ensure all leg locks are fully engaged. Check and tighten machine mounting bolts. |
| Support rollers do not adjust smoothly. | Dirt/debris in mechanism; lack of lubrication; bent component. | Clean the roller mechanism. Apply light lubricant. Inspect for damage and replace if necessary. |
| Difficulty folding/unfolding legs. | Hinges are stiff or dirty; locking mechanism jammed. | Clean and lubricate hinges. Check locking mechanisms for obstructions and clear them. |
6. Specifications
- Model: PUG 1600 C3
- Dimensions (L x W x H, assembled): 100 x 680 x 81 cm (approximately 39.4 x 26.8 x 31.9 inches)
- Weight: 3.5 kg (approximately 7.7 lbs)
- Voltage: 240 Volts (Note: This specification might be for a tool used with the stand, as the stand itself is passive.)
- Wattage: 1500 Watts (Note: This specification might be for a tool used with the stand, as the stand itself is passive.)
- Reference: 1600
- ASIN: B0BFG2HFYS
Note: Specifications are subject to change without prior notice for product improvement.
7. Warranty and Customer Support
For warranty information, technical support, or to order replacement parts, please refer to the documentation provided with your purchase or contact the retailer where the product was acquired. Keep your proof of purchase for warranty claims.


