1. Introduction
This manual provides essential instructions for the safe and effective operation of your Tenamic Deluxe Biometric Fingerprint Safe Box. Please read this manual thoroughly before installation and use, and retain it for future reference. This safe is designed to provide secure storage for your valuables using advanced biometric and electronic locking mechanisms.
2. Safety Information
- Always keep the emergency keys in a secure location away from the safe. Do not store them inside the safe.
- Ensure the safe is installed on a stable surface or securely mounted to a wall to prevent tipping.
- Do not expose the safe to extreme temperatures or humidity.
- Replace batteries promptly when the low battery indicator appears to ensure continuous functionality.
- Avoid using abrasive cleaners or solvents on the safe's surface.
3. Package Contents
Upon unpacking, please verify that all the following items are included:
- 1 x Tenamic Deluxe Biometric Fingerprint Safe Box (5.1 cuft)
- 4 x Emergency Keys
- 2 x Mounting Screws
- 1 x User Manual (this document)
- 1 x External Battery Compartment
4. Product Overview
The Tenamic Deluxe Biometric Fingerprint Safe Box features a robust design with multiple security layers.

Figure 4.1: Tenamic Deluxe Biometric Fingerprint Safe Box with door open, revealing interior storage compartments.
Key Features:
- Stronger Material: Constructed from solid steel with anti-corrosion and anti-wear powder coating. Features a pry-resistant steel door and concealed hinges.
- Reliable Fingerprint Locking System: Utilizes a semiconductor fingerprint reader for accurate and fast access.
- Double Security: Includes a separate internal lock box and a hidden compartment for sensitive items.
- Enhanced Configuration: Automatic internal LED light (30-second duration) and a leather-lined interior to protect valuables.
- Emergency Power: Equipped with an external battery pack for emergency power supply.
- Alarm System: Activates after multiple incorrect fingerprint or password entries.
- Flexible Storage: Features a removable shelf to customize interior space.
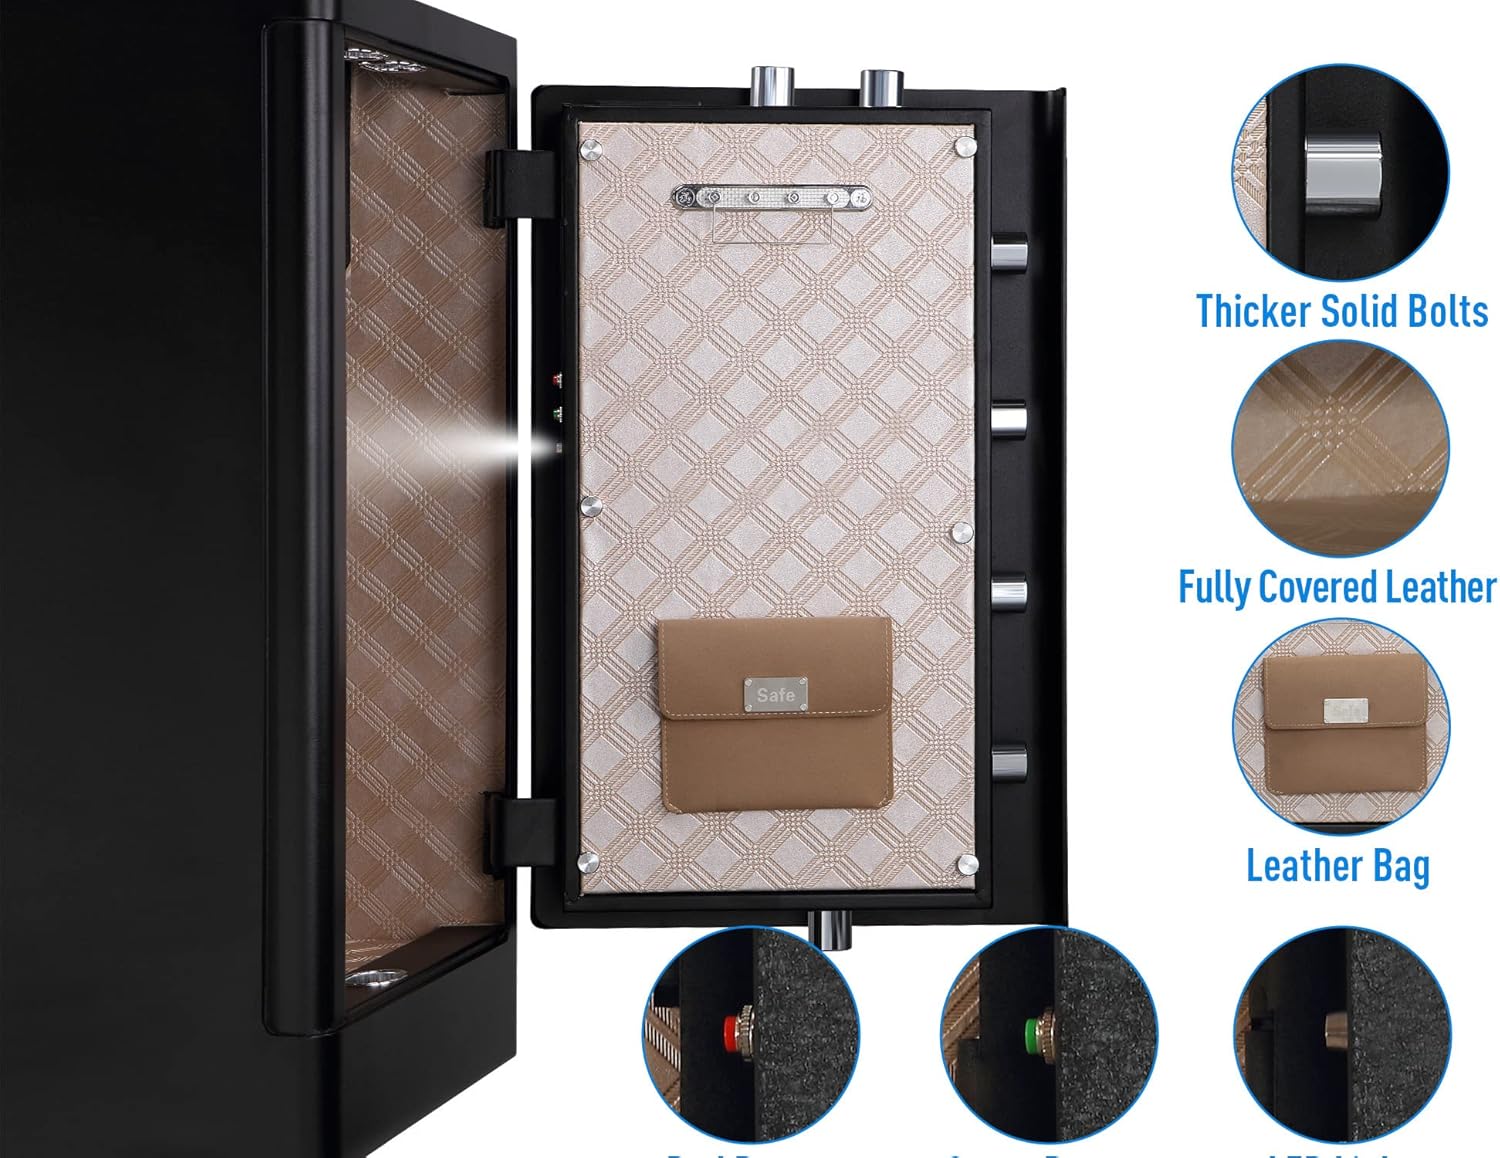
Figure 4.2: Interior details of the safe, showing locking bolts, leather lining, and internal features.

Figure 4.3: Illustration of the separate lock box and hidden compartment within the safe.
5. Setup
5.1 Initial Opening and Battery Installation
- Locate the emergency keyhole, usually concealed behind a cover on the front panel.
- Insert one of the emergency keys and turn it to unlock the safe.
- Open the safe door.
- Inside the door, locate the battery compartment. Install 4 AA batteries (not included) according to the polarity markings.
- Close the battery compartment.
5.2 Mounting the Safe
The safe can be freestanding or securely mounted to a wall or floor using the provided mounting screws.
- Choose a suitable location for the safe.
- Mark the desired drilling points through the pre-drilled holes at the back or bottom of the safe.
- Drill pilot holes in the wall or floor using an appropriate drill bit.
- Align the safe with the drilled holes and secure it using the mounting screws. Ensure the safe is firmly attached.
6. Operating Instructions
6.1 Opening the Safe
Your safe offers multiple access methods:

Figure 6.1: Four methods to open the safe.
A. Using Fingerprint:
- Place your registered finger on the fingerprint scanner.
- If recognized, the indicator light will turn green.
- Turn the knob clockwise within 5 seconds to open the safe.
B. Using Passcode:
- Enter your 4-6 digit passcode on the keypad.
- Press the '#' key to confirm.
- If correct, the indicator light will turn green.
- Turn the knob clockwise within 5 seconds to open the safe.
C. Using Emergency Key:
- Remove the keyhole cover.
- Insert the emergency key and turn it.
- Turn the knob clockwise to open the safe.
6.2 Programming Fingerprints
- With the safe door open, press the internal reset button (usually a small red button on the inside of the door).
- The indicator light will flash, prompting for fingerprint registration.
- Place your finger on the scanner. Lift and repeat 4-5 times until the indicator light confirms successful registration (e.g., a long beep or solid green light).
- You can register multiple fingerprints. Repeat the process for each finger.
6.3 Programming Passcode
- With the safe door open, press the internal reset button.
- Enter your desired 4-6 digit passcode on the keypad.
- Press the '#' key to confirm.
- Re-enter the same passcode and press '#' again to confirm.
- The indicator light will confirm successful registration.
6.4 Alarm System
The safe is equipped with an alarm system to deter unauthorized access.
- If 5 continuous incorrect fingerprint attempts or 3 incorrect passcode entries occur, the alarm will activate for 20 seconds.
- To stop the alarm, enter the correct fingerprint or passcode.

Figure 6.2: Visual representation of the alarm system activation.
6.5 Internal Light
The safe features an internal LED light that illuminates automatically when the door is opened and turns off after approximately 30 seconds.
6.6 External Battery Pack Use
In case the internal batteries are depleted and you cannot open the safe, use the external battery pack:

Figure 6.3: Connecting the external battery pack for emergency power.
- Install 4 AA batteries into the external battery pack.
- Plug the external battery pack into the emergency power port on the safe's front panel (usually located near the keypad).
- You can now use your fingerprint or passcode to open the safe.
- Once the safe is open, replace the internal batteries immediately.
7. Maintenance
7.1 Battery Replacement
When the low battery indicator activates, replace all 4 AA batteries in the internal battery compartment. Use high-quality alkaline batteries for optimal performance.
7.2 Cleaning
Wipe the safe's exterior with a soft, damp cloth. Do not use harsh chemicals or abrasive materials, as they may damage the finish or electronic components.
8. Troubleshooting
- Safe does not open with fingerprint/passcode:
- Ensure batteries are not depleted. Use the external battery pack if necessary.
- Re-enter your passcode carefully.
- Ensure your finger is clean and properly placed on the scanner.
- Try using a different registered fingerprint.
- Use the emergency key to open the safe and re-program your fingerprint/passcode.
- Alarm sounds unexpectedly:
- This indicates multiple incorrect entry attempts. Enter the correct fingerprint or passcode to disarm.
- Internal light not working:
- Check battery levels and replace if necessary.
9. Specifications

Figure 9.1: Dimensions and weight of the Tenamic safe.
| Feature | Detail |
|---|---|
| Brand | Tenamic |
| Model Number | TC80 |
| Exterior Dimensions (D x W x H) | 16.1" x 17.3" x 31.5" |
| Interior Dimensions (D x W x H) | 15.7" x 16.9" x 28.1" |
| Capacity | 5.1 Cubic Feet |
| Item Weight | 110 Pounds |
| Lock Type | Biometric, Electronic Combination Lock, Key |
| Material | Alloy Steel |
| Mounting Type | Freestanding, Tabletop |
| Power Source | Battery Powered (4 x AA batteries, not included) |
| Special Features | Alarm System, Internal LED Light, External Battery Pack |
| Water Resistance Level | Not Water Resistant |
10. Customer Support
For any questions, concerns, or assistance with your Tenamic Deluxe Biometric Fingerprint Safe Box, please contact our after-sales service. We are committed to providing support and resolving any issues you may encounter.
Please refer to the product packaging or the official Tenamic website for the most current contact information.


