Introduction
This manual provides comprehensive instructions for the Phomemo P12 PRO Bluetooth Label Maker. Please read this document carefully before operating the device to ensure proper use, optimal performance, and longevity of your label maker. This device is designed for creating personalized labels for home and office organization.
Package Contents
Upon opening the package, verify that all the following items are included:
- 1 x Phomemo P12 PRO Label Maker
- 2 x Plastic Label Tapes (12mm x 4m, Black on White)
- 4 x Additional Label Tapes (White on Black, Gold on Black, Black on Gold, Black on Silver)
- 1 x USB Charging Cable
- 1 x User Manual (this document)
Setup
1. Charging the Device
The Phomemo P12 PRO features a built-in 1000mAh lithium battery. Before first use, fully charge the device using the provided USB cable. Connect the cable to the label maker's charging port and a standard USB power adapter (not included). A full charge allows for approximately 2.5 hours of continuous use or up to 30 days of standby time.
2. Installing the Print Master App
The label maker operates via a mobile application. Download the "Print Master" app from your device's app store (compatible with iOS and Android). Search for "Print Master" and follow the on-screen instructions to install.
3. Connecting via Bluetooth
- Ensure your label maker is powered on.
- Enable Bluetooth on your smartphone or tablet.
- Open the "Print Master" app.
- Within the app, search for available devices and select "P12 PRO" to establish a connection. The app will indicate a successful connection.
4. Loading Label Tape
Open the label compartment cover. Insert the label tape roll with the label side facing up, ensuring the tape end extends slightly past the cutter. Close the cover securely.
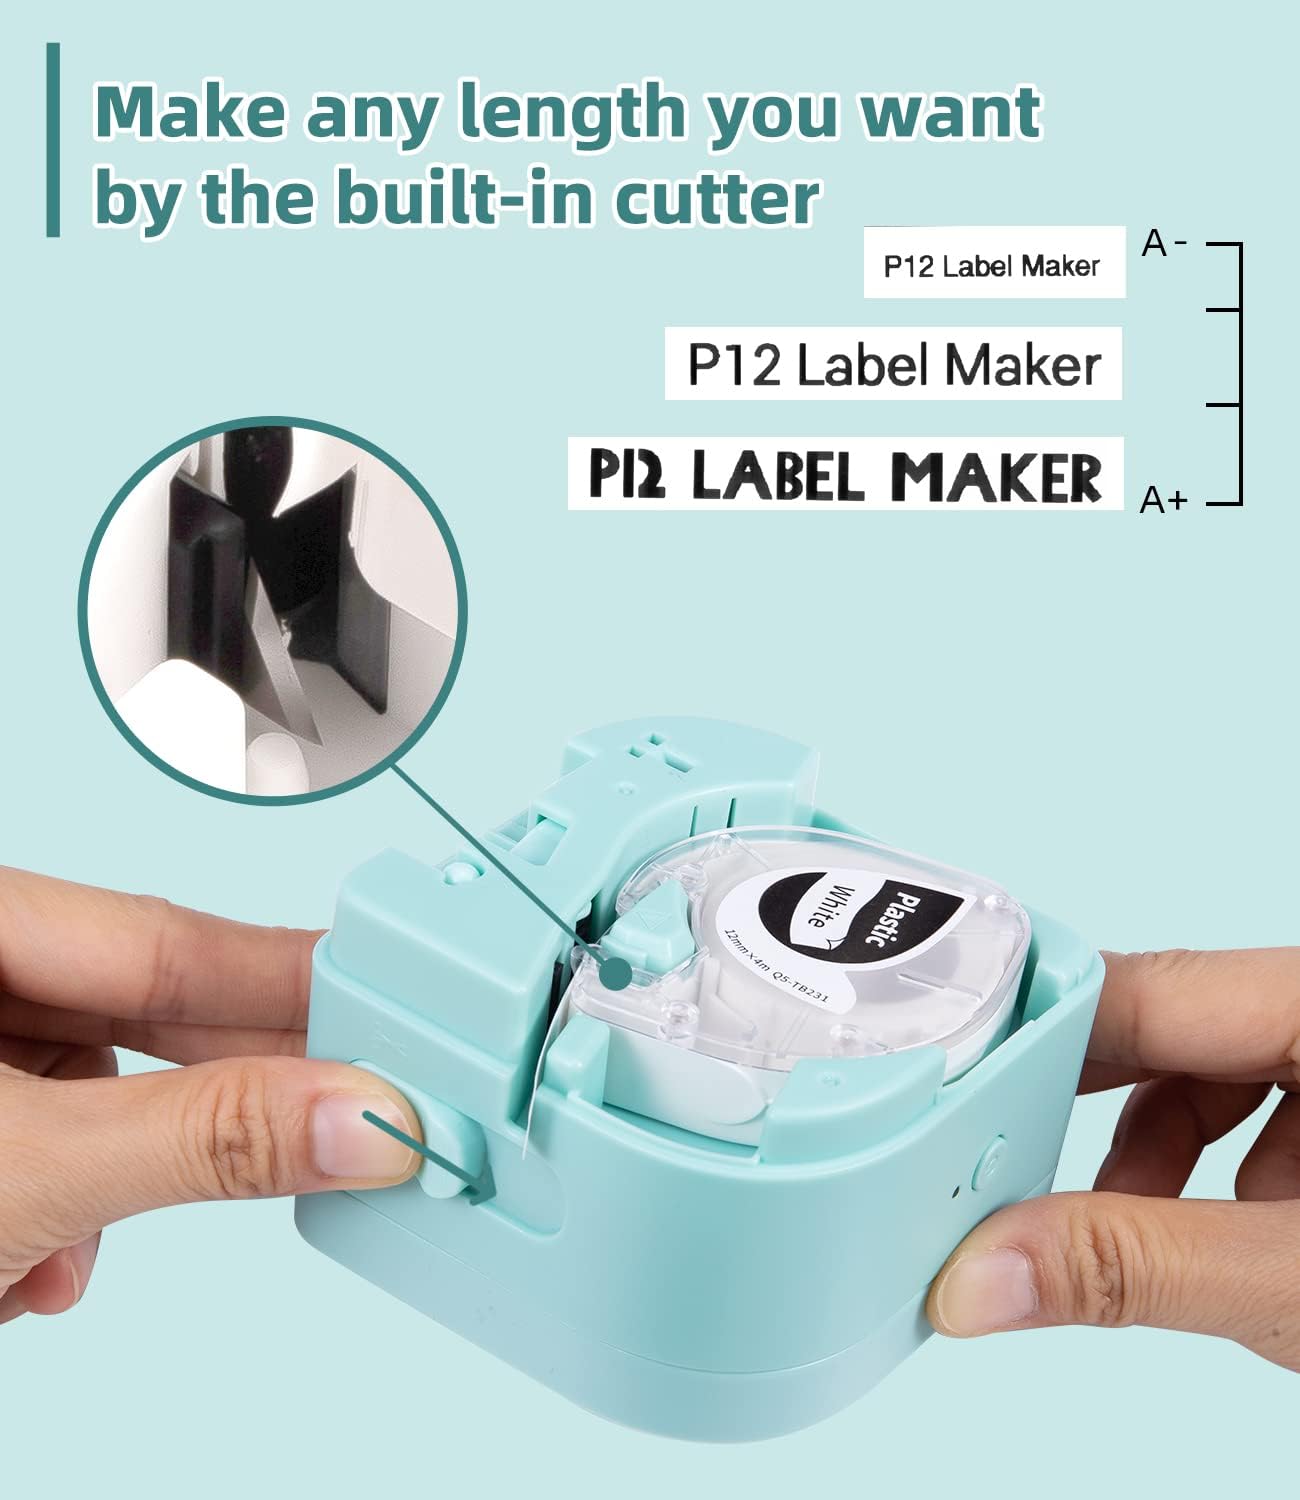
Figure 1: Loading label tape and the built-in cutter mechanism.
Operating Instructions
1. Creating and Editing Labels
Utilize the "Print Master" app to design your labels. The app offers:
- Multiple Fonts and Symbols: Access 12 languages, 8 fonts, 62 frames, and 1048 symbols to personalize your labels.
- Text Input: Supports printing 1-3 lines of text.
- Template Saving: Create and save templates for future use.

Figure 2: Label maker connected to the Print Master app for design.
2. Printing Labels
Once your label design is complete in the app, tap the print button. The label maker will print the label. The P12 PRO supports both thermal labels and thermal transfer labels, offering versatility for various applications.
3. Cutting Labels
After printing, use the built-in cutter to cleanly separate the printed label from the roll. Pull the lever on the side of the device to activate the cutter.
4. Applying Labels
The label tapes feature a split-back design for easy peeling. Carefully peel off the backing and apply the label to a clean, dry surface.

Figure 3: Easy-peel split-back label design.
5. Label Material Compatibility and Durability
The P12 PRO is compatible with various label materials, including:
- Plastic Labels: Durable, high-temperature resistant, cold-resistant, waterproof, and oil-proof.
- Iron-on Labels: Washable labels for fabric.
- Satin-ribbon Labels: Printable for decorative purposes.

Figure 4: Examples of compatible label materials.

Figure 5: Durability features of Phomemo plastic labels.

Figure 6: Various uses for Phomemo P12 PRO labels.
Maintenance
1. Cleaning the Print Head
To maintain print quality, periodically clean the print head. Use a soft, lint-free cloth lightly dampened with isopropyl alcohol. Gently wipe the print head surface. Ensure the device is powered off before cleaning.
2. Cleaning the Exterior
Wipe the exterior of the label maker with a soft, dry cloth. Avoid using abrasive cleaners or solvents.
3. Storage
Store the label maker in a cool, dry place away from direct sunlight and extreme temperatures. Remove any label tape from the compartment if storing for an extended period.
Troubleshooting
1. Device Not Powering On
- Ensure the battery is charged. Connect the label maker to a power source and allow it to charge for at least 30 minutes before attempting to power on again.
2. Cannot Connect via Bluetooth
- Verify Bluetooth is enabled on your mobile device.
- Ensure the label maker is within range (typically 10 meters or 33 feet).
- Restart both the label maker and your mobile device.
- Check if the "Print Master" app has Bluetooth permissions enabled in your device settings.
3. Poor Print Quality or Blank Labels
- Check if the label tape is correctly loaded and not jammed.
- Ensure the label tape is not expired or damaged.
- Clean the print head as described in the Maintenance section.
- Verify that the correct label type is selected in the "Print Master" app if applicable.
4. Label Jamming
- Power off the device.
- Open the label compartment and carefully remove any jammed tape.
- Ensure the tape is loaded correctly and not twisted.
Specifications
| Model Name | P12 PRO |
| Brand | Phomemo |
| Connectivity Technology | Bluetooth |
| Hardware Interface | Bluetooth |
| Control Method | App (Print Master) |
| Printing Technology | Thermal, Thermal Transfer |
| Special Features | Portable, Rechargeable, Dual-mode printing |
| Printer Output | Monochrome (with color tape options) |
| Controller Type | iOS, Android |
| Print Media | Labels (Plastic, Iron-on, Satin-ribbon) |
| Battery | 1000mAh Lithium Battery |
| ASIN | B0BF54JH68 |
| Date First Available | September 13, 2022 |
Warranty and Support
For warranty information, technical support, or customer service inquiries, please refer to the contact details provided on the product packaging or visit the official Phomemo website. Keep your purchase receipt as proof of purchase for warranty claims.


