
Product Overview
The DieseRC 4-Channel Wireless Relay Remote Control Switch (Model 2204G) is designed for convenient remote operation of various electrical devices. It features stable and reliable 433Mhz RF performance, allowing control through walls, floors, and doors within a 50-meter range without obstacles. The receiver includes two 10A relays with normally open, common, and normally closed terminals, providing independent control for each relay. It supports 85V~240V voltage and is suitable for a wide range of applications.

Figure 1: DieseRC 4-Channel Wireless Relay Remote Control Switch with two keyfob transmitters.
Key Features
- 433Mhz RF Wireless Control: Stable and reliable performance with high reception sensitivity.
- Long Range: Control devices up to 50 meters away without obstacles.
- Multiple Operating Modes: Supports Momentary, Toggle, and Latched modes for versatile control.
- Independent Relay Control: Two independent 10A relays with normally open, common, and normally closed terminals.
- Wide Voltage Compatibility: Suitable for AC 85V~240V, including 110V, 120V, 220V, and 240V systems.
- High Quality Components: Relays designed for over 100,000 uses and high-power terminals for stable current.
- Easy Setup: Simple programming for pairing remote controls.
Setup and Wiring
Before installation, ensure all power is disconnected. This device is designed for easy wiring with large screw terminals.
Wiring Connections
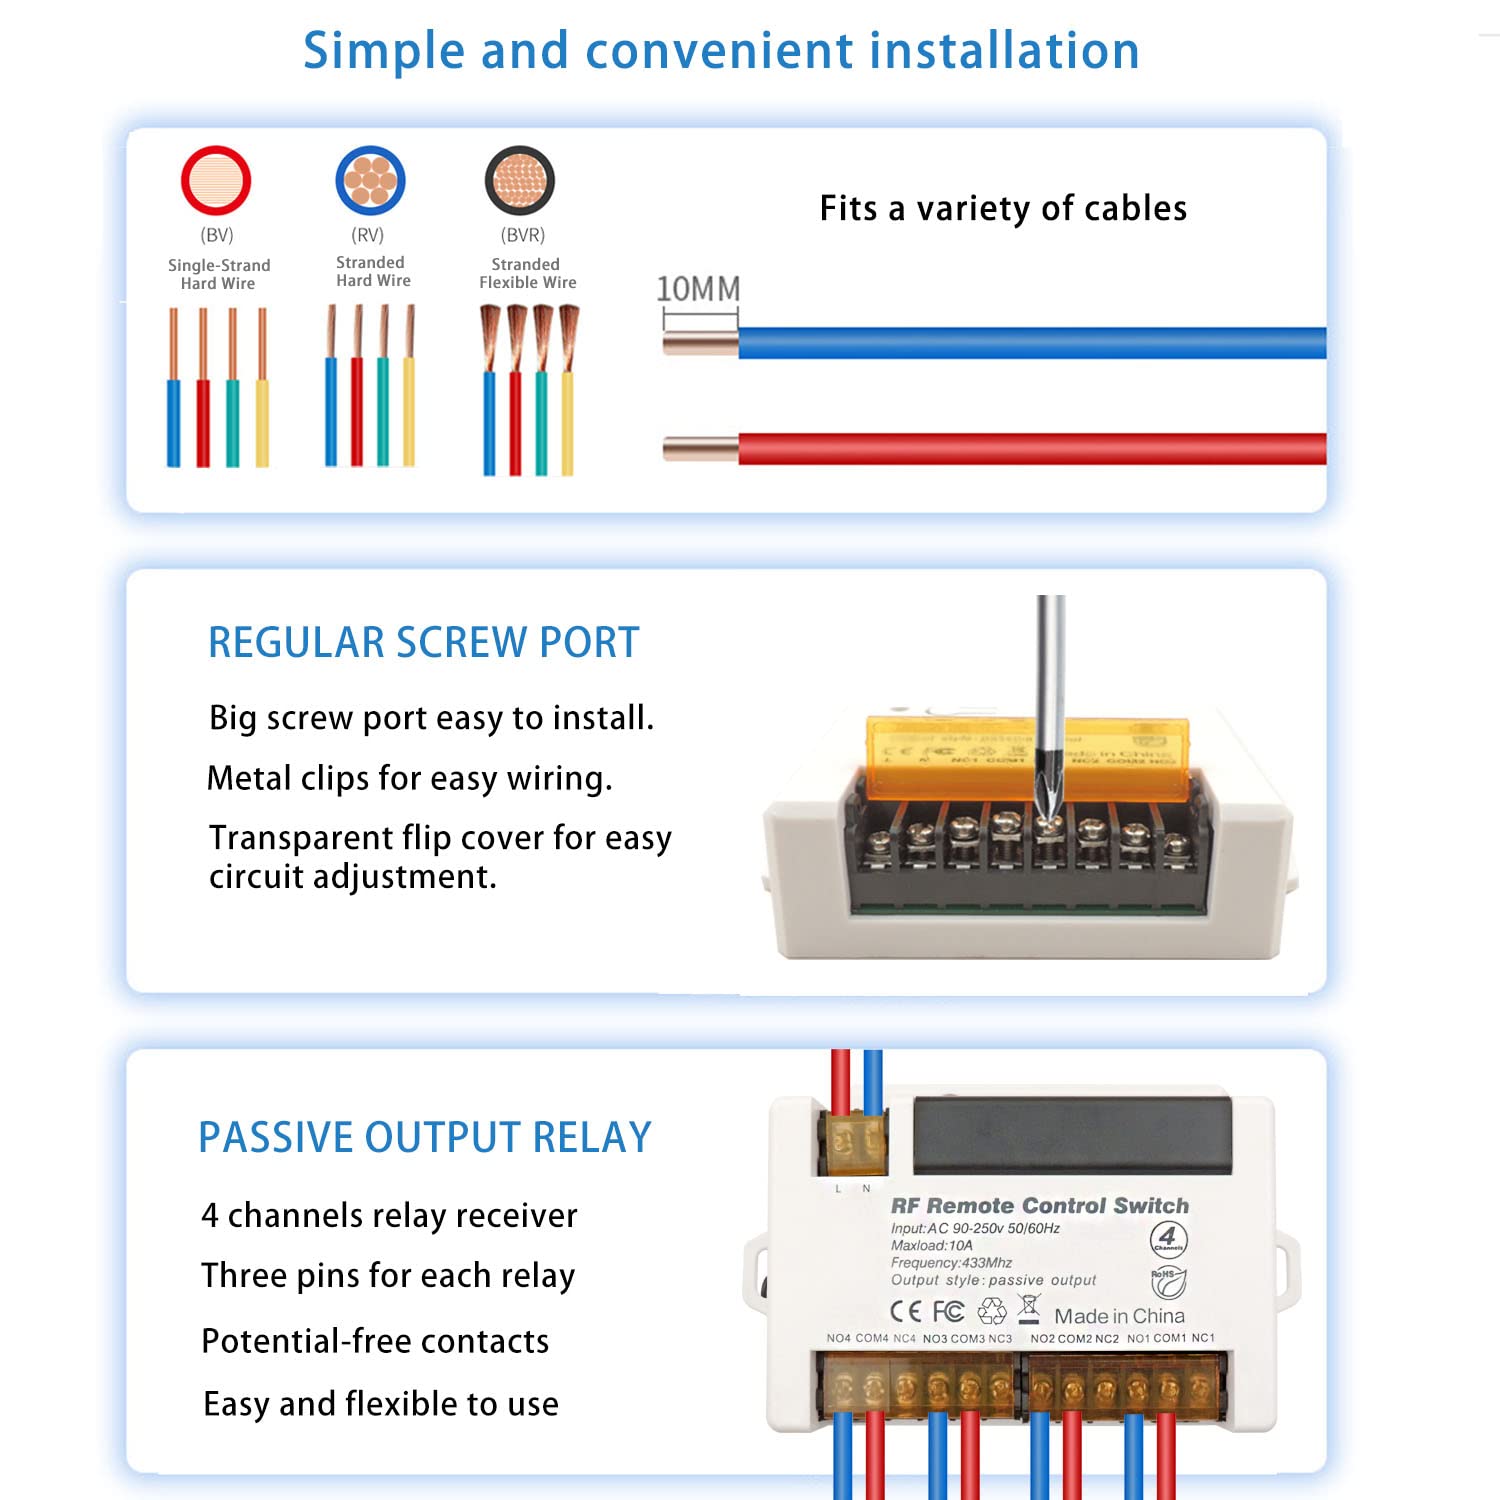
Figure 2: The receiver supports various cable types and features large screw terminals for easy installation. A transparent flip cover allows for circuit adjustment.
The receiver has clearly labeled terminals for input (L, N) and four channels (NO, COM, NC for each). Refer to the circuit diagram for specific wiring configurations based on your application.

Figure 3: Examples of four common wiring modes for AC devices (lights) and DC motors (curtain, garage).
For detailed wiring instructions, consult the circuit diagram provided with your product or refer to the official product video demonstrating wiring and display.
Video 1: This video demonstrates the wiring and display of the DieseRC Relay Remote Control Switch, showing various applications and connections.
Programming the Remote Control
The receiver supports multiple operating modes: Momentary, Toggle, and Latched. You can easily set up the desired mode by following the programming steps below. The product is typically pre-programmed in Toggle mode.

Figure 4: Visual guide for programming the remote control to Momentary, Toggle, and Latched modes.
- Momentary Mode (Mode 1):
- Press the learning button on the receiver 1 time.
- Press button "A" on the remote control.
- Press button "B" on the remote control. The pairing is successful.
- In Momentary mode, the relay turns ON when the button is pressed and turns OFF when released.
- Toggle Mode (Mode 2):
- Press the learning button on the receiver 2 times.
- Press button "A" on the remote control.
- Press button "B" on the remote control. The pairing is successful.
- In Toggle mode, press the button once to turn the relay ON, and press the same button again to turn it OFF.
- Latched Mode (Mode 3):
- Press the learning button on the receiver 3 times.
- Press button "A" on the remote control.
- Press button "B" on the remote control. The pairing is successful.
- In Latched mode, pressing button "A" turns Relay 1 ON and Relay 2 OFF. Pressing button "B" turns Relay 2 ON and Relay 1 OFF. (Note: This mode requires a remote control with at least 2 buttons for independent control of two relays).
For a visual demonstration of programming, please refer to the video below:
Video 2: This video provides a detailed guide on how to program the remote control switch for different operating modes.
Operating Modes Explained
Understanding the different operating modes is crucial for effective use of your DieseRC remote control switch.

Figure 5: Visual representation of the three primary operating modes.
- Momentary Mode: The relay remains active only as long as the remote control button is pressed. Releasing the button deactivates the relay. Ideal for applications requiring temporary contact, such as doorbells or electric strikes.
- Toggle Mode: Pressing the remote control button once activates the relay, and it remains active until the same button is pressed again to deactivate it. Suitable for on/off control of lights or fans.
- Latched Mode: This mode provides alternating control between two relays using two different buttons. Pressing one button activates its corresponding relay and deactivates the other. Pressing the second button activates its relay and deactivates the first. This is useful for controlling devices with two states, like opening/closing a garage door or curtain motor.
Maintenance
To ensure the longevity and optimal performance of your DieseRC Wireless Relay Remote Control Switch, follow these general maintenance guidelines:
- Keep the device clean and free from dust and debris. Use a soft, dry cloth for cleaning.
- Avoid exposing the device to extreme temperatures, humidity, or direct sunlight.
- Ensure all wiring connections are secure and free from corrosion. Periodically check connections for any looseness.
- Do not attempt to open the main receiver unit beyond the access panel for the learning button, as this may void the warranty or cause damage.
Troubleshooting
If you encounter issues with your DieseRC Wireless Relay Remote Control Switch, try the following troubleshooting steps:
- No Response from Remote:
- Check the battery in the remote control. The remote controls come with 2 x 12V batteries (included).
- Ensure the receiver is powered correctly (85V~240V AC).
- Verify that the remote control is properly paired with the receiver. Follow the programming steps in the "Setup and Wiring" section.
- Confirm that the remote control is within the effective operating range (up to 50 meters without obstacles). Signal strength can be affected by walls and other obstructions.
- Incorrect Operating Mode:
- Re-program the desired operating mode (Momentary, Toggle, or Latched) by following the programming instructions precisely.
- Resetting the Receiver:
- To clear all programmed remote controls from the receiver, press the learning button on the receiver 8 times. The indicator light will flash, confirming the reset. After a reset, all previously paired remote controls will no longer work, and you will need to re-program them.
- Relay Not Activating/Deactivating:
- Check all wiring connections to ensure they are secure and correctly matched to the device being controlled.
- Verify that the load connected to the relay does not exceed the maximum current rating of 10A.

Figure 6: The internal components of the relay receiver, highlighting the antenna and learning button. The image also illustrates the signal's ability to pass through walls.
Specifications
| Feature | Specification |
|---|---|
| Brand | DieseRC |
| Model Number | 2204G |
| Operating Voltage | AC 85V~240V (50/60Hz) |
| Current Rating | 10 Amps (Max Load) |
| Frequency | 433Mhz RF |
| Output Style | Passive Output (Dry Contacts) |
| Contact Type | Normally Open (NO), Common (COM), Normally Closed (NC) |
| Remote Control Batteries | 2 x 12V batteries (included) |
| Dimensions | 7.36 x 3.78 x 1.54 inches |
| Weight | 7.76 ounces |
| Material | Copper (Contact Material) |
| Country of Origin | China |
Warranty and Support
DieseRC is committed to providing high-quality products and excellent after-sales service. If you encounter any issues or have questions regarding your 4-Channel Wireless Relay Remote Control Switch, please contact DieseRC customer support. We are dedicated to resolving any problems you may experience with our remote control devices and solutions.
For further assistance, please visit the official DieseRC Store on Amazon.


