
1. Introduction
This manual provides detailed instructions for the CallToU Caregiver Pager Wireless Call Button Vibration Pager (Model CC21). This system is designed to assist caregivers and individuals who are hard of hearing, elderly, or disabled by providing a reliable and portable alert mechanism. Please read this manual thoroughly before using the product to ensure proper setup and operation.
2. Product Overview
2.1 Components
- 1 x Receiver Unit
- 2 x SOS Panic Call Buttons
- Lanyards for Call Buttons
- Adhesive Pads for Call Buttons
- User Manual
2.2 Key Features
- Wireless Range: Up to 1000 feet (305 meters) in open areas, approximately 500 feet indoors.
- Multiple Alert Modes: Ringtone, Vibration, Flashing Light, or combinations thereof.
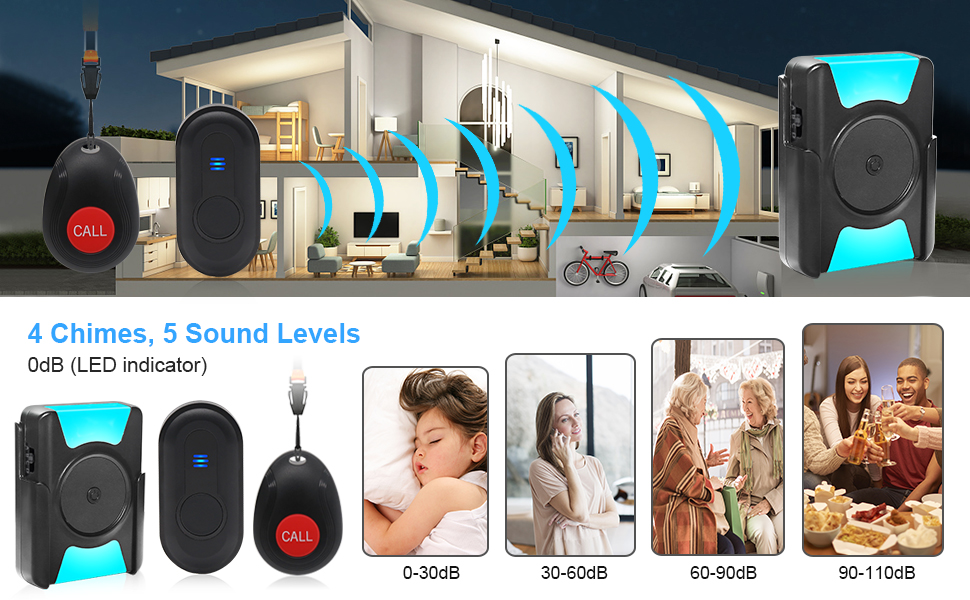
- Adjustable Volume: 5 levels (0-110dB) to suit various needs, including a silent mode with only LED indication.
- Waterproof Call Buttons: IP55 rated for use in bathrooms or near water.
- Portable Receiver: Equipped with a belt clip for easy carrying.
- Easy Pairing: Simple setup process for connecting call buttons to the receiver.
2.3 Product Diagram

The receiver unit features clearly marked buttons for mode selection, volume control, and ringtone changes. It also includes an LED indicator for visual alerts and a back clip for portability. The call buttons are compact and designed for easy activation.

This image displays the main components of the system: the portable receiver and two call buttons, one with a lanyard and another without, highlighting their compact design.
2.4 Range and Waterproof Features

The system offers extensive coverage, allowing the caregiver to move freely within a large home or yard while remaining connected. The signal strength is designed for reliable transmission through various indoor environments.

The waterproof design of the call buttons ensures durability and functionality even when exposed to moisture, providing peace of mind for users in various settings.
3. Setup
3.1 Battery Installation
- Receiver: The receiver unit requires 3 AAA 1.5V batteries (not included). Open the battery compartment on the back of the receiver and insert the batteries, ensuring correct polarity.
- Call Buttons: Each call button comes with a pre-installed 12V battery. If replacement is needed, carefully open the button casing and replace the 12V battery.

Ensure batteries are inserted correctly to avoid damage to the devices. The call button battery is typically long-lasting.
3.2 Pairing Call Buttons with Receiver
The call buttons are usually pre-paired with the receiver. If re-pairing is necessary or if you add new call buttons:
- Turn on the receiver.
- Press and hold the Volume Down button on the receiver for approximately 5 seconds until the LED indicator flashes rapidly. This indicates pairing mode.
- Press the call button you wish to pair. The receiver will emit a sound and the LED will flash, confirming successful pairing.
- To exit pairing mode, press any other button on the receiver or wait for 10 seconds.
3.3 Installation of Call Buttons
Call buttons can be installed using the provided lanyard or adhesive pads.
- Lanyard: Attach the lanyard to the call button for wearing around the neck or wrist.
- Adhesive Pads: For fixed locations (e.g., bedside, bathroom wall), use the adhesive pads to mount the call button. Ensure the surface is clean and dry before applying.

Strategic placement ensures the call button is always within reach when needed.
4. Operation
4.1 Activating an Alert
To send an alert, simply press the CALL button on the panic button. The receiver will activate according to its set mode.
This visual demonstrates the primary function: a user pressing the call button to alert their caregiver, who is then notified by the receiver's audible and visual signals.
4.2 Receiver Modes
The receiver offers four distinct alert modes, selectable via the "Mode Selection" switch (A, B, C, D) on the side of the unit:
- Mode A: Ringtone + Vibration
- Mode B: Ringtone + Strobe (Flashing Light)
- Mode C: Ringtone + Vibration + Strobe (All three combined)
- Mode D: Ringtone Only

The LED indicator provides a visual cue for the active mode, enhancing usability for caregivers.
4.3 Volume Adjustment
Use the Volume Up and Volume Down buttons on the receiver to adjust the alert volume. There are 5 volume levels, ranging from 0dB (silent, LED only) to 110dB (loudest).

This feature allows customization for various situations, such as silent monitoring during sleep or loud alerts in noisy environments.
4.4 Ringtone Selection
Press the Ringtone button on the receiver to cycle through the available melodies. There are 4 distinct ringtones to choose from.
4.5 Video Demonstrations
Video 1: Demonstrates how the CallToU Hearing Impaired Doorbell (similar to the pager) functions, showing quick signal transmission and various alert types.
Video 2: Shows the CallToU Wireless Doorbell in use for home, classroom, elderly, and kids, highlighting its versatility.
Video 3: Illustrates the CallToU Wireless Caregiver Pager as a portable doorbell for home use, emphasizing its convenience.
Video 4: Features the CallToU Waterproof Portable Deaf Doorbell with flashing light, demonstrating its accessibility features.
Video 5: Shows the CallToU Wireless Doorbell for the hearing impaired in a home setting, focusing on its practical application.
5. Maintenance
- Cleaning: Wipe the receiver and call buttons with a soft, dry cloth. Do not use abrasive cleaners or immerse the receiver in water.
- Battery Replacement: Replace batteries in the receiver when the alert signals become weak or inconsistent. Replace the 12V battery in the call button if it fails to trigger the receiver.
- Storage: Store the device in a cool, dry place when not in use for extended periods.
6. Troubleshooting
| Problem | Possible Cause | Solution |
|---|---|---|
| Receiver does not alert. | Low or dead batteries in receiver or call button. Not paired. Out of range. | Replace batteries. Re-pair the call button. Move receiver closer to the call button. |
| Alert is too quiet or too loud. | Volume setting is incorrect. | Adjust volume using the Volume Up/Down buttons. |
| Receiver does not vibrate or flash. | Incorrect mode selected. | Change the mode selection switch (A, B, C, D) to include vibration or strobe. |
| Call button not responding. | Low or dead battery. Button malfunction. | Replace call button battery. If issue persists, contact customer support. |
7. Specifications
- Model: CC21
- Wireless Range: 1000ft (305m) open area, 500ft (150m) indoor
- Receiver Power: 3 x AAA 1.5V batteries (not included)
- Call Button Power: 1 x 12V battery (included)
- Waterproof Rating (Call Button): IP55
- Volume Levels: 5 (0-110dB)
- Ringtones: 4 melodies
- Alert Modes: Ringtone + Vibration, Ringtone + Strobe, Ringtone + Vibration + Strobe, Ringtone Only
- Dimensions (Receiver): Approximately 3.74 x 3.35 x 2.95 inches
- Item Weight: 7 ounces (total package)
8. Warranty & Support
CallToU products are designed for reliability and performance. For warranty information, technical support, or any product-related inquiries, please refer to the contact details provided on the product packaging or visit the official CallToU website.
Manufacturer: CallToU
Customer Service: Please contact CallToU Direct for assistance.


