1. Introduction
This manual provides essential information for the safe and effective operation, setup, and maintenance of your HITBOX MT2000II 4-in-1 Welding Machine. The MT2000II is a versatile multi-process inverter welder capable of MIG/MAG, MMA (Stick), and Lift TIG welding, designed for both hobbyists and professionals. Please read this manual thoroughly before using the machine.

Figure 1: HITBOX MT2000II 4-in-1 Welding Machine
2. Safety Instructions
Welding operations involve significant risks. Always adhere to safety precautions to prevent injury or damage. This section outlines general safety guidelines. Refer to local regulations and standards for comprehensive safety information.
- Electric Shock: Welding current can cause fatal electric shock. Ensure proper grounding. Do not touch live electrical parts. Wear dry, insulating gloves and protective clothing.
- Fumes and Gases: Welding produces fumes and gases that can be hazardous to health. Work in a well-ventilated area. Use fume extractors if necessary.
- Arc Rays: Arc rays can burn eyes and skin. Always wear a welding helmet with appropriate shade lenses and protective clothing.
- Fire and Explosion: Welding sparks and hot metal can cause fires. Keep flammable materials away from the welding area. Have a fire extinguisher readily available.
- Burns: Hot metal and sparks can cause severe burns. Wear protective gloves and clothing.
- Machine Placement: Place the machine on a stable, level surface. Ensure adequate ventilation around the machine to prevent overheating.
3. Package Contents
Upon unpacking, verify that all items listed below are present and undamaged. If any items are missing or damaged, contact your supplier immediately.

Figure 2: Included Components
- MIG 15AK Torch (3.0 m)
- Earth Clamp (1.5 m)
- Electrode Holder (1.5 m)
- Gas Hose (1.5 m)
- Flux Cored Wire (0.8 mm, 1 kg)
- Contact Tips (0.8 mm * 2; 1.0 mm * 2)
- Drive Rollers (V: 0.8 mm / 1.0 mm)
- Hammer
- Hose Clamp * 2
- Instruction Manual
4. Product Overview
The HITBOX MT2000II is a compact and powerful welding machine featuring a color LCD display for intuitive control and synergic settings. It integrates multiple welding processes into one unit, making it highly adaptable for various welding tasks.
4.1 Key Features
- 4-in-1 Multi-Process: Supports Gas MIG, Gasless MIG, MMA, and Lift TIG welding.
- Color LCD Display: Provides clear and readable parameter settings.
- Synergic Control: Simplifies MIG welding by automatically adjusting wire speed and voltage based on selected mode and wire size.
- IGBT Inverter Technology: Ensures stable arc, high efficiency, and reliable performance.
- Advanced Protection: Built-in safeguards against overvoltage, overcurrent, overheating, and overload.
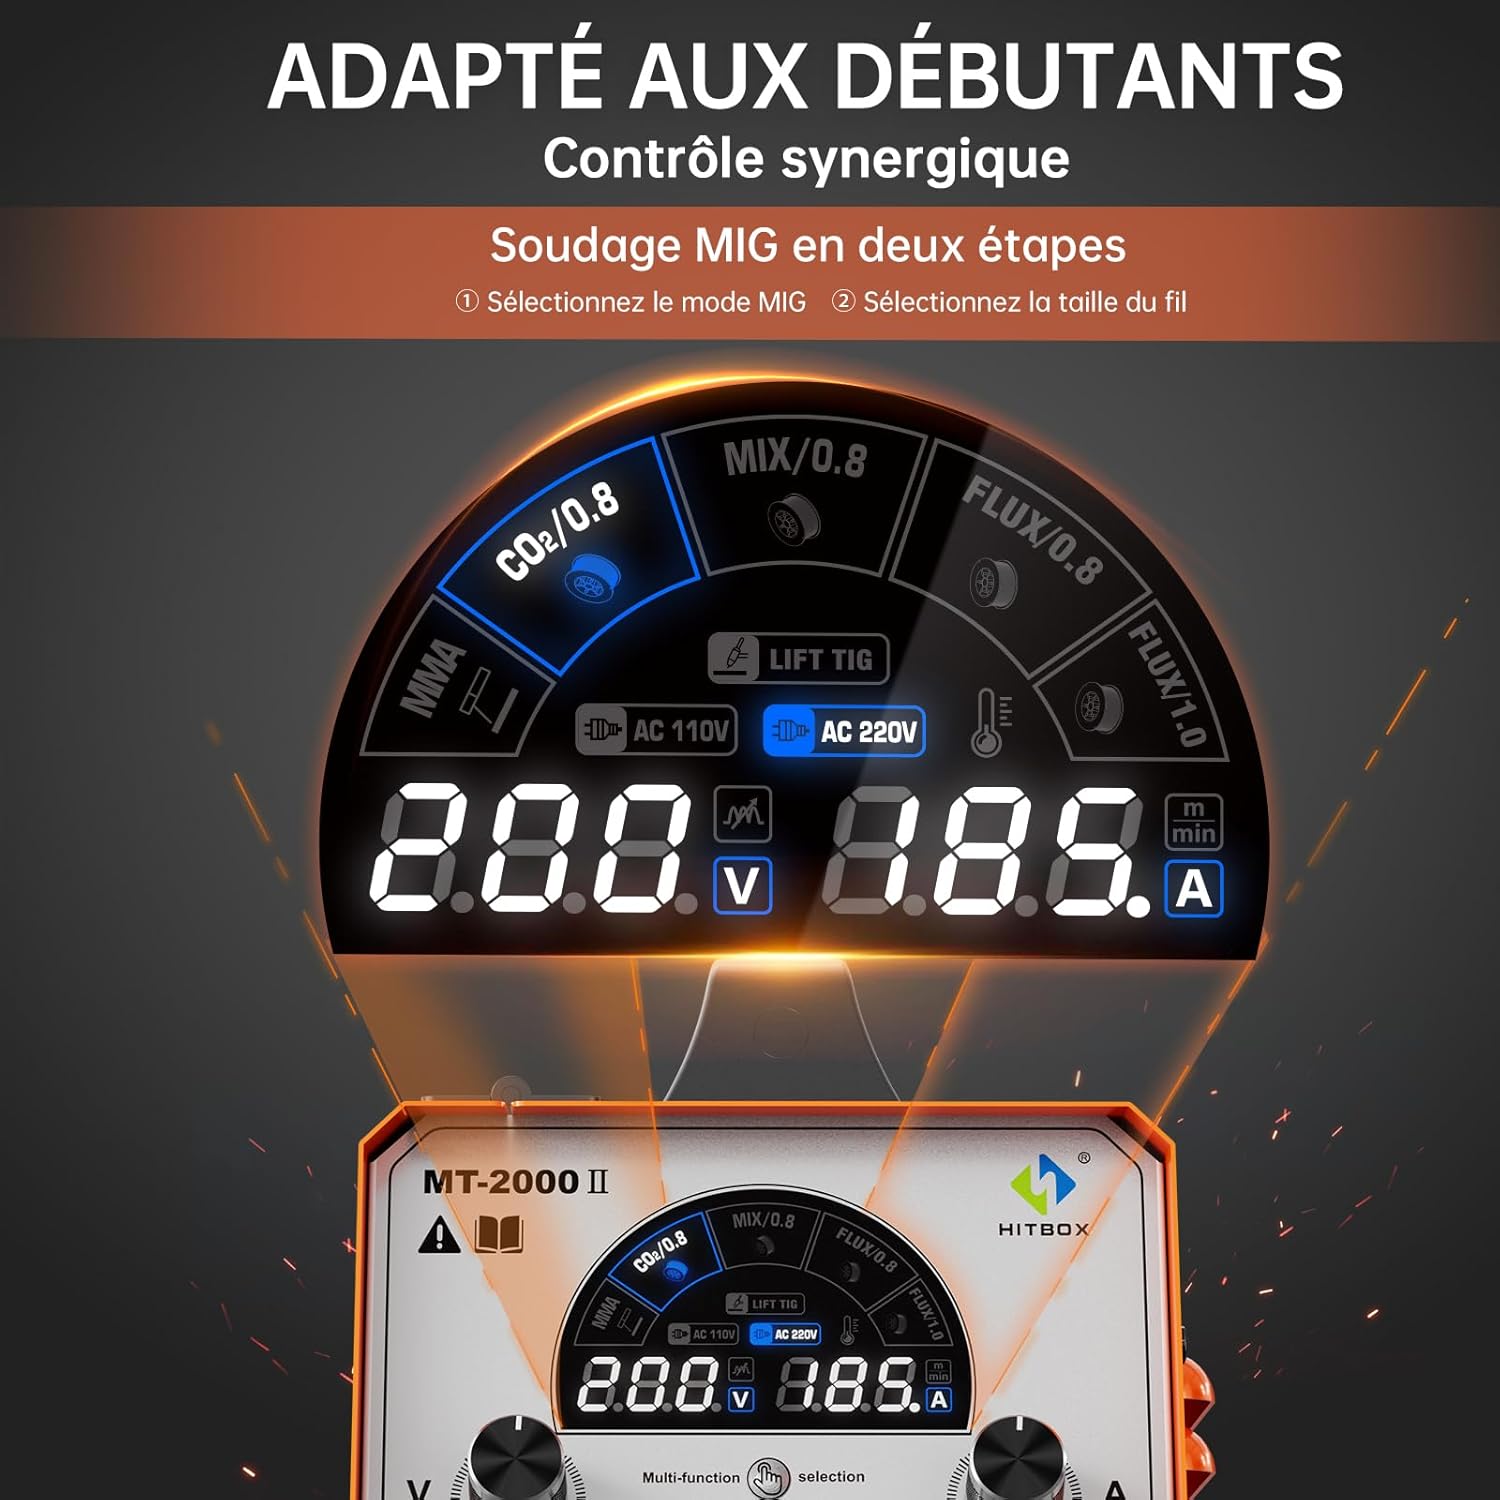
Figure 3: Color LCD Control Panel with Synergic Settings

Figure 4: Superior Performance Features

Figure 5: MCU & IGBT Control for Stable Welding
5. Setup
5.1 Power Connection
Connect the welding machine to a suitable 230V AC power supply. Ensure the power outlet is properly grounded and capable of handling the machine's maximum current draw. The machine operates on DC power internally.
5.2 Connecting Welding Accessories
The MT2000II features standard connectors for welding accessories. Refer to Figure 6 for connection points.

Figure 6: Connection Types for Different Welding Modes
- Earth Clamp: Connect the earth clamp cable to the negative (-) terminal on the front panel. Securely attach the clamp to the workpiece or welding table, ensuring good electrical contact.
- MIG Torch: Connect the MIG torch to the central Euro connector on the front panel.
- Electrode Holder (for MMA): Connect the electrode holder cable to the positive (+) terminal on the front panel.
- TIG Torch (for Lift TIG): For Lift TIG, a WP-17V TIG torch (not included) is required. Connect the TIG torch to the negative (-) terminal.
5.3 Wire Installation (for MIG)
The machine supports 1kg spools of 0.8mm and 1.0mm solid or flux-cored wire.

Figure 7: Wire Feed Mechanism
- Open the wire spool compartment.
- Place the wire spool onto the spindle, ensuring it rotates freely.
- Thread the wire through the guide tube and into the drive roller mechanism.
- Close the drive roller tension arm and adjust the tension appropriately for the wire type and diameter.
- Feed the wire through the MIG torch liner until it exits the contact tip.
5.4 Gas Connection (for Gas MIG)
For Gas MIG welding, connect a suitable shielding gas cylinder (e.g., CO2 or Argon/CO2 mix) to the gas inlet on the rear of the machine using the provided gas hose and hose clamps. Ensure all connections are secure and leak-free.
6. Operating Modes
The MT2000II offers four distinct welding processes. Select the desired mode using the 'Selection' button on the control panel.

Figure 8: Available Welding Modes
6.1 MIG Welding (Gas / Gasless)
- Gas MIG: Uses shielding gas (e.g., CO2, Argon/CO2 mix) and solid wire (0.8mm/1.0mm) for welding 1-8mm thick materials. Provides clean welds with minimal spatter.
- Gasless MIG: Uses flux-cored wire (0.8mm/1.0mm) which contains a flux that produces its own shielding gas. Suitable for outdoor use and welding 1-8mm thick materials.
- Operation: Select the MIG mode (Gas or Gasless) and the wire diameter on the control panel. The synergic control will automatically set optimal wire speed and voltage. Fine-tune settings as needed.
6.2 MMA Welding (Stick)
- Process: Uses coated electrodes (2.5mm, 3.2mm, 4.0mm) for welding 2-12mm thick materials.
- Operation: Select MMA mode. Adjust the current (22-200 amps) according to the electrode type and material thickness. The machine features easy arc ignition, low spatter, and stable current for good performance.
6.3 Lift TIG Welding
- Process: Suitable for welding stainless steel, iron sheet, and carbon steel with 1.6mm and 2.4mm tungsten electrodes, for material thicknesses of 1-6mm.
- Requirement: A WP-17V TIG torch (not included) is required for Lift TIG welding.
- Operation: Select Lift TIG mode. Connect the TIG torch to the negative (-) terminal. Initiate the arc by gently touching the tungsten electrode to the workpiece and lifting it slightly.
7. Operation
The MT2000II features a user-friendly control panel. Use the 'Selection' button to cycle through welding modes. The rotary knobs allow for precise adjustment of welding parameters such as voltage and wire speed (in manual MIG mode) or amperage (in MMA/TIG modes).
For MIG welding, the synergic control simplifies setup: select the MIG mode (Gas/Gasless) and the wire diameter. The machine will automatically suggest optimal settings, which can then be fine-tuned.
8. Maintenance
Regular maintenance ensures the longevity and optimal performance of your welding machine.
- Cleaning: Periodically clean the machine's exterior and ventilation openings to prevent dust and debris buildup. Use compressed air to clear internal components if necessary, ensuring the machine is unplugged.
- Cable Inspection: Regularly inspect all welding cables, torches, and clamps for damage, fraying, or loose connections. Replace damaged components immediately.
- Contact Tips and Nozzles: For MIG welding, regularly check and replace worn contact tips and clean spatter from nozzles to ensure consistent wire feeding and gas flow.
- Drive Rollers: Ensure drive rollers are clean and free of debris. Verify correct roller size for the wire being used and adjust tension as needed.
9. Troubleshooting
This section addresses common issues you might encounter. For problems not listed here, contact HITBOX customer support.
| Problem | Possible Cause | Solution |
|---|---|---|
| No power to the machine | Power cable disconnected, circuit breaker tripped, faulty power switch. | Check power cable connection. Reset circuit breaker. Contact support if switch is faulty. |
| No arc / Weak arc | Poor ground connection, incorrect settings, worn electrode/contact tip, wrong polarity. | Ensure good ground contact. Verify welding parameters. Replace consumables. Check polarity for MIG/MMA. |
| Wire feeding issues (MIG) | Incorrect drive roller tension, clogged liner, wrong drive roller size, spatter in contact tip. | Adjust drive roller tension. Clean or replace liner. Use correct drive roller. Clean/replace contact tip. |
| Overheat indicator on | Exceeded duty cycle, blocked ventilation. | Allow machine to cool down. Ensure clear ventilation paths. |
10. Specifications
| Feature | Specification |
|---|---|
| Manufacturer | HITBOX |
| Model | MT2000II |
| Product Dimensions (L x W x H) | 42 x 29 x 35 cm |
| Weight | 9.7 kg |
| Voltage | 230 Volts |
| Power Type | DC (Internal) |
| Noise Level | 52 Decibels |
| Included Components | 1*Instruction Manual, MIG 15AK Torch, Earth Clamp, Electrode Holder, Gas Hose, Flux Cored Wire, Contact Tips, Drive Rollers, Hammer, Hose Clamps |
| Batteries Included / Required | No |
| Usage | Auto Repair, DIY, General Fabrication |
11. Warranty and Support
HITBOX provides reliable after-sales service with over 10 years of experience in welding equipment. Should you encounter any issues during use, please contact our professional and responsive technical support team. Our online customer service is available 24/7 to assist you in finding a quick and effective solution.
For support, please visit the official HITBOX website or contact your retailer.


