
1. Introduction
Thank you for choosing the ABASK Q40S Dashcam. This device is designed to provide reliable video recording of your journeys, enhancing safety and providing evidence in case of incidents. It features Full HD 1080P recording, a wide-angle lens, night vision, G-sensor, loop recording, and parking monitoring capabilities. Please read this manual carefully before use to ensure proper installation and operation.
2. Package Contents
Please check the package for the following items:
- ABASK Q40S Dashcam
- Rear Camera
- Suction Cup Mount
- Car Charger (Cigarette Lighter Adapter)
- Mini USB Cable (0.6 m)
- 32GB SD Card
- Tape & Screws (for rear camera installation)
- User Manual

Figure 2.1: Package Contents
3. Product Features
- Full HD 1080P Dual Recording: The dashcam supports Full HD 1080P recording for both front and rear cameras, capturing clear video of the road ahead and behind. Equipped with a 6-layer HD lens and WDR technology, it provides crystal-clear video and image quality day or night, regardless of lighting conditions.

Figure 3.1: Dual Camera Recording (170° Front, 140° Rear)
- Super Night Vision: Utilizes multiple technologies to maximize night vision, ensuring clear recordings in low-light environments.

Figure 3.2: Super Night Vision
- Parking Monitoring & Motion Detection: The dashcam automatically turns on and starts recording video when an impact is detected while your car is parked, providing evidence if your car is scratched or damaged. This feature requires an ACC hardwire kit (not included) to connect the camera to the car battery for 24-hour surveillance.

Figure 3.3: 24-Hour Parking Monitoring
- Loop Recording & G-Sensor: The loop recording function automatically overwrites the oldest unlocked video files to free up memory on the SD card, ensuring continuous recording. The variable-sensitivity G-Sensor (Gravity Sensor) automatically detects sudden collisions or braking, recording and locking the corresponding video immediately. These locked videos cannot be overwritten, serving as crucial evidence.

Figure 3.4: Loop Recording
- Parking Assistance System: When reverse gear is engaged, the screen automatically displays the rear view with parking guidelines, assisting drivers in safe parking maneuvers. The red reverse line on the rear camera extension cable must be connected to the positive pole of the reverse light.

Figure 3.5: Parking Assistance System
- WDR (Wide Dynamic Range): Improves video quality in high-contrast lighting conditions, ensuring clear images in both bright and dark areas of the frame.
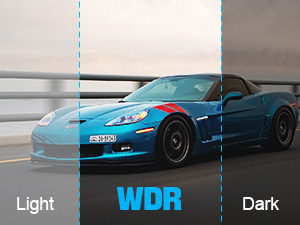
Figure 3.6: WDR Technology
4. Setup & Installation
Follow these steps to install your ABASK Q40S Dashcam:
- Clean the Windshield: Use a clean cloth to wipe the area on your windshield where the dashcam will be mounted. Ensure it is free of dust and grease for optimal suction.
Video 4.1: Dashcam Installation and Operation Guide. This video demonstrates cleaning the windshield, attaching the suction cup, routing cables, installing the rear camera, plugging in the power adapter, and the camera automatically starting.
The video shows a hand cleaning the windshield with a wipe.
- Attach the Suction Cup Mount: Secure the suction cup mount to the cleaned area of your windshield. Ensure it is firmly attached.
The video shows a hand attaching the dashcam with its suction cup mount to the windshield.
- Route and Hide Cables: Connect the power cable to the dashcam. Carefully route the cable along the edge of the windshield and down the A-pillar to conceal it. This provides a neat and safe installation.

Figure 4.1: Cable Routing
The video shows hands tucking the power cable into the car's trim along the windshield and A-pillar.
- Install the Rear Camera: Mount the rear camera on your rear windshield using the provided tape and screws. Connect its cable to the main dashcam unit. Ensure the red reverse line on the rear camera extension cable is connected to the positive pole of your car's reverse light for parking assistance functionality.
The video shows a hand installing the rear camera on the interior of the rear windshield.
- Plug in the Car Charger: Insert the car charger into your vehicle's cigarette lighter socket.
- Power On: The dashcam will automatically power on and begin recording when you start your car.
- Format the Micro SD Card: Before first use, or if you encounter recording issues, format the Micro SD card through the dashcam's settings menu. Navigate to the settings, find the 'Format' option, and confirm. This ensures optimal performance and compatibility.
The video demonstrates navigating the menu to the 'Format' option and confirming the formatting of the Micro SD card.
5. Operation
Here are the basic operating instructions for your dashcam:
- Automatic Recording: Once powered on, the dashcam automatically starts recording. The screen will display the live view from the front and/or rear cameras.
- Viewing Recorded Footage: To view recorded videos, stop the current recording (if active), switch to playback mode, and then navigate through the files. You can select and play back specific video clips.
The video demonstrates stopping video recording, switching to camera mode, and then playing back recorded images/videos.
- G-Sensor Activation: In the event of a sudden impact or collision, the built-in G-Sensor will automatically detect the event and lock the current video file, preventing it from being overwritten by loop recording.
- Parking Monitor: If the optional hardwire kit is installed, the dashcam will automatically detect vibrations or impacts while parked and record a short video clip, providing surveillance for your vehicle.
- Loop Recording: The dashcam continuously records in short segments (e.g., 1, 3, or 5 minutes). When the memory card is full, the oldest unlocked files are automatically overwritten to make space for new recordings.
6. Maintenance
- Cleaning: Use a soft, dry cloth to clean the camera lens and screen. Avoid using abrasive cleaners or solvents.
- SD Card Care: Regularly format your Micro SD card (e.g., once a month) to maintain optimal performance and prevent data corruption. Use a high-quality Class 10 or higher Micro SD card.
- Temperature: Avoid exposing the dashcam to extreme temperatures for extended periods, as this can affect battery life and device performance.
7. Troubleshooting
- Camera not turning on: Ensure the car charger is properly connected to both the dashcam and the cigarette lighter socket. Check if the car's ignition is on.
- Recording stops unexpectedly: The SD card might be full or corrupted. Format the SD card. Ensure you are using a high-speed (Class 10 or higher) SD card.
- Poor video quality: Clean the camera lens. Ensure the protective film has been removed from the lens. Check the video resolution settings.
- Rear camera not working: Check all cable connections between the rear camera and the main unit. Ensure the rear camera cable is not damaged.
- Parking monitor not working: This feature requires a hardwire kit (not included) to be installed and correctly connected to your car's battery.
8. Specifications
| Feature | Description |
|---|---|
| Brand | ABASK |
| Model Number | Q40S |
| Vehicle Service Type | Car |
| Connectivity Technology | USB |
| Special Features | Loop Recording, G-Sensor |
| Video Recording Resolution | 1296p (Front), 1080P (Overall system) |
| Mounting Type | Suction Cup Mount |
| Color | Grey |
| Field of View | 170 Degrees (Front), 140 Degrees (Rear) |
| Control Method | Touch |
| Screen Size | 4 inches (LCD) |
| Battery Type | Lithium-ion |
| Included Memory Card Size | 32 GB |
| Item Dimensions (L x W x H) | 9.9 x 6 x 3.9 cm |
| Item Weight | 32 Grams |
9. Warranty & Support
ABASK products are designed for reliability and performance. For any issues or questions regarding your ABASK Q40S Dashcam, please refer to the contact information provided with your purchase or visit the official ABASK support website. We are committed to providing satisfactory solutions within 24 hours.


