
1. Introduction and Overview
This manual provides essential information for the safe and efficient operation of your OOYCYOO MPPT 100A Solar Charge Controller. This device is designed to manage power flow from your solar panels to your battery bank, ensuring optimal charging and protecting your batteries from overcharge and over-discharge. It features Maximum Power Point Tracking (MPPT) technology for high efficiency and supports various battery types including sealed, gel, flooded, and lithium batteries. The controller automatically detects 12V or 24V DC system voltages.
2. Safety Instructions
- Ensure all connections are tight and correct to prevent damage or injury.
- Always connect the battery to the charge controller first, then the solar panels, and finally the load. Disconnect in the reverse order.
- Do not short-circuit the solar panel or battery terminals.
- Install the controller in a well-ventilated area, away from flammable materials and direct sunlight.
- This device is for indoor use only. Protect it from water and moisture.
- Only qualified personnel should perform installation and maintenance.
- Wear appropriate personal protective equipment (PPE) when working with electrical systems.
3. Product Features
- Advanced MPPT Technology: Minimum 99.99% tracking efficiency and maximum 99% conversion efficiency.
- Automatic System Voltage Detection: Compatible with 12V and 24V DC systems.
- High Current Capacity: 100A maximum power current.
- Versatile Battery Compatibility: Supports sealed, gel, flooded, and lithium battery types.
- Comprehensive Protection: Includes protection against overcharge, over-discharge, overload, short circuit, reverse polarity, overheating, and battery undervoltage.
- LCD Display: Provides clear data display and system status monitoring.
- User-Friendly Controls: Adjustable load operating mode, one-key load control (open/close), and one-key factory reset function.
- Temperature Sensor: External temperature sensor included for accurate battery charging compensation.
4. Package Contents
- 1 x OOYCYOO MPPT Solar Charge Controller (Model: K 2500W 100A)
- 1 x Temperature Sensor
- 1 x User Manual (English)
5. Setup and Installation
5.1 Mounting the Controller
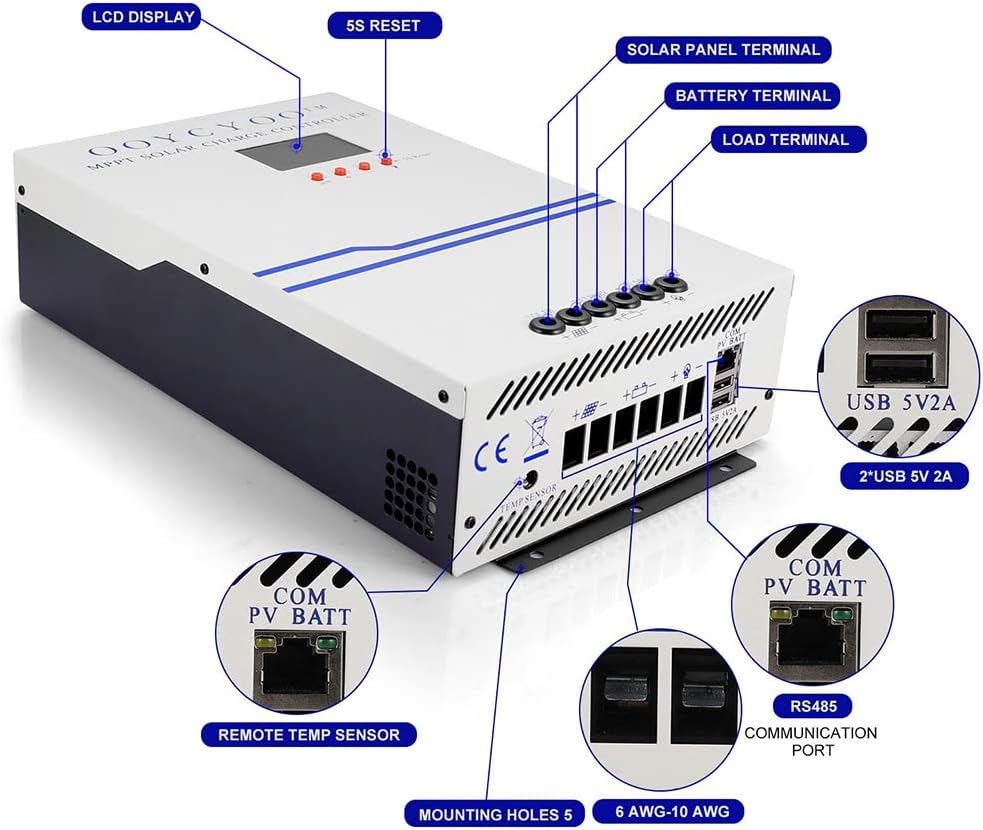
Mount the controller vertically on a wall or a stable surface in a dry, well-ventilated indoor environment. Ensure there is sufficient space around the controller for heat dissipation. The controller features 5 mounting holes for secure installation.
5.2 Wiring Connections
Follow the wiring order precisely to avoid damage to the controller or other components. Use appropriate wire gauges (recommended 20 mm² or 4# AWG for main power connections) and ensure all connections are secure.
- Connect the Battery: Connect the battery cables to the battery terminals on the controller (marked 'BATTERY'). Ensure correct polarity (+ to + and - to -). The controller will automatically detect the system voltage (12V or 24V).
- Connect the Solar Panels: Connect the solar panel cables to the solar input terminals (marked 'SOLAR'). Ensure correct polarity.
- Connect the Load: Connect your DC load to the load terminals (marked 'LOAD'). Ensure correct polarity.
- Connect the Temperature Sensor: Plug the external temperature sensor into its designated port (marked 'TEMP SENSOR'). Place the sensor near the battery for accurate temperature compensation during charging.
- USB Output: The controller includes USB 5V 2A output ports for charging small electronic devices.
- Communication Port: The RS485 communication port (marked 'COM PV BATT') allows for external monitoring or control (if applicable).
6. Operating Instructions
6.1 Initial Power-Up
Once the battery is connected, the controller will power on and automatically detect the system voltage. The LCD display will show real-time system information.
6.2 Load Control
The controller allows for manual control of the DC load output. Use the designated button (often labeled 'A' or similar) to toggle the load on or off. Refer to the display section for button functions.
6.3 Battery Type Selection
The controller is compatible with multiple battery types. While some parameters are automatically detected, specific battery types (sealed, gel, flooded, lithium) may require selection or fine-tuning through the controller's interface to ensure optimal charging profiles. Consult the on-screen menu or the included English user manual for detailed instructions on setting battery parameters.

7. Display and Button Functions
The LCD screen provides real-time monitoring of your solar system's performance. It displays information such as battery voltage, charging current, load current, and system status. The controller typically features buttons for navigation and settings adjustment.
- LCD Display: Shows all operational information at one time.
- '5S Reset' Button: Used for resetting certain parameters or functions by holding for 5 seconds.
- Load Control Button: A dedicated button (often indicated by an 'A' or similar icon) to open or close the load output.
- Factory Reset Button: A button to restore the controller to its default factory settings.

8. Maintenance
Regular maintenance ensures the longevity and optimal performance of your solar charge controller.
- Check Connections: Periodically inspect all wiring connections for tightness and corrosion.
- Clean the Controller: Keep the controller clean and free from dust and debris. Use a dry cloth for cleaning. Do not use liquids.
- Ventilation: Ensure that the ventilation openings are not blocked to allow for proper heat dissipation.
- Monitor Performance: Regularly check the LCD display for normal operation and any error codes.
9. Troubleshooting
If you encounter issues with your solar charge controller, refer to the following basic troubleshooting steps:
- No Display/No Power: Check battery connections and ensure the battery voltage is within the operating range. Verify that the battery is charged.
- No Charging: Check solar panel connections and ensure panels are receiving adequate sunlight. Verify solar panel voltage.
- Load Not Working: Check load connections and ensure the load is not exceeding the controller's rated current. Verify that the load output is enabled via the controller's settings.
- Error Codes: If an error code appears on the LCD, consult the detailed English user manual for specific meanings and solutions.
10. Specifications
| Parameter | Value |
|---|---|
| Model | K 2500W 100A |
| Max Power Current | 100 A |
| System Voltage | 12V / 24V Auto Detection |
| Max PV Input Voltage (VOC) | 18V ~ 48V (12V System) 36V ~ 96V (24V System) |
| Max PV Input Power | 1300W (12V System) 2600W (24V System) |
| Battery Capacity Configuration (Recommended) | 800 Ah |
| Floating Voltage | 13.8V (12V System) 27.6V (24V System) |
| Battery Under-voltage Protection | 10.6V (12V System) 21.2V (24V System) |
| Battery Under-voltage Recovery | 12.6V (12V System) 25.2V (24V System) |
| System Load Loss | <= 13 mA |
| Buck Loop | <= 100 mV |
| Operating Temperature | -10 ℃ ~ 60 ℃ |
| Storage Temperature | -30 ℃ ~ -70 ℃ |
| Operating Humidity | <= 90% (Non-condensing) |
| Temperature Compensation | -4 mV/Cell/℃ |
| Installation Wire (mm²) | 20 mm² |
| Installation Wire (AWG) | 4# AWG |
| Product Dimensions (Approx.) | Height: 32 cm (12.60 inches) Width: 20 cm (7.87 inches) Depth: 8 cm (3.15 inches) |
| Weight | 3.89 Kilograms |
| Material | Plastic |
| Display Type | LCD |
| UPC | 768461886877 |
11. Warranty and Support
For warranty information, technical support, or service inquiries, please contact the seller or manufacturer directly. Keep your purchase receipt as proof of purchase.


