1. Introduction
This manual provides essential information for the safe and efficient operation, installation, and maintenance of your Zanussi ZCG92686XA Free Standing Gas Cooker. Please read these instructions carefully before using the appliance and keep them for future reference.
1.1 Safety Information
Always prioritize safety when operating any gas appliance. This cooker is equipped with a safety feature that automatically turns off the gas supply if the flame extinguishes. Ensure proper ventilation and never leave the appliance unattended during operation.
- Read all instructions before use.
- Ensure the appliance is installed by a qualified technician.
- Keep children away from the appliance during operation.
- Do not store flammable materials near the cooker.
- In case of a gas leak, immediately shut off the gas supply, open windows, and do not operate any electrical switches.
2. Product Overview
The Zanussi ZCG92686XA is a freestanding gas cooker featuring 5 burners, a large digital screen, and a gas oven with both cooking and cooling fans. It is constructed from stainless steel and includes cast iron pan supports.

Figure 2.1: Angled front view of the Zanussi ZCG92686XA Gas Cooker with the top lid open, showing the five burners and control panel.

Figure 2.2: Front view of the Zanussi ZCG92686XA Gas Cooker, highlighting the digital screen, control knobs, and oven door.
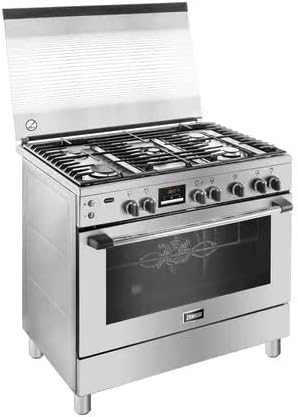
Figure 2.3: Side view of the Zanussi ZCG92686XA Gas Cooker, showing its freestanding design.
2.1 Main Components
- Cooktop: Five gas burners with cast iron pan supports.
- Control Panel: Knobs for burner and oven control, large digital screen for settings and timer.
- Gas Oven: Equipped with cooking fan for even heat distribution and a cooling fan.
- Storage Drawer: Located at the bottom for storing accessories.
3. Setup and Installation
Installation of this appliance must be performed by a qualified and authorized technician in accordance with local regulations and standards.
3.1 Unpacking
Carefully remove all packaging materials. Inspect the cooker for any damage incurred during transit. Report any damage to your retailer immediately.
3.2 Positioning
Place the cooker on a stable, level surface. Ensure adequate clearance from adjacent walls and cabinets as specified in the installation guide provided separately with the product. The appliance is freestanding.
3.3 Gas Connection
Connect the cooker to the gas supply using a flexible hose and appropriate fittings. Ensure all connections are tight and leak-free. A gas leak test must be performed by the installer.
3.4 Electrical Connection
Connect the cooker to a grounded 240 Volt electrical outlet. Ensure the electrical supply meets the appliance's requirements. This connection is primarily for the digital screen, oven light, and fans.
4. Operating the Cooktop
The cooktop features five gas burners of varying sizes for different cooking needs.
4.1 Lighting a Burner
- Place a suitable cooking pot or pan on the cast iron support over the desired burner.
- Push in and turn the corresponding control knob counter-clockwise to the maximum flame setting.
- Hold the knob in for a few seconds until the flame ignites. If the flame does not ignite, release the knob and repeat the process.
- Once lit, adjust the flame size by turning the knob to the desired heat level.
Note: The safety device will automatically cut off the gas if the flame goes out. If this happens, wait a few moments before attempting to re-ignite the burner.
4.2 Using Cast Iron Holders
The cast iron pan supports provide stable and durable surfaces for your cookware. Ensure they are correctly positioned over the burners before use. They can be removed for cleaning.
5. Operating the Oven
The gas oven includes a cooking fan for even heat distribution and a cooling fan to manage external temperatures.
5.1 Setting Oven Temperature
- Open the oven door and place food on the appropriate rack.
- Turn the oven control knob to the desired temperature setting.
- The digital screen will display the current settings and can be used to set timers or other functions. Refer to the separate digital screen manual for detailed instructions on advanced features.
5.2 Using the Cooking Fan
The cooking fan circulates hot air within the oven cavity, promoting more even cooking and reducing hot spots. This is particularly useful for baking and roasting multiple items simultaneously.
5.3 Cooling Fan Operation
The cooling fan operates automatically to dissipate heat from the appliance's exterior, protecting surrounding cabinetry and components. It may continue to run for a period after the oven is turned off.
6. Maintenance and Cleaning
Regular cleaning and maintenance will ensure the longevity and optimal performance of your cooker.
6.1 General Cleaning
- Always ensure the cooker is cool before cleaning.
- Wipe stainless steel surfaces with a soft cloth and a mild, non-abrasive cleaner.
- Remove cast iron pan supports and burner caps for separate cleaning with warm soapy water. Dry thoroughly before replacing.
- Do not use harsh chemicals, abrasive cleaners, or scouring pads, as these can damage surfaces.
6.2 Oven Door Glass Cleaning
The oven door is designed for easy cleaning. The inner glass panels can be completely removed for thorough cleaning on both sides. Refer to the detailed instructions in the separate installation and maintenance guide for the specific removal procedure.
7. Troubleshooting
Before contacting service, review the following common issues and their potential solutions.
| Problem | Possible Cause | Solution |
|---|---|---|
| Burner does not ignite. | No gas supply, igniter dirty, burner cap incorrectly placed. | Check gas supply valve. Clean igniter and burner cap. Ensure burner cap is seated correctly. |
| Oven not heating. | Gas supply issue, oven control knob not set correctly. | Verify gas supply. Ensure oven knob is turned to a temperature setting. |
| Digital screen is blank. | No electrical power. | Check power cord connection and circuit breaker. |
| Uneven cooking in oven. | Food placement, cooking fan not operating. | Ensure food is placed centrally. Check if cooking fan is active. |
If the problem persists after attempting these solutions, contact a qualified service technician.
8. Specifications
Technical details for the Zanussi ZCG92686XA Free Standing Gas Cooker.
| Feature | Detail |
|---|---|
| Brand | Zanussi |
| Model Number | ZCG92686XA |
| Installation Type | Freestanding |
| Product Dimensions (D x W x H) | 60 x 90 x 88.5 cm |
| Item Weight | 68 Kilograms |
| Efficiency Rating | A+ |
| Oven Cooking Mode | Gas |
| Number of Heating Elements (Burners) | 5 |
| Burner Type | Open |
| Control Console | Knob |
| Voltage | 240 Volts |
| Fuel Type | Gas |
| Material Type | Glass, Stainless Steel |
| Included Components | Free standing Cooker |
| Batteries Required? | No |
| Drawer Type | Storage |
9. Warranty and Support
Your Zanussi ZCG92686XA Free Standing Gas Cooker comes with a manufacturer's warranty.
9.1 Warranty Information
This product is covered by a 5 Years Manufacturer Warranty. Please retain your proof of purchase for warranty claims. The warranty covers manufacturing defects and malfunctions under normal use conditions.
9.2 Customer Support
For technical assistance, service requests, or warranty claims, please contact your local Zanussi service center or the retailer from whom you purchased the appliance. Always provide the model number (ZCG92686XA) and serial number (if applicable) when seeking support.