
1. Product Overview
The QIACHIP Ewelink WiFi Relay Module is a smart switch designed for remote control of appliances and devices. It operates via the eWelink application, supporting third-party voice control systems such as Amazon Alexa and Google Home. This module offers features like timed on/off, scene linking, and power settings, making it suitable for various automation projects.
The module features a USB 5V input and provides a clean contact (passive low voltage) output. By default, it operates in self-locking mode, but users can switch to inching mode via the eWelink app, allowing for adjustable timed operations (e.g., automatically turning off after 1 second).
Important Note: This WiFi relay module supports only 2.4G WiFi networks and is not compatible with 5G WiFi networks.
2. Product Components and Dimensions
The QIACHIP Ewelink WiFi Relay Module is a compact device. Below are its key components and dimensions.
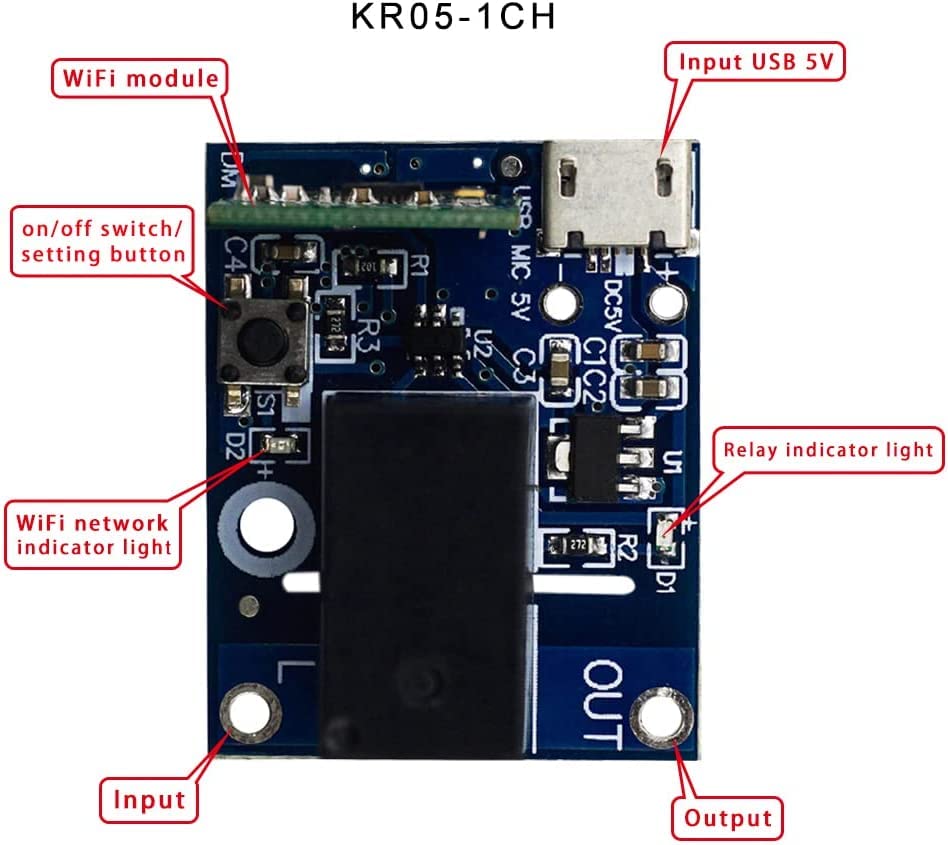
Image: Labeled diagram of the QIACHIP WiFi Relay Module, indicating the WiFi module, on/off/setting button, WiFi network indicator light, relay indicator light, USB 5V input, and output terminals.

Image: Dimensions of the QIACHIP WiFi Relay Module, measuring 32mm in length and 25mm in width.
The module is designed to be small for easy integration into various projects. Please note that newer models may feature a USB Type-C interface for power input.

Image: The QIACHIP WiFi Relay Module with a USB Type-C power input, highlighting the interface upgrade.
3. Setup Instructions
3.1 Powering the Module
The module requires a DC 5V power supply. Connect a standard USB power adapter (not included) to the module's USB port. Ensure the power supply provides a stable 5V output to prevent damage to the device.
3.2 Wiring the Relay Output
The module provides a clean contact (passive low voltage) output. This means the relay acts as a switch to complete or break a circuit for your connected device, rather than supplying power directly. Wiring typically involves soldering wires to the designated input and output pads on the module. Refer to the diagrams below for common wiring configurations:
- AC Load: Connect the AC power source and the AC appliance to the relay output terminals.
- Garage Door Opener: Integrate the relay into your garage door opener's control circuit.
- DC Load: Connect the DC power source and the DC appliance to the relay output terminals.
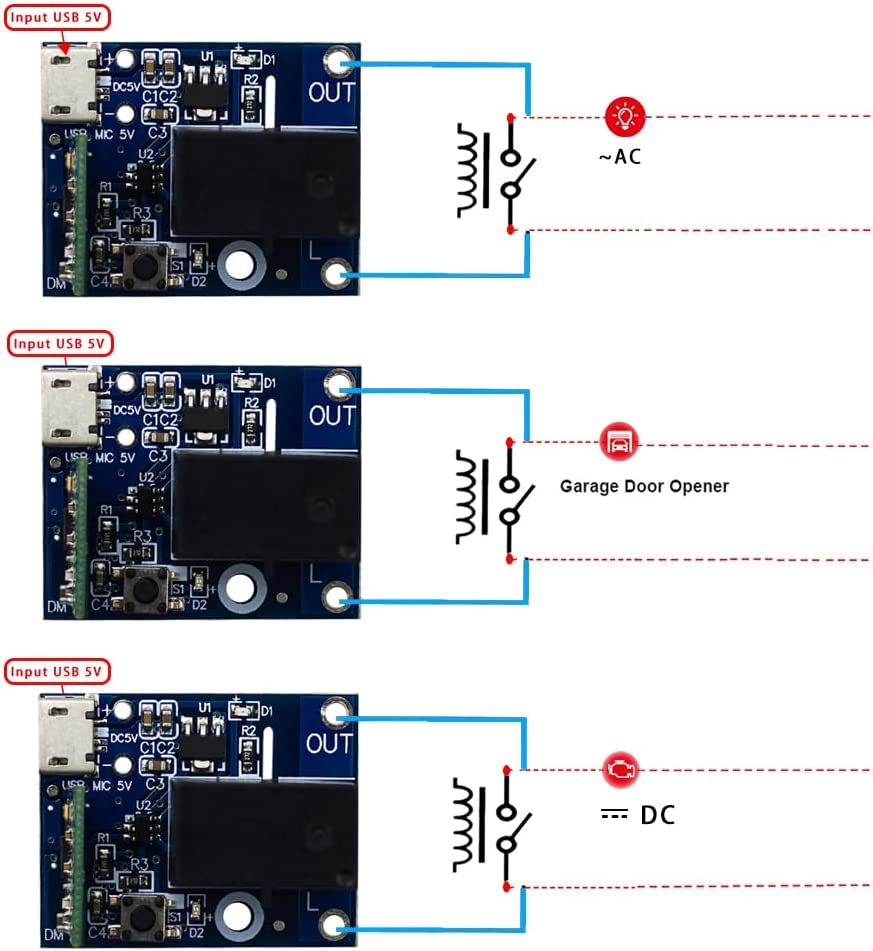
Image: Wiring examples for connecting the relay module to AC loads, a garage door opener, and DC loads.
Note: Basic soldering skills are required for connecting wires to the module's output pads. If you are unsure about wiring, consult a qualified electrician.
3.3 Connecting to eWelink App
- Download the eWelink app from your smartphone's app store (available on Google Play Store and Apple App Store).
- Register an account or log in to your existing eWelink account.
- Power on the QIACHIP WiFi Relay Module.
- Press and hold the on/off/setting button on the module for approximately 5 seconds until the blue WiFi network indicator light starts blinking rapidly. This indicates the module is in pairing mode.
- In the eWelink app, tap the "+" icon to add a new device. Follow the on-screen instructions to complete the pairing process. Ensure your smartphone is connected to a 2.4G WiFi network during setup.
4. Operating Instructions
4.1 App Control
Once connected to the eWelink app, you can control the relay module remotely:
- On/Off: Toggle the connected device on or off directly from the app interface.
- Timed Functions: Set schedules, countdown timers, or loop timers for automated operation.
- Scene Linking: Create smart scenes to automate actions based on specific conditions or other smart devices.

Image: eWelink app interface demonstrating scheduling and timer functions for smart home control.
4.2 Operating Modes
The module supports two operating modes, configurable within the eWelink app:
- Self-locking Mode (Default): The relay remains in its last state (on or off) until manually changed.
- Inching Mode: The relay turns on for a set duration (e.g., 1 second) and then automatically turns off. The duration can be adjusted in the app's advanced settings. This mode is ideal for momentary actions like opening a garage door.
4.3 Voice Control Integration
The QIACHIP Ewelink WiFi Relay Module is compatible with Amazon Alexa and Google Assistant. To enable voice control:
- Link your eWelink account within the Amazon Alexa or Google Home app.
- Discover devices in the Alexa or Google Home app.
- You can then use voice commands such as "Alexa, open the garage door" or "OK Google, close the garage door" (if configured for a garage door opener).

Image: Voice control integration with Amazon Alexa and Google Assistant for device operation.
4.4 2.4G Smart Light Remote Control
The module supports adding a 2.4G smart light remote control (remote not included). This allows for simultaneous control of multiple devices. The remote control distance can be up to 30 meters.
5. Maintenance
To ensure optimal performance and longevity of your QIACHIP Ewelink WiFi Relay Module, follow these maintenance guidelines:
- Keep Dry: Avoid exposing the module to moisture or liquids.
- Stable Power Supply: Always use a stable DC 5V power source. Over-voltage can damage the module.
- Firmware Updates: Periodically check the eWelink app for available firmware updates to ensure the module has the latest features and security enhancements.
- Cleaning: If necessary, gently clean the module with a dry, soft cloth. Do not use harsh chemicals or abrasive materials.
6. Troubleshooting
- Module not powering on:
Ensure the USB 5V power supply is correctly connected and functional. Check the power cable for damage. - Unable to connect to eWelink app:
Verify your smartphone is connected to a 2.4G WiFi network. The module does not support 5G WiFi. Ensure the module is in pairing mode (blue LED blinking rapidly). Try restarting the module and your router. - Device not responding to commands:
Check the WiFi connection status in the eWelink app. Ensure the module is within range of your WiFi router. Verify the wiring to the connected appliance is secure and correct. - Inching mode not working as expected:
Adjust the inching duration in the eWelink app's advanced settings. Ensure the duration is set appropriately for your application. - High battery drain (if using battery power):
The module consumes power continuously. If powered by a battery, it may drain quickly. Consider a continuous power source for long-term use.
7. Specifications
| Brand | QIACHIP |
| Model | CK-BL602-4SW-HS |
| Part Number | KR05-1CHKG-W-EW |
| UPC | 787996396422 |
| Input Voltage | 5 Volts (DC) via USB |
| Rated Current | 10 Ampere |
| Wattage | 50 watts |
| Contact Type | Normally Open (Clean Contact / Passive Low Voltage) |
| Minimum Switching Voltage | 5 Volts (DC) |
| Number of Terminals | 2 |
| Material | Copper |
| Mounting Type | Surface Mount |
| Operating Mode | Automatic (Configurable to Self-locking or Inching via App) |
| Wireless Connectivity | WiFi 2.4G (IEEE 802.11 b/g/n) |
| Certifications | CE, FCC |
| Components Included | 1x WiFi Relay Module |
8. Warranty and Support
8.1 Warranty Information
Specific warranty details for this product are not provided in the available information. Please refer to the retailer or manufacturer's official website for current warranty terms and conditions.
8.2 Customer Support
For technical assistance, troubleshooting, or further inquiries, please contact QIACHIP customer support through their official website or the eWelink application support channels. You may also visit the QIACHIP Store on Amazon for additional product information and resources.

