
1. Introduction
The XTUGA M-6604S is a professional ultra-high frequency (UHF) 4-channel wireless microphone system designed for reliable audio transmission. It features a frequency range of 530-580MHz and offers flexible operation modes to suit various environments. The system includes intelligent switching between 4-channel UHF mode and 2-channel true diversity mode, enhancing signal stability and transmission range.
2. Package Contents
Please verify that all items listed below are included in your package:
- Wireless Microphone Receiver System (1 unit)
- Handheld Microphones (4 units)
- Antennas (4 units)
- Power Adapter (1 unit)
- User Manual (1 unit)
- Audio Line (1 unit)

Image 2.1: Contents of the XTUGA M-6604S Wireless Microphone System package.
3. Product Overview
The XTUGA M-6604S system consists of a receiver unit and four handheld microphones. Familiarize yourself with the components and their functions.
3.1 Receiver Unit
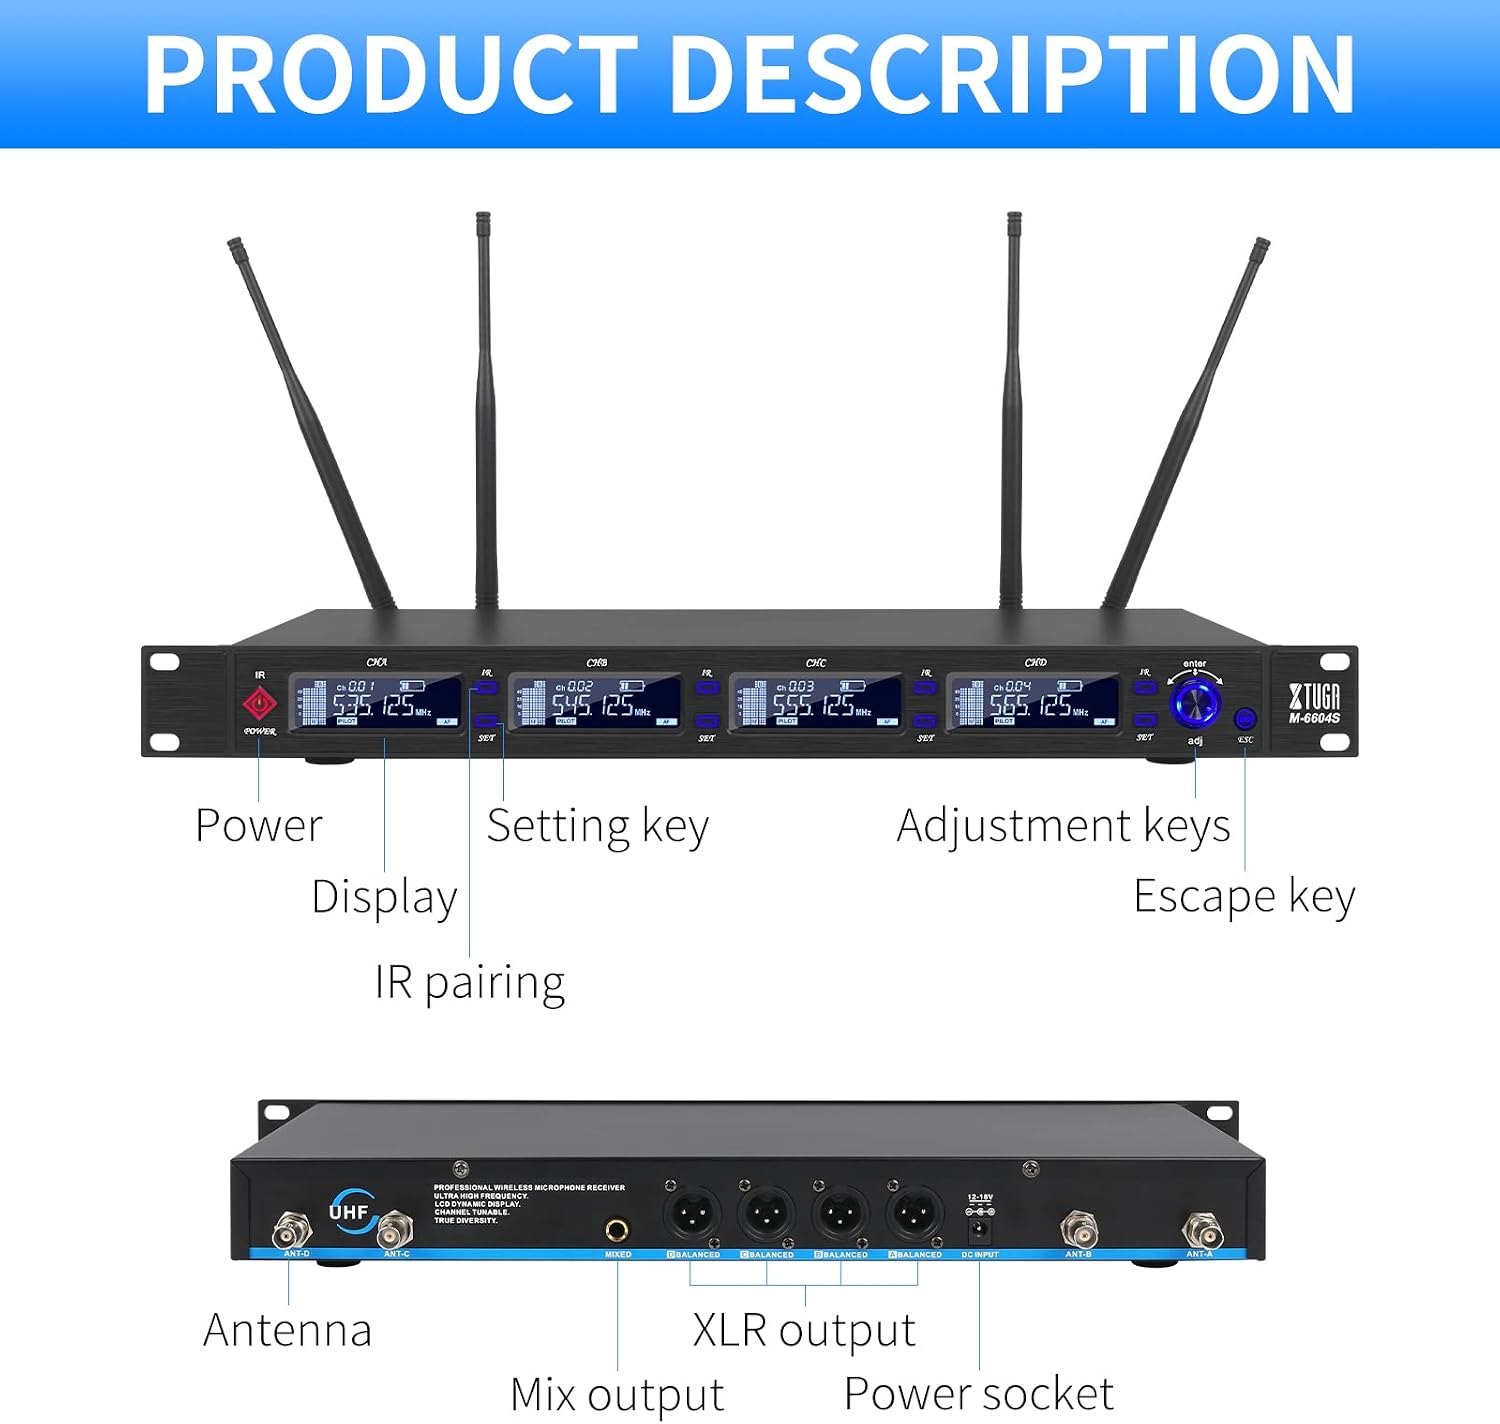
Image 3.1: Front panel of the receiver unit.
- Power Button: Turns the receiver on or off.
- IR Sensor: Used for infrared synchronization with microphones.
- Display Screens: Show channel information, frequency, battery status, and settings for each microphone.
- Setting Keys (SET): Used to enter and confirm menu selections.
- Adjustment Keys (ADJ): Used to navigate and change values within menus.
- Escape Key (ESC): Used to exit menus or cancel operations.

Image 3.2: Rear panel of the receiver unit.
- Antenna Ports: Connect the included antennas for signal reception.
- Mix Output: Combined audio output for all channels (6.35mm jack).
- XLR Outputs: Individual balanced audio outputs for each channel (XLR connectors).
- Power Socket: Connect the power adapter here.
3.2 Handheld Microphones

Image 3.3: Handheld microphones and receiver.
- Each microphone features a display showing channel, frequency, and battery status.
- Power button and IR sensor are located on the microphone body.
- Battery compartment is at the base of the microphone.
4. Setup Instructions
- Connect Antennas: Screw the four antennas securely into the corresponding ports on the rear of the receiver. Ensure they are positioned vertically for optimal signal reception.
- Connect Power: Plug the provided power adapter into the receiver's power socket and then into a suitable electrical outlet.
- Audio Output Connection: Connect the receiver's audio output to your mixer, amplifier, or sound system. You can use either the individual XLR outputs for each channel or the mixed 6.35mm output.
- Insert Batteries: Open the battery compartment of each handheld microphone and insert two AA batteries, observing correct polarity.
- Power On: Press the power button on the receiver. The display screens should illuminate. Then, press the power button on each microphone to turn them on.
5. Operating Instructions
5.1 Mode Selection (UHF vs. True Diversity)
The system supports two operational modes: 4-channel UHF mode and 2-channel true diversity mode. True diversity mode offers enhanced signal stability and an extended range.
- 4-Channel UHF Mode: Provides a working range of up to 260 feet (approximately 80 meters).
- 2-Channel True Diversity Mode: Provides a working range of up to 390 feet (approximately 120 meters).
To switch between modes, use the intelligent switching circuit button on the receiver. Refer to the receiver's display for the current mode indication.

Image 5.1: Comparison of UHF and True Diversity modes and their respective ranges.
5.2 IR Synchronization (Pairing)
The system uses infrared (IR) synchronization to pair microphones with the receiver channels.
- Ensure both the receiver and the desired microphone are powered on.
- On the receiver, select the channel you wish to pair.
- Press the 'SET' button on the receiver to initiate IR pairing mode for that channel.
- Align the IR sensor on the microphone with the IR sensor on the receiver.
- The microphone and receiver will synchronize automatically within seconds. The display on both units will confirm successful pairing.

Image 5.2: IR pairing process between microphone and receiver.
5.3 Frequency Adjustment and Auto Search
The system offers 100 groups of frequencies to minimize interference. You can manually adjust frequencies or use the auto-search function.
- Manual Frequency Adjustment: Use the 'SET' and 'ADJ' buttons on the receiver to navigate to the frequency setting for a specific channel and manually select a desired frequency.
- Automatic Search Frequency: The receiver can automatically scan for available, clear frequencies. Access this function via the 'SET' and 'ADJ' buttons. This helps avoid interference.

Image 5.3: Receiver display showing available adjustment modes.
5.4 EQ Mode Adjustment
The system includes an EQ effect function for sound customization. This allows for flexible and effective adjustment to present optimal audio.
- Navigate to the EQ setting for the desired channel using the 'SET' and 'ADJ' buttons.
- Adjust the treble and bass parameters to achieve the desired sound profile.

Image 5.4: EQ mode adjustment interface on the receiver.
5.5 Distance Adjustment
In UHF mode, the receiving distance can be adjusted to adapt to different scenarios and optimize performance.
- Access the distance adjustment setting through the receiver's menu using the 'SET' and 'ADJ' buttons.
- Select the appropriate distance setting based on your operational environment.

Image 5.5: Distance adjustment feature in UHF mode.
5.6 Lock Function
The receiver includes a lock function to prevent accidental changes to settings during operation.
- To lock the settings, long-press the 'ADJ' button on the receiver. A lock icon will appear on the display.
- To unlock the settings, long-press the 'ADJ' button again. The lock icon will disappear.
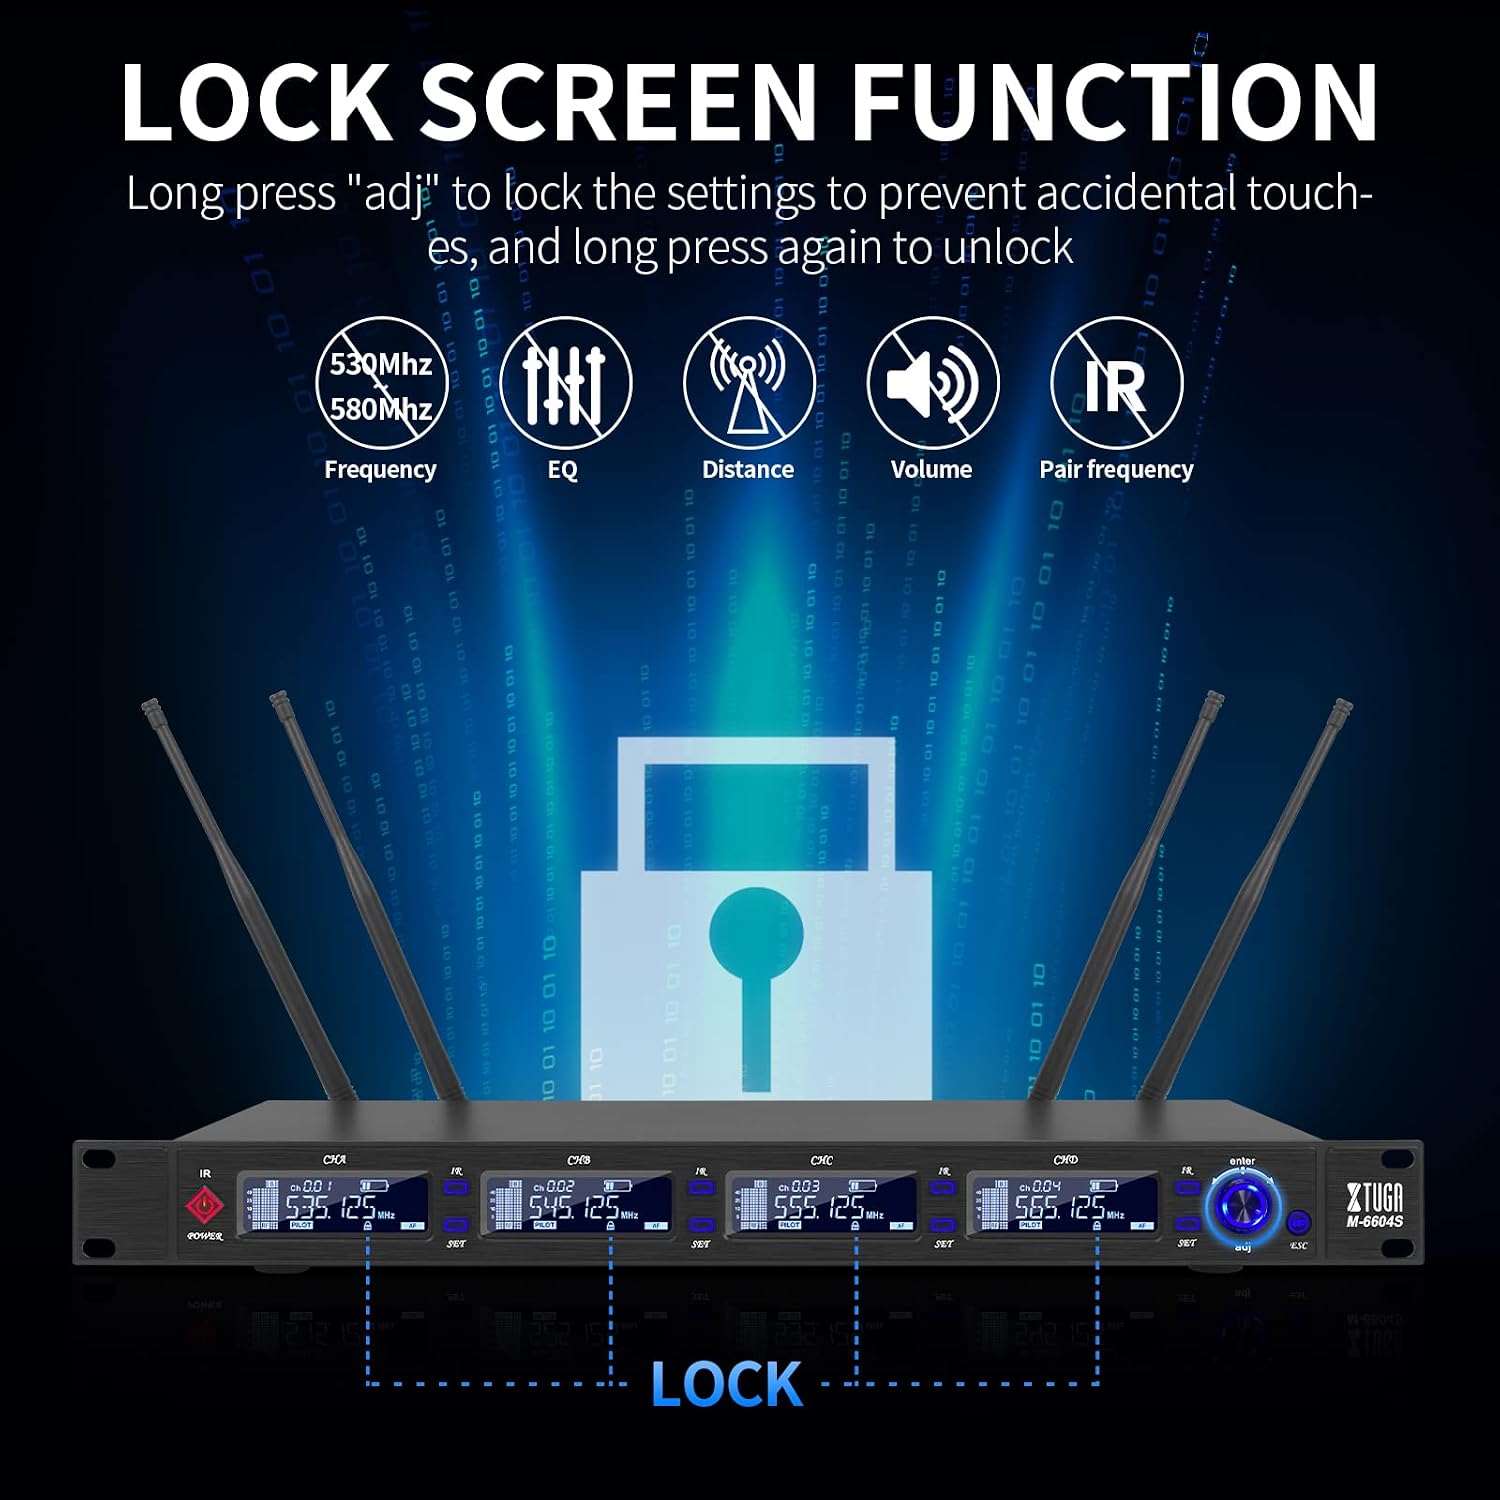
Image 5.6: Lock screen function to prevent accidental adjustments.
6. Specifications
| Feature | Specification |
|---|---|
| Model Number | M-6604S |
| Brand | XTUGA |
| Number of Channels | 4 |
| Connectivity Technology | UHF |
| Frequency Response | 530-580 MHz |
| Microphone Form Factor | Handheld |
| Polar Pattern | Unidirectional |
| Material | Metal |
| Special Features | Noise Reduction, Volume Control, IR Synchronization, EQ Effect, Lock Function |
| Power Source | Corded Electric |
| Item Dimensions (L x W x H) | 21.46 x 4.92 x 14.57 inches |
| Item Weight | 9.23 pounds |
| Compatible Devices | Audio mixer, Karaoke Machine, Television |
7. Maintenance
- Cleaning: Use a soft, dry cloth to clean the receiver and microphones. Avoid using liquid cleaners or solvents, as they may damage the finish or internal components.
- Battery Replacement: Replace microphone batteries promptly when the low battery indicator appears on the microphone or receiver display. Always use fresh AA batteries.
- Storage: When not in use for extended periods, store the system in a cool, dry place away from direct sunlight and extreme temperatures. Remove batteries from microphones before long-term storage.
- Antenna Care: Ensure antennas are not bent or damaged. Handle them carefully during setup and teardown.
8. Troubleshooting
If you encounter issues with your XTUGA M-6604S system, refer to the following common problems and solutions:
| Problem | Possible Cause | Solution |
|---|---|---|
| No sound from microphone | Microphone not powered on; low batteries; microphone not paired; receiver output not connected or volume too low. | Ensure microphone is on and has fresh batteries. Perform IR pairing. Check receiver's audio output connection and volume levels on both receiver and connected audio equipment. |
| Intermittent signal or dropouts | Interference from other wireless devices; distance too far; obstacles blocking signal; antennas not positioned correctly. | Change frequency using auto-search or manual adjustment. Ensure antennas are vertical and unobstructed. Reduce distance between microphone and receiver. Switch to True Diversity mode for extended range if applicable. |
| Microphone muted and cannot unmute | Accidental mute activation on microphone. | Check the microphone's power/mute button. Some microphones may have a dedicated mute function. Refer to the microphone's specific controls. |
| Receiver settings are locked | Lock function activated. | Long-press the 'ADJ' button on the receiver to unlock the settings. |
9. Warranty and Support
The XTUGA M-6604S Wireless Microphone System comes with a 1-year warranty covering parts and labor. This warranty ensures high quality and reliability.
For technical support, warranty claims, or any questions regarding your product, please contact XTUGA customer service through the official XTUGA website or your point of purchase. Please have your model number (M-6604S) and purchase details ready when contacting support.


