1. Introduction
This manual provides essential instructions for the safe and efficient operation, assembly, and maintenance of your Koblenz WD-353L Portable Wet-Dry Vacuum Cleaner. This 3-gallon, 2.0 Peak HP unit is designed for versatile cleaning tasks, handling both wet and dry messes in various environments.

Image 1.1: The Koblenz WD-353L Portable Wet-Dry Vacuum Cleaner.
2. Safety Information
Always follow basic safety precautions when using electrical appliances to reduce the risk of fire, electric shock, or injury. Read all instructions before using this appliance.
- Do not leave the appliance unattended when plugged in. Unplug from outlet when not in use and before servicing.
- Do not use outdoors or on wet surfaces.
- Do not allow to be used as a toy. Close attention is necessary when used by or near children.
- Use only as described in this manual. Use only manufacturer’s recommended attachments.
- Do not use with damaged cord or plug. If appliance is not working as it should, has been dropped, damaged, left outdoors, or dropped into water, return it to a service center.
- Do not pull or carry by cord, use cord as a handle, close a door on cord, or pull cord around sharp edges or corners. Do not run appliance over cord. Keep cord away from heated surfaces.
- Do not unplug by pulling on cord. To unplug, grasp the plug, not the cord.
- Do not handle plug or appliance with wet hands.
- Do not put any object into openings. Do not use with any opening blocked; keep free of dust, lint, hair, and anything that may reduce air flow.
- Keep hair, loose clothing, fingers, and all parts of body away from openings and moving parts.
- Do not pick up anything that is burning or smoking, such as cigarettes, matches, or hot ashes.
- Do not use to pick up flammable or combustible liquids, such as gasoline, or use in areas where they may be present.
- Do not use without filter bag and/or filters in place.
- Turn off all controls before unplugging.
- Use extra care when cleaning on stairs.
3. Package Contents
Verify that all components listed below are included in your package:
- Koblenz WD-353L Wet/Dry Vac Unit
- 1-1/4 inch x 4 feet TWIST-N-LOCK Hose
- Pick Up Tool
- Crevice Nozzle
- Filter Bag (Cloth Filter)

Image 3.1: Included accessories: Crevice Tool, Pick Up Tool, TWIST-N-LOCK Hose, and Filter Bag.
4. Assembly
Follow these steps to assemble your vacuum cleaner:
- Unpack Components: Carefully remove all parts from the packaging.
- Attach Wheels (if separate): If the wheels are not pre-attached, firmly press them into the designated slots on the base of the tank until they click into place.
- Install Filter Bag: For dry vacuuming, ensure the cloth filter bag is securely installed over the filter cage inside the tank. Refer to Image 4.1 for visual guidance on internal components.
- Secure Motor Head: Place the motor head onto the tank, ensuring it is properly aligned. Secure the latches on both sides of the tank to firmly lock the motor head in place.
- Connect Hose: Insert the TWIST-N-LOCK hose into the intake port on the front of the motor head. Turn the hose 1/4 turn clockwise to lock it securely. (See Image 4.2 for hose connection).
- Attach Accessories: Connect the desired cleaning tool (Pick Up Tool or Crevice Nozzle) to the end of the hose or to the extension tubes if extra reach is needed.
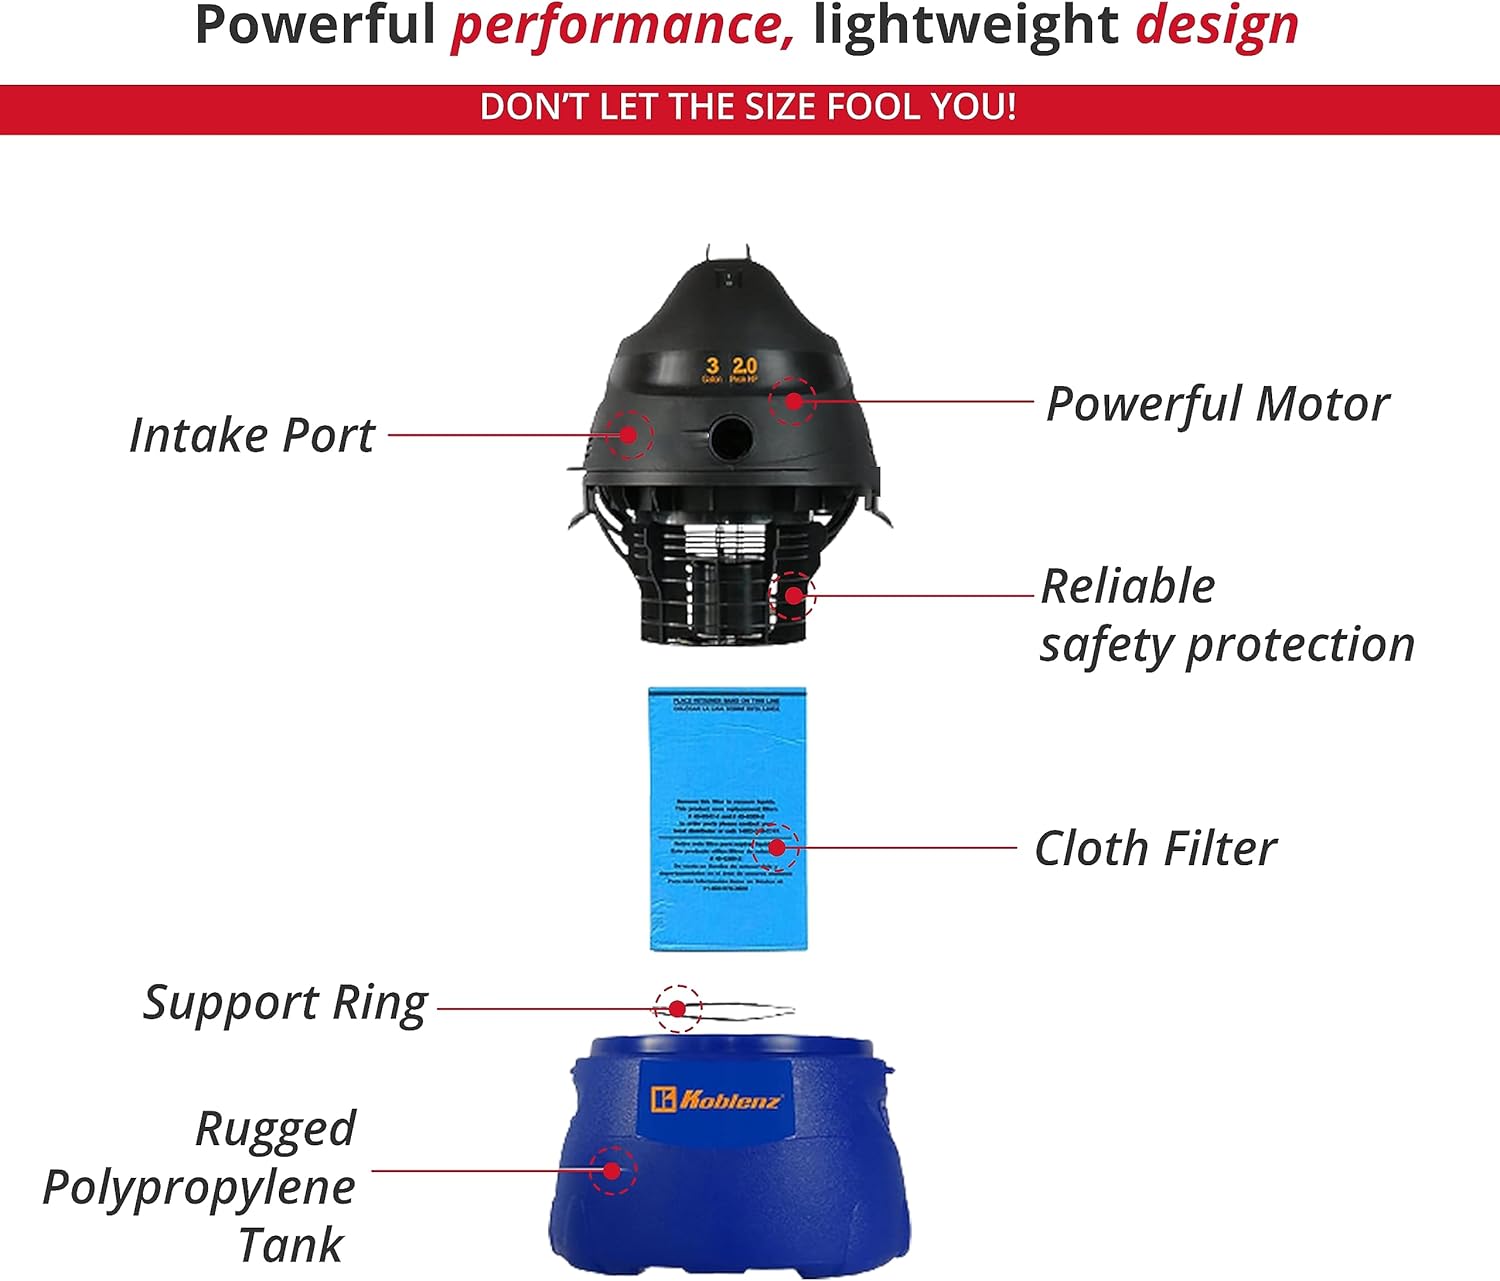
Image 4.1: Exploded view showing the Powerful Motor, Intake Port, Cloth Filter, Support Ring, and Rugged Polypropylene Tank.

Image 4.2: Detail of the TWIST-N-LOCK Hose Connection.
5. Operating Instructions
Your Koblenz WD-353L offers 3-in-1 functionality: wet vacuuming, dry vacuuming, and blowing.
5.1 Dry Vacuuming
- Ensure the cloth filter bag is properly installed.
- Connect the hose and desired dry cleaning accessory (e.g., Pick Up Tool for general debris, Crevice Nozzle for tight spaces).
- Plug the power cord into a suitable electrical outlet.
- Press the power switch located on the motor head to the 'ON' position.
- Begin vacuuming dry debris.
- When finished, turn the power switch to 'OFF' and unplug the unit.
5.2 Wet Vacuuming
Important: Remove the cloth filter bag before wet vacuuming. Using the cloth filter for wet pickup will damage the filter and reduce suction.
- Unlatch the motor head and remove it from the tank.
- Remove the cloth filter bag. Reattach the motor head and secure the latches.
- Connect the hose and desired wet cleaning accessory.
- Plug the power cord into a suitable electrical outlet.
- Press the power switch to the 'ON' position.
- Begin vacuuming liquids. The vacuum will automatically shut off when the tank is full.
- When finished, turn the power switch to 'OFF' and unplug the unit. Empty the tank immediately after wet vacuuming.
5.3 Blower Function
The vacuum can be converted into a powerful blower for clearing debris from surfaces.
- Ensure the unit is unplugged.
- Remove the hose from the intake port.
- Insert the hose into the blower port located on the rear of the motor head (see Image 5.1). Turn 1/4 turn clockwise to lock.
- Plug the power cord into an outlet and turn the unit 'ON'.
- Direct the airflow to clear debris.
- When finished, turn the power switch to 'OFF' and unplug the unit.

Image 5.1: Overview of the vacuum showing Accessory Storage, Oversize Handle, TWIST-N-LOCK Hose Connection, Pick Up Tool, Crevice Tool, and Blower Port.
6. Maintenance
Regular maintenance ensures optimal performance and extends the life of your vacuum cleaner.
6.1 Filter Care
- Cloth Filter: For dry vacuuming, regularly blow dust off the cloth filter to maintain suction power. Change the filter after multiple cleanings or when suction noticeably decreases.
- Wet Vacuuming: Always remove the cloth filter before wet vacuuming. Allow the filter to dry completely before reinstalling for dry use.
6.2 Emptying the Tank
- Always unplug the vacuum before emptying.
- Unlatch the motor head and carefully lift it off the tank.
- Dispose of collected debris or liquids responsibly.
- Clean the inside of the tank with water and mild detergent if necessary. Rinse thoroughly and allow to dry before reassembly.
6.3 Cord Storage
Wrap the 10 ft power cord around the designated cord wraps on the motor head for tidy storage (see Image 6.1).

Image 6.1: Rear view showing the power cord wrapped for storage.
7. Troubleshooting
If your vacuum cleaner is not operating correctly, consult the table below for common issues and solutions.
| Problem | Possible Cause | Solution |
|---|---|---|
| Vacuum does not turn on | No power to outlet; Power switch is OFF; Faulty cord/plug | Check power outlet; Turn switch ON; Inspect cord/plug for damage, contact service if damaged. |
| Low suction power | Clogged hose/accessories; Full tank; Dirty filter; Motor head not sealed properly | Clear obstructions; Empty tank; Clean/replace filter; Ensure motor head latches are secure. |
| Water leaks from tank | Tank is overfilled; Motor head not sealed properly; Damaged tank | Empty tank; Ensure motor head latches are secure; Inspect tank for cracks, contact service if damaged. |
| Hose disconnects during use | Hose not properly locked into port | Ensure hose is inserted and twisted 1/4 turn clockwise to lock. |
8. Specifications
Key technical specifications for the Koblenz WD-353L:
- Model Name: WD-353L
- Brand: Koblenz
- Capacity: 3 Gallons
- Motor Horsepower: 2.0 Peak HP
- Wattage: 540 watts
- Amperage: 4.5 Amps
- Maximum Suction: 43 Inches
- Hose Length: 4 Feet (1-1/4 inch diameter)
- Power Cord Length: 10 Feet
- Filter Type: Cloth
- Special Feature: Compact, Lightweight, Portable, Wet/Dry, Blower Function
- Product Dimensions: 13.78"L x 11.42"W x 15.35"H
- Item Weight: 7.1 pounds
- Noise Level: 75 Decibels
- Color: Blue, Black
- Power Source: Corded Electric
- Safety Listing: cETLus

Image 8.1: Koblenz WD-353L with key dimensions.
9. Warranty & Support
Your Koblenz WD-353L Portable Wet-Dry Vacuum Cleaner comes with a 5 Year Limited Manufacturer's Warranty. This warranty covers defects in material and workmanship under normal use.
For warranty claims, technical support, or to purchase replacement parts, please contact Koblenz customer service. Refer to the contact information provided with your product packaging or visit the official Koblenz website.
Care Instructions: To maintain product longevity, blow dust off the filter to maintain suction, change the filter after multiple cleanings, empty the tank regularly, and ensure the hose is properly locked and unlocked with a 1/4 turn.


