
Introduction
This manual provides detailed instructions for the installation, operation, and maintenance of your EINPARTS EPDVR04 Dash Camera. Please read this manual thoroughly before using the device to ensure proper functionality and safety. Keep this manual for future reference.
Safety Information
- Do not operate the device while driving. Adjustments should only be made when the vehicle is safely parked.
- Ensure the dash camera is securely mounted and does not obstruct the driver's view or interfere with vehicle controls.
- Use only the provided power adapter and cables. Using unauthorized accessories may damage the device and void the warranty.
- Avoid exposing the device to extreme temperatures, direct sunlight for prolonged periods, or excessive moisture.
- Do not attempt to disassemble or repair the device yourself. Contact customer support for assistance.
Package Contents
Verify that all items listed below are present in your package:
- EINPARTS EPDVR04 Mirror Dash Camera
- Rear Camera with Cable
- Car Charger (Power Adapter)
- Mounting Straps/Bands
- User Manual (this document)

Image: Complete package contents of the EINPARTS EPDVR04 Dash Camera.
Product Overview
Mirror Dash Camera

Image: Front view of the mirror dash camera, displaying the reflective surface.
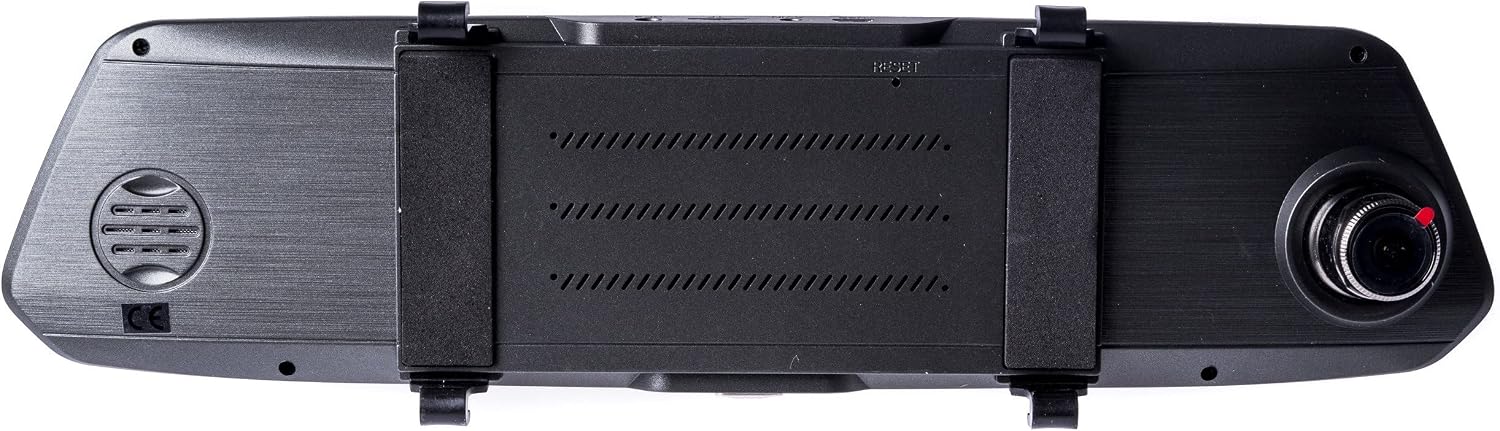
Image: Rear view of the mirror dash camera, highlighting the front camera lens, speaker, and mounting points.
Rear Camera

Image: The rear camera with its connecting cable.
Car Charger

Image: The car charger for powering the dash camera.
Dimensions

Image: Dimensions of the mirror dash camera (305mm x 77mm).

Image: Spacing between mounting points (120mm).
Setup and Installation
1. Insert MicroSD Card
Before mounting, insert a high-speed MicroSD card (Class 10 or higher, up to 32GB recommended) into the designated slot on the dash camera. Ensure the card is inserted correctly until it clicks into place.
2. Mount the Mirror Dash Camera
- Place the mirror dash camera over your vehicle's existing rearview mirror.
- Use the provided rubber straps to secure the dash camera firmly to the rearview mirror. Ensure it is centered and stable.
- Adjust the front camera lens to capture the desired view of the road ahead.
3. Install the Rear Camera
- Identify a suitable location for the rear camera, typically above the license plate or inside the rear window.
- Clean the mounting surface thoroughly.
- Secure the rear camera using the adhesive pad or screws (if provided and applicable).
- Route the rear camera cable to the main mirror dash camera. Connect the rear camera cable to the AV-in port on the mirror dash camera.
- If the rear camera has a red wire for reverse trigger, connect it to your vehicle's reverse light power supply for automatic display of the rear view when reversing.
4. Connect Power
- Plug the car charger into your vehicle's 12V power outlet (cigarette lighter socket).
- Connect the other end of the car charger cable to the power input port on the mirror dash camera.
- Route the power cable neatly along the windshield trim and dashboard to avoid obstruction.
Operating Instructions
Power On/Off
- The dash camera will automatically power on and begin recording when the vehicle's ignition is turned on (and power is supplied to the 12V outlet).
- To manually power on/off, press and hold the power button located on the device.
Recording Modes
- Loop Recording: The camera continuously records video in short segments (e.g., 1, 3, or 5 minutes). When the memory card is full, the oldest unlocked files are overwritten.
- G-Sensor (Emergency Recording): If the built-in G-sensor detects a sudden impact or collision, the current video segment will be automatically locked and saved to prevent it from being overwritten.
- Parking Monitor: When enabled, the camera will automatically start recording if it detects a vibration or impact while the vehicle is parked. This feature typically requires a hardwire kit for continuous power.
Menu Navigation
Use the physical buttons on the device or the associated mobile application (if available, as indicated by 'Application' control method) to navigate through the settings menu. Common settings include:
- Video Resolution (e.g., 1080p)
- Loop Recording Duration
- G-Sensor Sensitivity
- Parking Monitor On/Off
- Date and Time Stamp
- Microphone On/Off
Viewing Footage
- On Device: Use the playback mode on the LCD screen to review recorded videos.
- On Computer: Remove the MicroSD card from the dash camera and insert it into a computer's card reader. The video files can be accessed and played using standard media players.
- Via Application: If an application control method is supported, connect your smartphone to the dash camera's Wi-Fi (if available) to view and download footage.

Image: Illustration of the wide viewing angles (Front: 170°, Rear: 140°).
Maintenance
- Cleaning: Use a soft, dry cloth to clean the camera lens and the LCD screen. Do not use abrasive cleaners or solvents.
- MicroSD Card: Format the MicroSD card regularly (e.g., once a month) to ensure optimal performance and prevent data corruption. This can usually be done through the camera's settings menu.
- Firmware Updates: Check the manufacturer's website periodically for firmware updates. Follow the instructions carefully if an update is available.
Troubleshooting
| Problem | Possible Cause | Solution |
|---|---|---|
| Camera does not power on. | No power supply; faulty cable; damaged device. | Check car charger connection and vehicle's 12V outlet. Try a different power source. Ensure the power cable is not damaged. |
| Recording stops or freezes. | Slow MicroSD card; full MicroSD card; card error. | Use a Class 10 or higher MicroSD card. Format the MicroSD card. Replace the MicroSD card if the issue persists. |
| Poor video quality. | Dirty lens; incorrect resolution setting. | Clean the camera lens. Ensure video resolution is set to 1080p or highest available. |
| Rear camera not displaying. | Loose connection; faulty camera/cable. | Check the connection of the rear camera cable to the main unit. Ensure the cable is not damaged. |
| Buttons unresponsive. | Device frozen. | Press the reset button (if available, often a small pinhole) or disconnect and reconnect power. |
Specifications
| Feature | Detail |
|---|---|
| Brand | EinParts |
| Model Name | EPDVR04 |
| Color | Black |
| Compatible Devices | Car, Truck |
| Video Recording Resolution | 1080p |
| Mounting Type | Rearview Mirror Mount |
| Control Method | Application |
| Automotive Part Position | Internal Front |
| Batteries Included | Yes |
| Rechargeable Battery | No |
| Display Type | LCD |
Warranty and Support
For warranty information and technical support, please refer to the official EinParts website or contact your retailer. Keep your purchase receipt as proof of purchase for warranty claims.
For further assistance, please visit: www.einparts.de