
KINGBOLEN YA200
KINGBOLEN YA200 OBD-II Scanner User Manual
Model: YA200
1. Introduction
The KINGBOLEN YA200 is a powerful and user-friendly OBD-II/EOBD diagnostic scanner designed to help vehicle owners and technicians quickly identify and resolve engine-related issues. This device allows you to read and clear Diagnostic Trouble Codes (DTCs), view live data streams, perform I/M readiness tests, and conduct specific tests like EVAP and O2 sensor checks. Its compact design and intuitive interface make it an essential tool for vehicle maintenance.
2. Safety Information
Please read and understand all safety instructions before operating the device. Failure to do so may result in damage to the device, vehicle, or personal injury.
- Always perform automotive testing in a safe environment.
- Do not connect or disconnect the device while the vehicle's ignition is on or the engine is running.
- Keep clothing, hair, hands, tools, test equipment, etc., away from all moving or hot engine parts.
- Wear eye protection that meets ANSI standards.
- Ensure the vehicle is in PARK (for automatic transmission) or NEUTRAL (for manual transmission) and the parking brake is engaged.
- Keep a fire extinguisher suitable for gasoline/chemical/electrical fires nearby.
3. Product Overview
The KINGBOLEN YA200 features a clear color screen and intuitive button layout for easy operation.

Figure 3.1: Front view of the KINGBOLEN YA200 OBD-II Scanner, highlighting its display, navigation buttons, and dedicated hotkeys.

Figure 3.2: Overview of the YA200's multifunctional capabilities, including one-key DTC, VIN, and I/M Readiness, 2.4-inch TFT color screen, battery voltage test, multi-language support, and lifetime free updates.
Device Components:
- 2.4-inch TFT Color Screen: Displays diagnostic results and menu options.
- OBD-II Connector: Connects to the vehicle's OBD-II port.
- DTC Button (F1): Quick access to Diagnostic Trouble Code lookup.
- VIN Button (F2): Quick access to Vehicle Identification Number display.
- I/M Button (F3): Quick access to I/M Readiness status.
- OK Button: Confirms selections or enters menus.
- Navigation Buttons (Up/Down/Left/Right): Navigates through menus and options.
- Back/Exit Button: Returns to the previous screen or exits a function.
4. Setup
The KINGBOLEN YA200 is a plug-and-play device, requiring minimal setup.
Connecting to the Vehicle:
- Locate the vehicle's 16-pin Data Link Connector (DLC). This is usually located under the dashboard on the driver's side.
- Turn the vehicle's ignition to the OFF position.
- Firmly plug the OBD-II connector of the YA200 into the vehicle's DLC.
- Turn the vehicle's ignition to the ON position (engine off or running, depending on the test). The scanner will automatically power on and establish communication with the vehicle's ECU.
5. Operating Instructions
This section details the primary functions of the KINGBOLEN YA200 scanner.
5.1. Main Menu Navigation
Once powered on, the main menu will display options such as Diagnosis, DTC Lookup, Battery, and Settings. Use the directional buttons to navigate and the OK button to select an option.
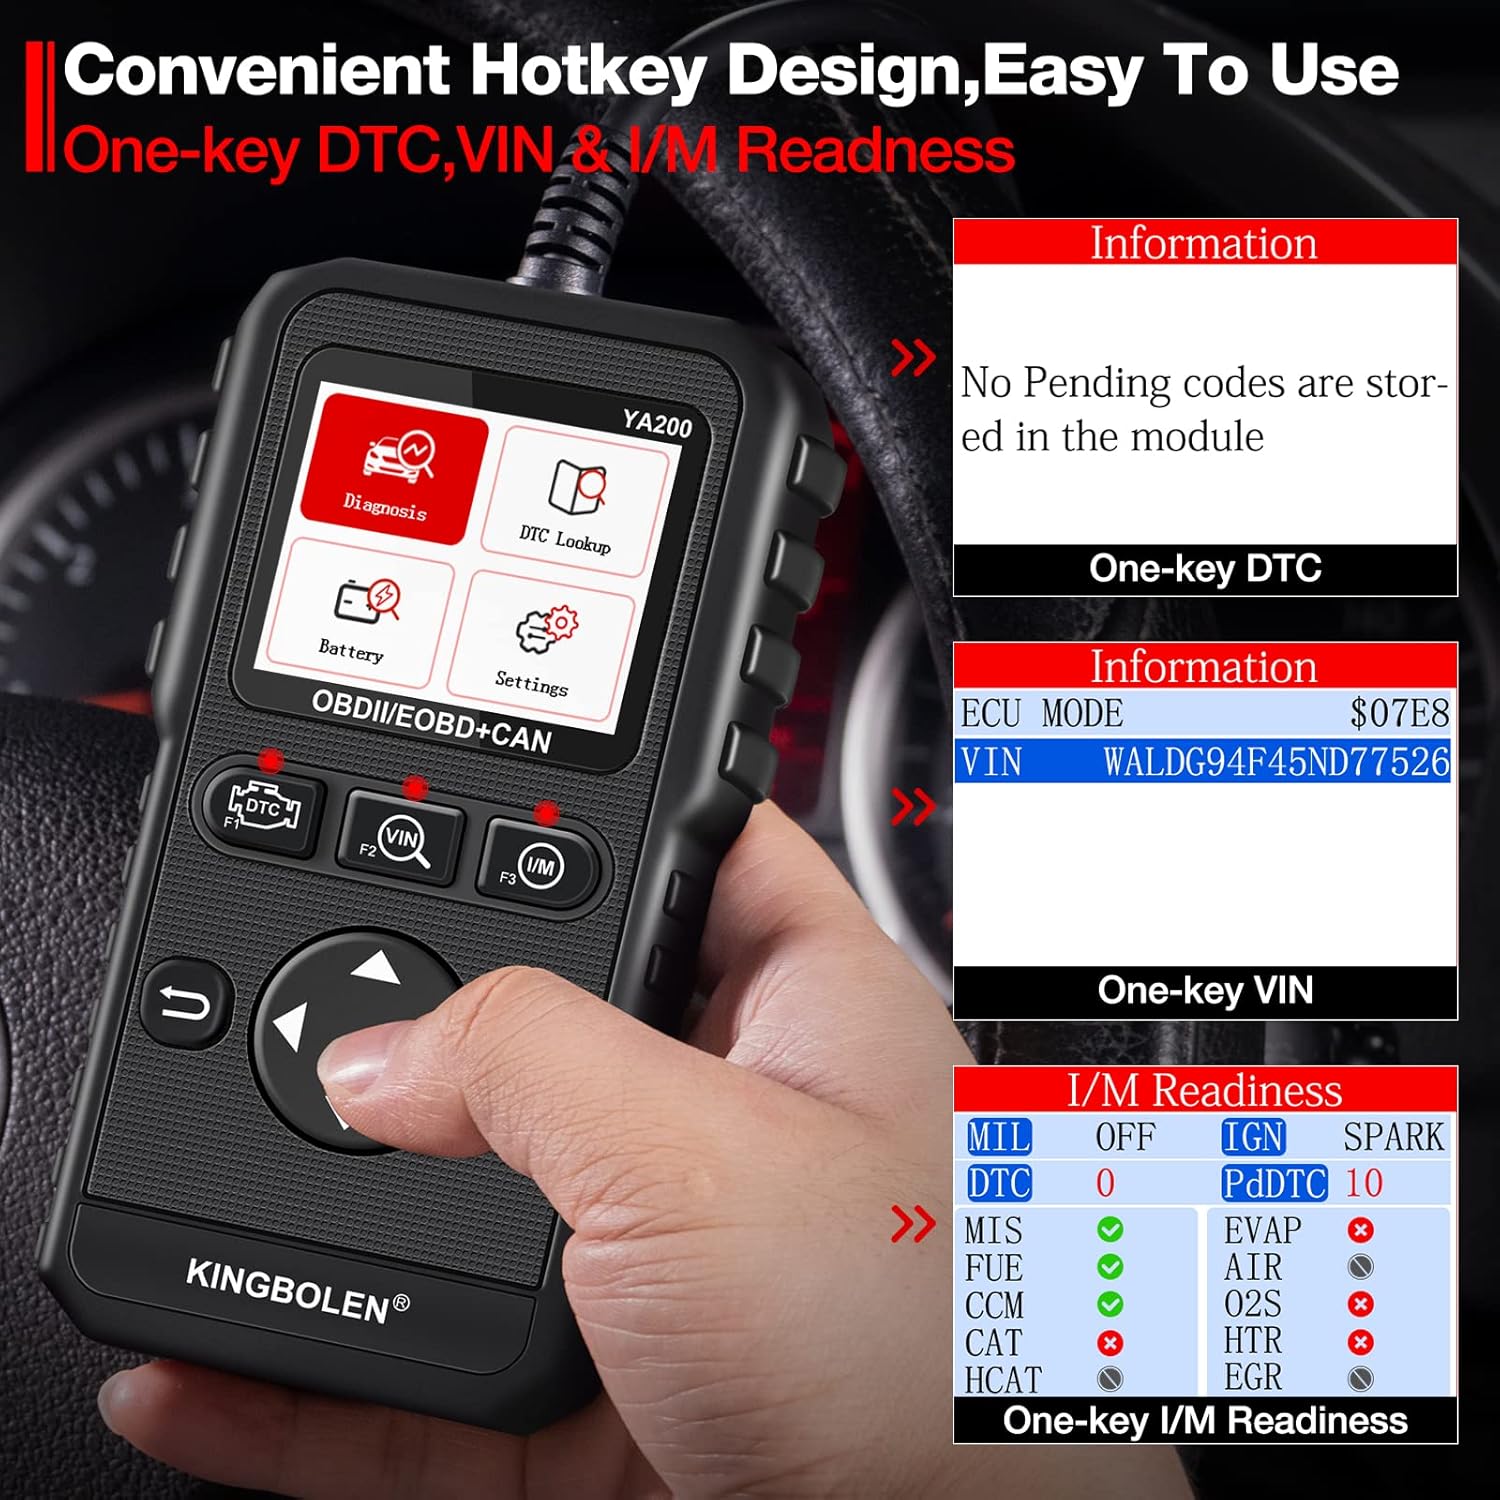
Figure 5.1: The convenient hotkey design of the YA200, allowing quick access to DTC lookup, VIN display, and I/M Readiness status.
5.2. Reading and Clearing Codes
To diagnose engine issues, you can read and clear Diagnostic Trouble Codes (DTCs).

Figure 5.2: The main diagnostic menu showing options to Read Codes and Erase Codes, along with other functions like I/M Readiness and Live Data.
Reading Codes:
- From the main menu, select "Diagnosis" and press OK.
- Select "Read Codes" and press OK. The scanner will display current, pending, and permanent codes.
- Use the Up/Down buttons to scroll through the codes and their descriptions.
Clearing Codes:
Clearing codes will turn off the Malfunction Indicator Lamp (MIL) or Check Engine Light. Ensure the vehicle's ignition is ON and the engine is OFF before clearing codes.
- From the "Diagnosis" menu, select "Erase Codes" and press OK.
- A confirmation message will appear. Select "Yes" to confirm.
- The scanner will confirm if the codes have been successfully cleared.
5.3. I/M Readiness Test
The I/M Readiness function checks the operation of the emission system monitors on the vehicle. This is useful for determining if the vehicle is ready for an emissions test.

Figure 5.3: The I/M Readiness screen, indicating whether emission monitors have run and completed (OK), not yet completed (INC), or are not supported by the vehicle (N/A).
- From the main menu, select "Diagnosis" or press the dedicated I/M button (F3).
- Select "I/M Readiness" and press OK.
- The screen will display the status of various emission monitors (e.g., Misfire, Fuel System, Catalyst). "OK" indicates the monitor has completed, "INC" indicates incomplete, and "N/A" indicates not applicable.
5.4. Live Data Stream
View real-time operational data from the vehicle's sensors and components.

Figure 5.4: The live data stream display, showing various sensor readings and the option for graphical recording and playback for detailed analysis.
- From the "Diagnosis" menu, select "Live Data" and press OK.
- You can view data in text format or, for some parameters, in a graphical waveform.
- Use the Up/Down buttons to scroll through different data parameters.
5.5. EVAP System Test
The EVAP (Evaporative Emission Control System) Test function lets you initiate a leak test for the vehicle's EVAP system.
- From the "Diagnosis" menu, select "EVAP Test" and press OK.
- Follow the on-screen instructions to perform the test.
5.6. O2 Sensor Test
The O2 Sensor Test function allows retrieval and viewing of O2 sensor monitor test results for the most recently performed tests from the vehicle's on-board computer.
- From the "Diagnosis" menu, select "O2 Sensor Test" and press OK.
- Review the test results displayed on the screen.
5.7. Battery Voltage Test
The YA200 can perform a basic voltage test for 12V vehicle batteries.

Figure 5.5: The battery voltage test screen, showing real-time voltage readings and a graphical representation of the battery's performance.
- From the main menu, select "Battery" and press OK.
- The scanner will display the current battery voltage.
5.8. Language Settings
The device supports multiple languages for user convenience.

Figure 5.6: The language selection screen, illustrating the device's support for 9 different languages, including English, French, German, Italian, and Spanish.
- From the main menu, select "Settings" and press OK.
- Select "Languages" and choose your preferred language from the list.
6. Maintenance
Proper maintenance ensures the longevity and optimal performance of your KINGBOLEN YA200 scanner.
Cleaning:
- Use a soft, damp cloth with mild detergent to clean the exterior of the scanner.
- Do not use abrasive cleaners or solvents.
- Keep the screen clean and free from scratches.
Software Updates:
The KINGBOLEN YA200 offers lifetime free software updates via PC to ensure compatibility with new vehicle models and to improve functionality.
- Visit the official KINGBOLEN website to download the update tool.
- Connect the scanner to your PC using the provided USB cable.
- Follow the instructions in the update tool to download and install the latest software.
7. Troubleshooting
This section provides solutions to common issues you might encounter.
| Problem | Possible Cause | Solution |
|---|---|---|
| Scanner fails to power on. | Loose connection; Vehicle battery low; Blown fuse in vehicle's OBD-II circuit. | Check the connection to the vehicle's DLC. Ensure vehicle battery has sufficient charge. Check vehicle's fuse box for a blown fuse related to the OBD-II port. |
| Communication error with vehicle. | Incorrect protocol; Faulty connection; Vehicle not OBD-II compliant. | Verify the vehicle is OBD-II compliant (most vehicles after 1996 in the US, 2001 in Europe). Ensure the connection is secure. Try on another OBD-II compliant vehicle. |
| Codes cannot be cleared. | Ignition not ON; Fault still present; Multiple ECUs. | Ensure ignition is ON (engine off). The fault may be a hard fault requiring repair before codes can be cleared. Some vehicles require specific procedures. |
| Screen freezes or device is unresponsive. | Software glitch; Power interruption. | Disconnect the scanner from the vehicle, wait a few seconds, and reconnect. Perform a software update if available. |
8. Specifications
| Brand | KINGBOLEN |
| Model | YA200 |
| Item Weight | 250 g |
| Dimensions (L x W x H) | 8.2 x 5.3 x 16.1 cm |
| Screen Size | 2.4 Inches |
| Display Resolution | 320x240 pixels |
| Power Source | Vehicle OBD-II Port (Cable Electric) |
| Operating Voltage | 9-16V |
| Supported Protocols | OBDII/EOBD+CAN |
9. Warranty and Support
KINGBOLEN is committed to providing high-quality products and customer satisfaction.
Software Updates:
The KINGBOLEN YA200 comes with lifetime free software updates via PC. Regularly updating your device ensures optimal performance and compatibility with the latest vehicle models.
Technical Support:
For technical assistance, troubleshooting, or any inquiries regarding your KINGBOLEN YA200 scanner, please contact our support team:
- Email: support@kingbolen.com
Ask a question about this manual
Ask about setup, troubleshooting, compatibility, parts, safety, or missing instructions. Manuals+ will review the question and use this page’s manual context to help answer it.