
ddpai N3 PRO GPS
DDPAI N3 Pro Dual Dash Cam User Manual
Model: N3 PRO GPS
Brand: DDPAI
1. Introduction
This user manual provides comprehensive instructions for the installation, operation, and maintenance of your DDPAI N3 Pro Dual Dash Cam. Designed to enhance your driving safety and provide reliable evidence in case of incidents, this dual dash camera system captures high-quality video from both the front and rear of your vehicle.
Please read this manual thoroughly before using the product to ensure proper functionality and to maximize its features. Keep this manual for future reference.
2. Package Contents
Verify that all items listed below are included in your package:
- 1x 2.5K N3P Dash Cam (Front)
- 1x 1080P In-car Rear Camera
- 1x Car Charger
- 1x 9.84ft Dash Cam Front Power Cable
- 1x 18ft Rear Car Camera Cable
- 1x Dash Cam Bracket
- 1x User Manual
- 1x 3M Sticker
- 1x Installation Tool
3. Product Overview
The DDPAI N3 Pro Dual Dash Cam system consists of a main front camera unit and a compact rear camera. Below are the key components and their functions:
3.1. Main Front Camera
The front camera captures 2.5K (1600P) video and houses the main processing unit, GPS module, Wi-Fi module, and control buttons.
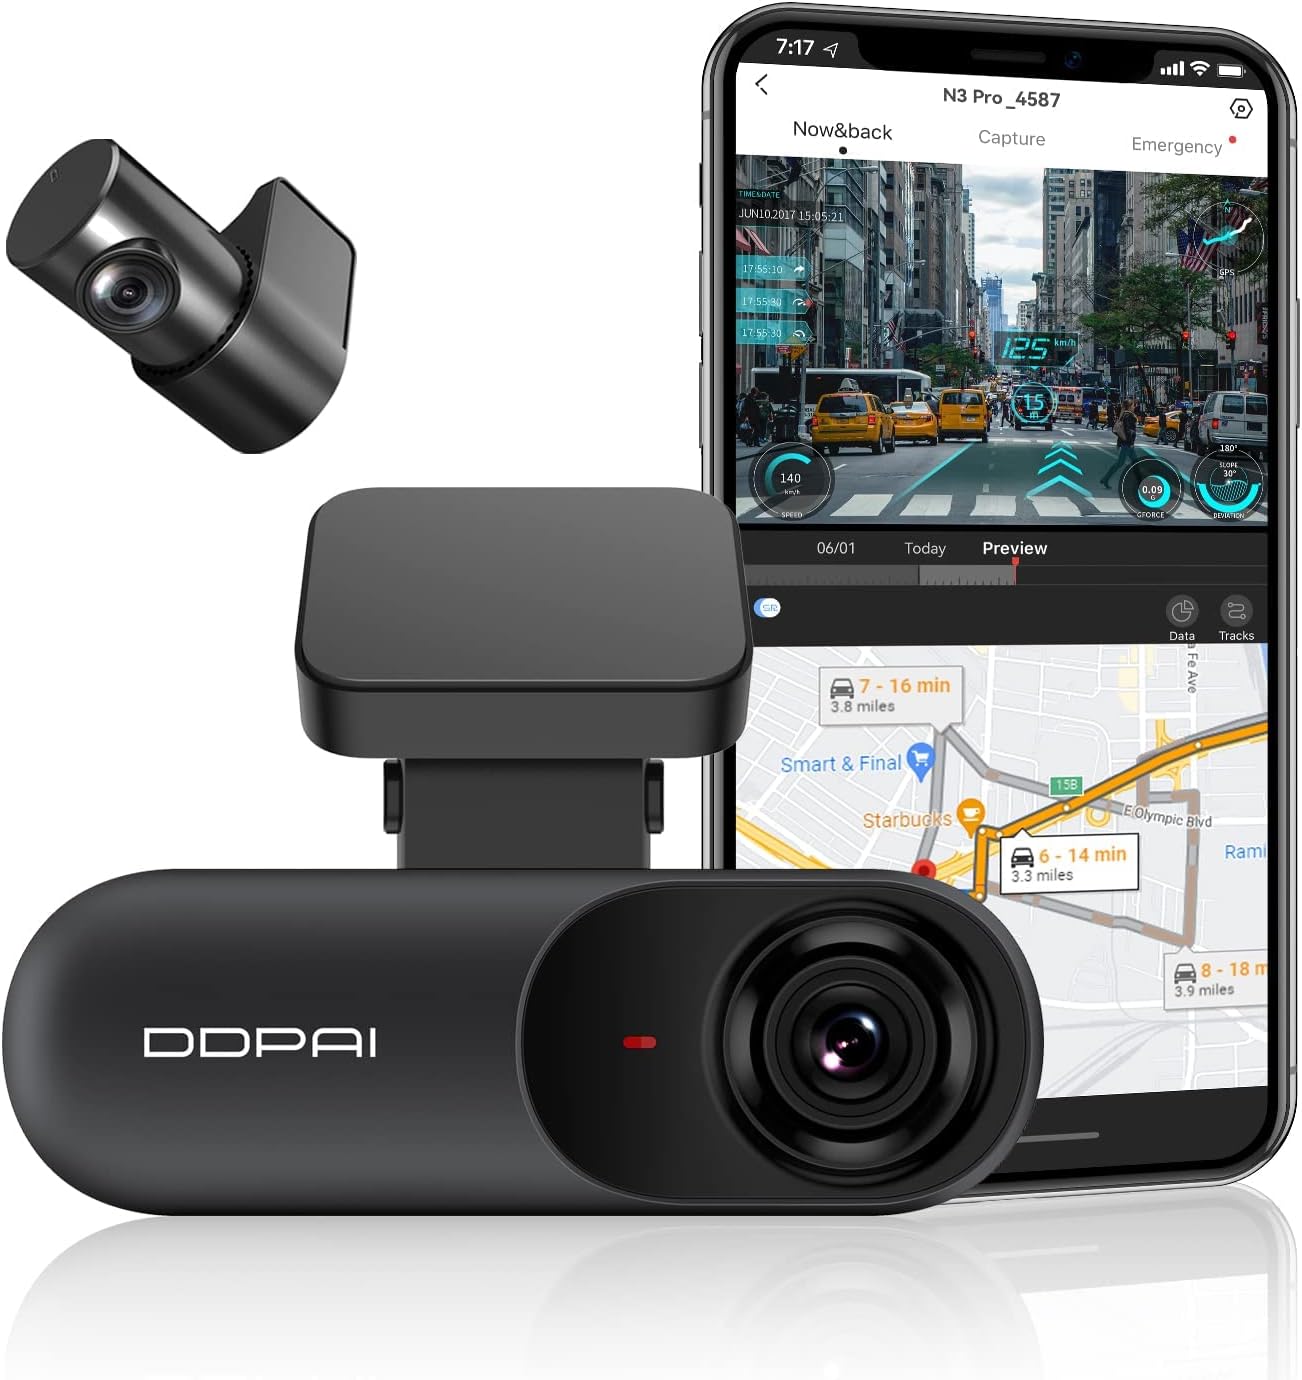
Figure 3.1: DDPAI N3 Pro Dual Dash Cam (Front and Rear) with App Interface.
This image displays the main DDPAI N3 Pro dash cam unit, the smaller rear camera, and a smartphone screen showing the accompanying mobile application interface with live view and map data.
3.2. Rear Camera
The rear camera records 1080P video and connects to the main unit via a dedicated cable. It is designed for discreet installation on the rear windshield.
3.3. Foldable Design and Dimensions
The dash cam features a compact and foldable design, allowing for flexible positioning and minimal obstruction of your view.

Figure 3.2: Foldable Design and Dimensions of the Dash Cam.
This diagram illustrates the compact, foldable design of the dash cam, highlighting its adjustable angle and built-in GPS module. It also shows options for capturing inside or outside the vehicle.
4. Setup
Before permanent installation, it is recommended to perform an initial setup to ensure all components are functioning correctly.
4.1. Inserting the MicroSD Card
The DDPAI N3 Pro supports MicroSD cards up to 256GB (Class 10 or higher recommended, not included). Ensure the dash cam is powered off before inserting or removing the card.
- Locate the MicroSD card slot on the side of the main dash cam unit.
- Insert the MicroSD card with the gold contacts facing the back of the camera until it clicks into place.
- To remove, gently push the card inward until it clicks, then release to eject.
4.2. Initial Power-On Check
Connect the front dash cam to the car charger using the provided power cable. Plug the car charger into your vehicle's cigarette lighter socket. The dash cam should power on automatically and indicate recording status.
Video 4.1: DDPAI N3 PRO 2K Dash Cam Front and Rear Camera Overview.
This video provides an overview of the DDPAI N3 Pro dash cam, including its components and initial setup steps. It demonstrates connecting the camera and preparing for installation.
5. Installation
Follow these steps for optimal installation of your DDPAI N3 Pro Dual Dash Cam.
5.1. Front Camera Installation
- Clean the area on your windshield where you intend to mount the dash cam. Ensure it is free of dust and grease.
- Attach the dash cam bracket to the main unit.
- Remove the protective film from the 3M adhesive on the bracket and firmly press it onto the chosen spot on the windshield, ideally behind the rearview mirror to avoid obstructing your view.
- Route the front power cable along the edge of the windshield and down to your car's cigarette lighter socket. Use the provided installation tool to tuck the cable neatly under the trim.
5.2. Rear Camera Installation
- Clean the rear windshield area where the rear camera will be mounted.
- Attach the rear camera to its bracket.
- Remove the protective film from the 3M adhesive on the rear camera bracket and stick it to the middle of the rear windshield.
- Connect the rear camera cable to the rear camera and route it along the headliner and side pillars to the front dash cam unit. Plug the rear camera cable into the designated port on the front dash cam.

Figure 5.1: Hidden and Discreet Installation.
This image illustrates the recommended hidden cable routing for both the front and rear dash cameras, ensuring a clean and unobtrusive installation within the vehicle's interior.
Video 5.2: DDPAI 2.5K Dual Car Dash Cam Front and Rear Installation.
This video demonstrates the step-by-step installation process for the DDPAI 2.5K Dual Dash Cam, covering both front and rear camera placement and cable management.
6. DDPAI App Usage
The DDPAI App allows you to control your dash cam, view live footage, download videos, and manage settings directly from your smartphone.
6.1. Downloading the App
Scan the QR code in the user manual or search for "DDPAI" on the Google Play Store (Android) or Apple App Store (iOS) to download the official DDPAI App.

Figure 6.1: DDPAI App Download Options.
This image shows a smartphone displaying a QR code for the DDPAI app, along with icons for downloading from Google Play and the App Store, emphasizing easy access to the application.
6.2. Connecting to the Dash Cam
- Ensure your dash cam is powered on.
- Enable Bluetooth on your smartphone.
- Open the DDPAI App and tap "Add a device". The app will scan for nearby Bluetooth devices.
- Select your dash cam's device name (e.g., "DDPAI_N3Pro_XXXX") from the list.
- Follow the on-screen prompts to authorize the connection by pressing the function button on the dash cam.
- For Wi-Fi connection (required for live view and file transfer), the app will guide you to your phone's Wi-Fi settings. Select the dash cam's Wi-Fi network (e.g., "DDPAI_N3Pro_XXXX") and enter the default password (usually "1234567890").
6.3. App Functions
Once connected, you can access various features:
- Live Preview: View real-time footage from both front and rear cameras.
- Device Album: Browse and download recorded videos and photos to your phone.
- Device Settings: Adjust camera settings such as recording resolution, G-sensor sensitivity, parking mode, and more.
- Firmware Update: Update the dash cam's firmware over-the-air (OTA) through the app.
Video 6.2: DDPAI App Tutorial.
This tutorial video guides users through the features and functionalities of the DDPAI mobile application, including device connection, live view, file management, and settings adjustment.
7. Operating Instructions
The DDPAI N3 Pro is designed for automatic operation once powered on. Here's how its core features work:
7.1. Dual Recording (2.5K Front + 1080P Rear)
The dash cam simultaneously records high-definition video from both the front (1600P) and rear (1080P) cameras, providing comprehensive coverage of your driving environment. This enhances clarity for details like license plates and road signs.
Figure 7.1: 2.5K Front and 1080P Rear Dual Recording.
This image demonstrates the high-definition recording capabilities of the DDPAI N3 Pro, showcasing clear footage from both the 2.5K front camera and the 1080P rear camera, even at a distance.
7.2. Super Night Vision 2.0
Equipped with an advanced CMOS sensor, Night Vision 2.0, a large F1.8 aperture, and a 5-layer lens, the dash cam delivers enhanced clarity in low-light conditions. WDR (Wide Dynamic Range) technology further optimizes image quality, ensuring critical details are captured day and night.

Figure 7.2: NightVIS Technology for Super-Clarity Day and Night.
This graphic highlights the key technologies contributing to the dash cam's superior night vision, including WDR, NightVIS, and a wide F1.8 aperture, which improve clarity and detail capture in challenging light conditions.
7.3. Built-in GPS and SR2.0 Technology
The integrated GPS module records your driving route, speed, and location data. The SR2.0 technology, accessible via the DDPAI app, provides real-time driving data such as acceleration, distance to vehicles ahead, and lane deviation alerts, enriching your driving experience.

Figure 7.3: Built-in GPS & Virtual and Reality Features.
This image illustrates the advanced features of the DDPAI app, including real-time driving data display (speed, G-force, deviation) and GPS tracking, providing a comprehensive overview of driving metrics.
7.4. 24-Hour Parking Mode & Collision Lock (G-Sensor)
The dash cam features a built-in G-sensor that automatically detects sudden shakes or collisions while driving or parked. In parking mode, it records critical footage to protect your vehicle. For 24-hour parking monitoring, an additional hardwire kit (ASIN: B0D12D7HSC) is required and sold separately.

Figure 7.4: Essential Witness for Accidents.
This graphic highlights the dash cam's role as an essential witness, featuring 24-hour parking monitoring and emergency lock functions that automatically save footage during collisions or suspicious activities.
7.5. Loop Recording
Loop recording ensures continuous recording by automatically overwriting the oldest unlocked files when the MicroSD card is full. This guarantees that you always have the most recent footage available.
8. Maintenance
Proper maintenance ensures the longevity and optimal performance of your dash cam.
8.1. Formatting the MicroSD Card
It is recommended to format the MicroSD card regularly (e.g., once a month) to prevent data corruption and ensure smooth recording. This can typically be done through the DDPAI App's device settings.
8.2. Cleaning the Lenses
Use a soft, lint-free cloth to gently wipe the front and rear camera lenses. Avoid using abrasive cleaners or solvents that could damage the lens coating.
8.3. Firmware Updates
Regularly check for firmware updates via the DDPAI App. Firmware updates often include performance improvements, bug fixes, and new features. Follow the app's instructions for a safe update process.
8.4. Super Capacitor Technology
The DDPAI N3 Pro utilizes a built-in super capacitor instead of a traditional lithium battery. This technology offers enhanced durability and safety, especially in extreme temperatures ranging from -4°F to 158°F, preventing issues like battery bulging or overheating.

Figure 8.1: Super Performance Capacitor Benefits.
This image highlights the advantages of the built-in Super Capacitor, such as resistance to extreme temperatures (-4°F to 158°F), increased safety, heat resistance, and longer lifespan, contrasting it with the potential hazards of lithium batteries.
9. Troubleshooting
If you encounter issues with your DDPAI N3 Pro, refer to the following common problems and solutions:
| Problem | Possible Cause / Solution |
|---|---|
| Dash cam does not power on. |
|
| Cannot connect to the DDPAI App. |
|
| Recording issues (e.g., corrupted files, stops recording). |
|
| GPS not working or inaccurate. |
|
10. Specifications
| Feature | Detail |
|---|---|
| Product Dimensions | 2.05 x 8.85 x 5.91 inches |
| Item Weight | 12.3 ounces |
| Model Number | N3 PRO GPS |
| Batteries | 1 AA batteries required (for remote, if applicable, not for main unit) |
| Video Capture Resolution | Front: 1600P (2.5K), Rear: 1080P |
| Wide Angle | Front: 140°, Rear: 125° |
| Connectivity Technology | Wi-Fi |
| Special Features | Built-In WiFi, G-Sensor, Night Vision, Built-In GPS, 24H Parking Monitor (requires hardwire kit) |
| Storage Support | Up to 256GB MicroSD (Class 10 or higher) |
| Operating Temperature | -4°F to 158°F (with Super Capacitor) |
11. Warranty and Support
11.1. Warranty Information
The DDPAI N3 Pro Dash Cam comes with an 18-month warranty from the date of purchase, covering manufacturing defects. Please retain your proof of purchase for warranty claims.
11.2. Customer Support
For any questions, technical support, or warranty inquiries, please contact DDPAI customer support:
- Email: servicecenter@ddpai.com
- User Manual (PDF): Download PDF User Manual
DDPAI offers quick 24/7 live email customer support.
Related documentsN3 PRO GPS


Ask a question about this manual
Ask about setup, troubleshooting, compatibility, parts, safety, or missing instructions. Manuals+ will review the question and use this page’s manual context to help answer it.