1. Introduction
The uStream TT2 is a cutting-edge belt-drive turntable designed to deliver a premium vinyl listening experience. It combines classic analog sound reproduction with modern wireless convenience, featuring Bluetooth V5.1 connectivity for effortless pairing with compatible audio devices. This manual provides comprehensive instructions for setting up, operating, and maintaining your uStream TT2 turntable.
2. Package Contents
Please ensure all items are present before proceeding with setup:
- uStream TT2 Turntable Unit
- Dust Cover
- Platter
- Drive Belt
- Counterweight
- Anti-skate Weight
- Power Cable
- USB Recording Software (Audacity, typically provided via download link or CD)
- RCA Audio Cable
- Instruction Manual (this document)
3. Turntable Components
Familiarize yourself with the main components of your uStream TT2 turntable:

Figure 3.1: Top view of the uStream TT2 Turntable. This image shows the main unit with the dust cover open, revealing the platter, tonearm assembly, and speed/power knob.
- Platter: The circular platform on which records are placed. Made of aluminum for reduced resonance.
- Drive Belt: Located beneath the platter, it connects to the motor pulley to rotate the platter.
- Tonearm: The arm that holds the cartridge and stylus. Made of aluminum.
- Cartridge (Audio-Technica AT91): Houses the stylus and converts groove vibrations into electrical signals.
- Stylus: The needle that tracks the record grooves.
- Counterweight: Balances the tonearm and allows for adjustment of tracking force.
- Anti-skate Adjustment: Compensates for the inward force on the tonearm, ensuring even tracking.
- Speed Selector/Power Knob: Controls power and selects playback speeds (33 1/3 and 45 RPM).
- Dust Cover: Protects the turntable from dust when not in use.

Figure 3.2: Rear view of the uStream TT2 Turntable. This image highlights the connectivity options including RCA Line Out, Pre-Amp switch, USB port, and AC power input.
- RCA Outputs (LINE OUT): For connecting to an external amplifier or receiver.
- PRE-AMP Switch (ON/OFF): Toggles the built-in RIAA equalizer. Set to ON for connecting to line-level inputs (e.g., AUX on a stereo system) or Bluetooth. Set to OFF for connecting to a dedicated PHONO input on an amplifier.
- USB Port: For connecting to a computer to digitize vinyl records.
- AC Input: For connecting the power cable.

Figure 3.3: Close-up of the Audio-Technica AT91 moving magnet cartridge. This image provides a detailed view of the cartridge attached to the tonearm, responsible for sound reproduction.
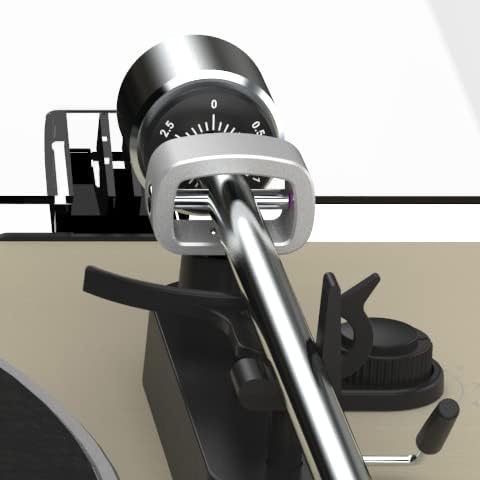
Figure 3.4: Close-up of the tonearm counterweight and anti-skate adjustment. This image shows the precision components used to balance the tonearm and ensure proper tracking force.
4. Setup Guide
4.1 Unpacking and Placement
- Carefully remove all components from the packaging.
- Place the turntable on a stable, level surface away from direct sunlight, heat sources, and excessive vibration.
4.2 Platter and Belt Installation
- Place the platter onto the center spindle.
- Locate the drive belt. Gently stretch the belt around the inner rim of the platter and hook it onto the motor pulley (a small brass or plastic cylinder) located in the motor well. Ensure the belt is not twisted.
- Place the felt mat on top of the platter.
4.3 Tonearm Balance and Tracking Force Adjustment
- Remove the stylus protector from the cartridge.
- Place the counterweight onto the rear of the tonearm and twist it clockwise until it is approximately halfway on.
- Release the tonearm clamp. Carefully move the tonearm away from its rest.
- Adjust the counterweight by rotating it until the tonearm is perfectly balanced, floating horizontally above the platter. Do not let the stylus touch the platter.
- Once balanced, hold the counterweight steady with one hand and rotate the numbered ring on the front of the counterweight until the "0" aligns with the line on the tonearm.
- Rotate the entire counterweight (both the numbered ring and the weight) clockwise until the desired tracking force is set. For the Audio-Technica AT91 cartridge, the recommended tracking force is typically 2.0 grams. Align the "2.0" mark with the line on the tonearm.
- Return the tonearm to its rest and secure it with the clamp.
4.4 Anti-skate Adjustment
- Attach the small loop of the anti-skate weight's thread to the anti-skate lever on the tonearm support.
- Pass the thread through the wire support loop.
- The anti-skate force should generally match the tracking force. If your tracking force is 2.0 grams, set the anti-skate to the corresponding notch or number (usually 2).
4.5 Dust Cover Installation
- Insert the hinges of the dust cover into the hinge slots on the rear of the turntable base.
4.6 Audio Connections
Your uStream TT2 offers both wired (RCA) and wireless (Bluetooth) audio output options.
4.6.1 RCA Wired Connection
- Connect the RCA audio cable (red and white plugs) from the "LINE OUT" ports on the rear of the turntable to the corresponding audio input (e.g., AUX, CD, LINE IN) on your amplifier, receiver, or powered speakers.
- PRE-AMP Switch:
- Set to ON if connecting to a standard line-level input (e.g., AUX, CD, LINE IN) on your amplifier/receiver, or if using Bluetooth. This activates the built-in phono preamp.
- Set to OFF if connecting to a dedicated "PHONO" input on your amplifier/receiver, as these inputs have their own built-in phono preamp.
4.6.2 Power Connection
- Connect the power cable to the AC input on the rear of the turntable.
- Plug the other end of the power cable into a suitable wall outlet.
5. Operation
5.1 Playing a Record
- Place a record on the platter.
- Select the correct speed (33 1/3 or 45 RPM) using the speed selector knob. For 45 RPM records, you may need to use a 45 RPM adapter (not included, but commonly available).
- Rotate the speed selector knob to turn the turntable ON. The platter will begin to spin.
- Gently lift the tonearm using the cueing lever.
- Position the tonearm over the desired starting groove of the record.
- Slowly lower the cueing lever to gently place the stylus onto the record.
- At the end of the record, the auto-stop function will stop the platter rotation. Lift the tonearm using the cueing lever, return it to its rest, and secure it with the clamp. Rotate the speed selector knob to OFF to power down the unit.
5.2 Bluetooth Pairing
Ensure the PRE-AMP switch on the rear is set to ON for Bluetooth functionality.
- Power on the uStream TT2 turntable.
- Activate Bluetooth pairing mode on your desired Bluetooth speaker or headphones. Refer to your audio device's manual for specific instructions.
- The uStream TT2 will automatically enter pairing mode when powered on with the PRE-AMP switch ON. The Bluetooth indicator light (if present, typically near the speed knob) will flash.
- Once successfully paired, the Bluetooth indicator light will become solid.
- You can now play records, and the audio will stream wirelessly to your paired Bluetooth device.
5.3 Digitizing Vinyl Records (USB)
The uStream TT2 allows you to convert your vinyl records into digital audio files using the USB port and included Audacity software.
- Connect the USB cable (not included, standard USB-A to USB-B printer cable) from the turntable's USB port to an available USB port on your computer.
- Install the Audacity software on your computer. (Download link or CD provided with purchase).
- Open Audacity and configure the input device to recognize the turntable (often listed as "USB Audio CODEC" or similar).
- Begin playing a record on the turntable.
- In Audacity, click the "Record" button to start recording the audio.
- When finished, click "Stop" in Audacity. You can then edit and export your digitized audio files.
6. Maintenance and Care
6.1 Cleaning the Stylus
- A dirty stylus can cause poor sound quality and damage to your records.
- Use a soft brush specifically designed for stylus cleaning. Brush gently from back to front (away from the cantilever).
- Do not use solvents or excessive force.
6.2 Cleaning the Turntable
- Wipe the dust cover and plinth with a soft, dry, lint-free cloth.
- For stubborn marks, use a slightly damp cloth with mild soap, then dry thoroughly.
- Avoid using abrasive cleaners or solvents, as they can damage the finish.
6.3 Belt Replacement
The drive belt is a wear item and may need replacement over time if it stretches or degrades, leading to inconsistent speed. Replacement belts can be obtained from authorized Mitchell Acoustics dealers or reputable audio suppliers.
7. Troubleshooting
If you encounter issues with your uStream TT2, please consult the following table before contacting support.
| Problem | Possible Cause | Solution |
|---|---|---|
| No power | Power cable not connected; Outlet not active; Power knob OFF. | Ensure power cable is securely connected to turntable and outlet. Check outlet with another device. Rotate speed selector knob to ON. |
| No sound or low volume | Incorrect PRE-AMP switch setting; RCA cables not connected properly; Amplifier/receiver input not selected; Bluetooth not paired. | Check PRE-AMP switch (ON for line-level/Bluetooth, OFF for PHONO input). Ensure RCA cables are fully inserted. Select correct input on your amplifier/receiver. Re-pair Bluetooth device. |
| Distorted sound or skipping | Stylus dirty or damaged; Incorrect tracking force/anti-skate; Record dirty or damaged; Turntable not level. | Clean stylus. Re-adjust tracking force and anti-skate. Clean record. Ensure turntable is on a level surface. Replace stylus if damaged. |
| Platter not spinning or inconsistent speed | Drive belt dislodged or worn; Incorrect speed selected. | Check and re-seat the drive belt. Replace belt if worn or stretched. Ensure correct speed (33 1/3 or 45 RPM) is selected. |
| Bluetooth pairing issues | PRE-AMP switch OFF; Device too far; Device already paired to another source. | Ensure PRE-AMP switch is ON. Move Bluetooth device closer to turntable (within 10 meters). Disconnect Bluetooth device from other sources and try pairing again. |
8. Specifications
| Feature | Detail |
|---|---|
| Model Name | uStream TT2 |
| Brand | Mitchell Acoustics |
| Connectivity Technology | Bluetooth V5.1, RCA (Line Out), USB |
| Maximum Rotational Speed | 33 1/3 RPM, 45 RPM |
| Cartridge Type | Audio-Technica AT91 Moving Magnet |
| Tonearm Material | Aluminum |
| Platter Material | Aluminum |
| Built-in Preamp | Yes (RIAA equalizer, switchable) |
| Special Features | Anti-skate adjustment, Adjustable counterweight, Auto-stop function, USB digitization |
| Product Dimensions (L x W x H) | 440 x 380 x 135 mm (17.32 x 14.96 x 5.31 inches) |
| Item Weight | 6.68 kg (14.72 pounds) |
| Material | Real wood veneer plinth (Black Ash), Plastic |
| Included Components | Power cable, USB recording software (Audacity) |
9. Warranty and Support
9.1 Warranty Information
Mitchell Acoustics products are crafted to exacting standards for superior performance. For specific warranty terms and conditions, please refer to the warranty card included with your product or visit the official Mitchell Acoustics website. Keep your proof of purchase for warranty claims.
9.2 Customer Support
If you require further assistance or have questions not covered in this manual, please contact Mitchell Acoustics customer support. Contact details can typically be found on the official Mitchell Acoustics website or on your product packaging.
Designed by Paul Mitchell, renowned British audio specialist.


