1. Product Overview
The Herrfilk Electric Lunch Box Food Heater is a versatile 4-in-1 portable food warmer designed to heat your meals quickly and efficiently. It supports multiple power sources (12V/24V for vehicles, 110V/220V for home/office) and features a 100W PTC constant temperature heating system. The unit includes a removable stainless steel food container, a separate fruit container, and essential utensils, all housed within a leakproof design for convenient use on the go.
2. Package Contents
- Electric Lunch Box main unit
- 1.8L 304 Stainless Steel Food Container
- 0.7L Food Grade PP Fruit Container
- Insulated Carry Bag
- Fork
- Spoon
- 110V/220V Power Cable (for home/office use)
- 12V/24V Power Cable (for car/truck use)
- User Manual (this document)

Figure 1: Exploded view of the Electric Lunch Box showing its components: Lid Locks, Strong Handle, Steam Outlet, Spoon & Fork, Fruit Layer, Power Button, and Stainless Steel Lunch Box.
3. Setup and Assembly
- Unpack: Carefully remove all components from the packaging.
- Initial Cleaning: Before first use, wash the stainless steel food container, the PP fruit container, fork, and spoon with warm soapy water. Rinse thoroughly and dry. Do not wash the main heating unit or immerse it in water.
- Assemble Containers: Place your food into the 1.8L stainless steel container. If using, place fruits or other separate items into the 0.7L PP fruit container.
- Insert Containers: Place the stainless steel container into the main heating unit. If using the fruit container, place it on top of the stainless steel container.
- Secure Lid: Close the main lid, ensuring the lid locks are securely fastened on both sides.
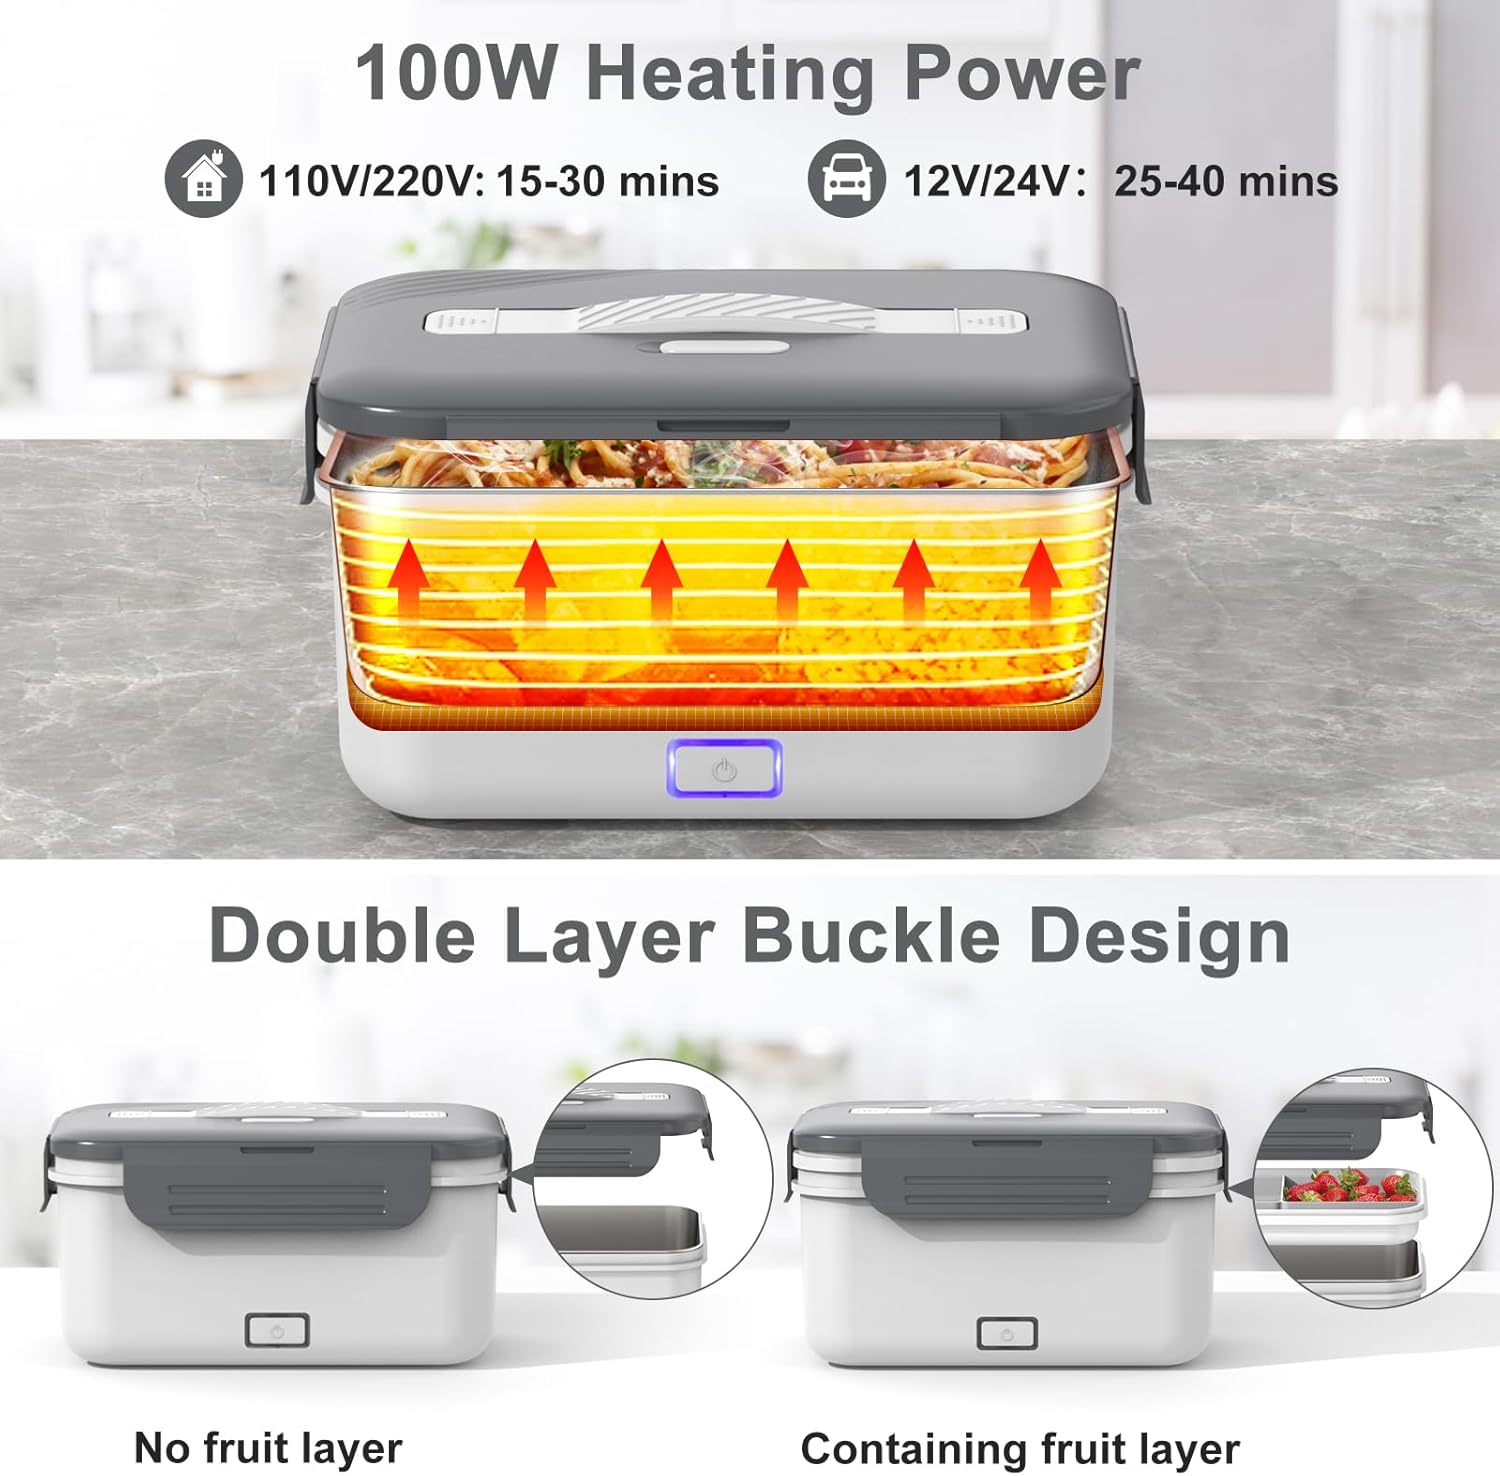
Figure 2: The double-layer buckle design allows for use with or without the fruit container.
4. Operating Instructions
4.1 Heating Your Meal
- Prepare Food: Place your cooked food into the stainless steel container. For best results and to prevent drying, add a small amount of water (1-2 tablespoons) to your food, especially if it's rice or pasta.
- Close and Vent: Secure the lid. Open the steam outlet on the lid to allow steam to escape during heating.
- Connect Power:
- For home/office (110V/220V): Use the provided AC power cable.
- For car/truck (12V/24V): Use the provided DC car adapter cable.
- Heating Time: The lunch box uses 100W high power PTC constant temperature heating.
- 110V/220V: Approximately 15-30 minutes.
- 12V/24V: Approximately 25-40 minutes.
- Enjoy: Once heated, unplug the device, close the steam vent, and carefully open the lid to enjoy your warm meal.

Figure 3: Heating process: 1. Add food and some water. 2. Close the cover and plug in the power supply. 3. Press the power button and open the air outlet. 4. Heat for 20-30 minutes. 5. Enjoy your hot meal.

Figure 4: The lunch box supports 110V/220V for office/home and 12V/24V for car/truck use.
5. Maintenance and Cleaning
- Unplug Before Cleaning: Always ensure the lunch box is unplugged from the power source and has cooled down before cleaning.
- Removable Parts: The 304 stainless steel food container, the PP fruit container, fork, and spoon are dishwasher safe. They can also be hand washed with warm soapy water.
- Main Heating Unit: The exterior of the main heating unit can be wiped clean with a damp cloth. Never immerse the main heating unit in water or any other liquid. Ensure the power port is dry before plugging in again.
- Storage: Store the lunch box and its components in a clean, dry place when not in use.

Figure 5: The stainless steel container and removable plastic layer are easy to clean and dishwasher safe.
6. Troubleshooting
- Food not heating:
- Ensure the power cable is securely plugged into both the lunch box and the power source.
- Verify the power source is active (e.g., car ignition is on, wall outlet is functional).
- Check if the indicator light on the lunch box is illuminated. If not, try a different power cable or outlet.
- Uneven heating or scorching:
- Add a small amount of water (1-2 tablespoons) to your food before heating to help distribute heat and prevent drying.
- Stir the food halfway through the heating process if possible, to ensure more even heating.
- Ensure the steam vent is open during heating to prevent excessive pressure buildup.
- Lid not sealing properly:
- Check for any food debris or obstructions around the silicone seal.
- Ensure the lid locks are fully engaged on both sides.
7. Specifications
| Model Number | HD-J-0054 |
| Brand | Herrfilk |
| Power | 100W |
| Voltage Compatibility | 12V/24V (DC), 110V/220V (AC) |
| Material | Stainless Steel (inner container), Food-grade PP (outer shell, fruit container) |
| Capacity | 1.8L (main container), 0.7L (fruit container) |
| Product Dimensions | 9.3"L x 6.6"W x 5.2"H |
| Item Weight | 10.6 ounces (approx. 300 grams) |
| Care Instructions | Hand Wash Only (main unit), Dishwasher Safe (removable containers/utensils) |

Figure 6: Detailed dimensions of the lunch box and its accessories.
8. Warranty and Support
Herrfilk provides a 30-day money-back guarantee and a 12-month replacement warranty for this Electric Lunch Box. If you encounter any issues with the product, such as it not heating or any other functional problems, please contact Herrfilk customer service for assistance. Contact information can typically be found on the product packaging or the official Herrfilk website.


