
Stealth SAQ-11215, S-314MKIT
Stealth 12 Gallon Ultra Quiet Air Compressor & ColorFit by Milton Coupler & Plug Kit Instruction Manual
Model: SAQ-11215 (Compressor), S-314MKIT (Coupler & Plug Kit)
1. Introduction
This manual provides comprehensive instructions for the safe and efficient operation, maintenance, and troubleshooting of your Stealth 12 Gallon Ultra Quiet Air Compressor (Model SAQ-11215) and the ColorFit by Milton Coupler & Plug Kit (Model S-314MKIT). Please read this manual thoroughly before initial use to ensure proper function and to prevent injury or damage.
2. Safety Information
Always observe basic safety precautions when using electrical appliances and air tools to reduce the risk of fire, electric shock, and personal injury.
General Safety Rules:
- Read all instructions before operating the compressor.
- Wear appropriate personal protective equipment (PPE), including safety glasses, hearing protection, and gloves.
- Ensure the work area is clean, well-lit, and free from obstructions.
- Do not operate the compressor in damp or wet locations, or in the presence of flammable liquids or gases.
- Keep children and bystanders away from the operating compressor.
- Always disconnect the power supply before performing any maintenance or adjustments.
- Do not exceed the maximum operating pressure of any air tool or accessory.
- Regularly inspect the air tank for rust or damage. Do not use a damaged tank.
- Drain condensation from the air tank daily to prevent corrosion.
Electrical Safety:
- Ensure the power supply voltage matches the compressor's requirements (12 Volts).
- Use only grounded outlets.
- Do not use extension cords unless absolutely necessary, and ensure they are properly rated for the compressor's power requirements.
- Never carry the compressor by its power cord.
3. Product Overview
3.1 Stealth 12 Gallon Ultra Quiet Air Compressor
The Stealth SAQ-11215 is a 12-gallon, 1.5 HP oil-free air compressor designed for quiet operation and long life. It features a maximum pressure of 150 PSI and is equipped with wheels and a handle for portability.

Figure 3.1: Front view of the Stealth 12 Gallon Ultra Quiet Air Compressor. This image shows the main unit with its control panel, tank, wheels, and handle.
Key Components:
- Air Tank: 12-gallon capacity, stores compressed air.
- Motor/Pump Assembly: 1.5 HP oil-free motor for quiet and maintenance-free operation.
- Pressure Gauges: Displays tank pressure and regulated output pressure.
- Regulator Knob: Adjusts the output air pressure.
- Quick Couplers: Two outlets for connecting air tools.
- Drain Valve: Located at the bottom of the tank for draining condensation.
- Wheels and Handle: For easy transport.
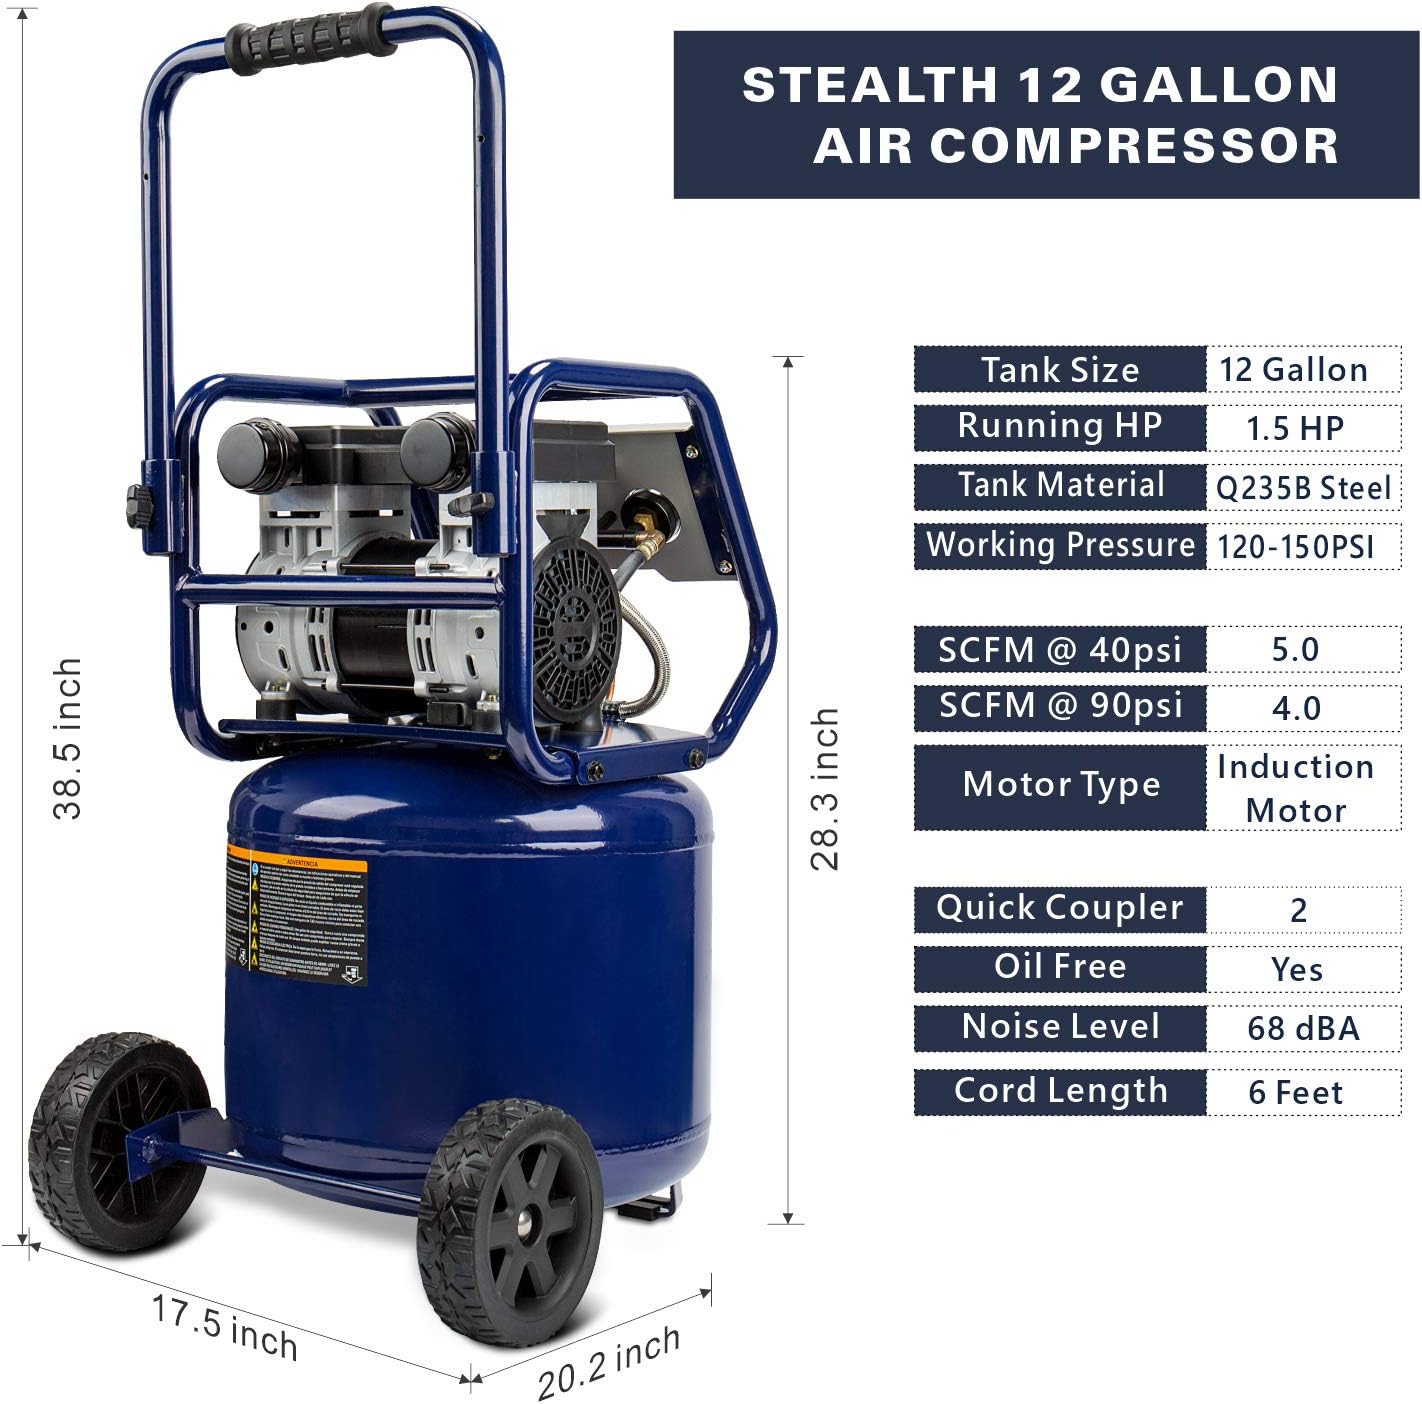
Figure 3.2: Dimensions of the Stealth 12 Gallon Air Compressor. This image provides a visual representation of the compressor's height, width, and depth, along with key specifications like tank size, horsepower, and noise level.
3.2 ColorFit by Milton Coupler & Plug Kit (M-Style, Red)
The Milton S-314MKIT is a 14-piece M-Style coupler and plug kit designed for easy identification and connection of air tools. The red color coding helps distinguish air lines.

Figure 3.3: The complete ColorFit by Milton Coupler & Plug Kit. This image displays all 14 pieces of the kit, including male and female plugs and couplers, all in a distinctive red finish.
Kit Contents:
- 6 Male Plugs (1/4" NPT)
- 4 Female Plugs (1/4" NPT)
- 2 Male Couplers (1/4" NPT)
- 2 Female Couplers (1/4" NPT)
All components are M-Style (Industrial) and feature a scratch-resistant anodized red coating. They are compatible with traditional Milton M-style and competitor M-style couplers and plugs.
4. Setup
4.1 Air Compressor Setup:
- Unpacking: Carefully remove the compressor from its packaging. Inspect for any shipping damage.
- Muffler Installation: Attach the included air filter/muffler assemblies to the intake ports on the pump head.
- Placement: Position the compressor on a firm, level surface in a well-ventilated area. Ensure adequate clearance around the unit for air circulation.
- Drain Valve: Ensure the drain valve at the bottom of the tank is closed before operation.
- Power Connection: Plug the power cord into a grounded 12-volt electrical outlet.
4.2 Coupler & Plug Kit Setup:
- Identify Components: Familiarize yourself with the male plugs, female plugs, male couplers, and female couplers.
- Thread Sealant: Apply thread sealant tape (not included) to the male threads of all plugs and couplers before installation to ensure an airtight seal.
- Attach Plugs to Tools: Thread the appropriate male or female plug onto the air inlet of your pneumatic tools. Tighten securely.
- Attach Couplers to Hoses: Thread the appropriate male or female coupler onto the ends of your air hoses. Tighten securely.
- Color Coding: Utilize the red color to designate specific air lines (e.g., for lubricated vs. non-lubricated air, or high vs. low pressure) to prevent cross-contamination.
5. Operating Instructions
5.1 Initial Break-in Procedure (Compressor Only):
Before first use, perform a 20-minute break-in to ensure optimal performance and longevity.
- With the power cord plugged in, turn the compressor's power switch to the "ON" position.
- Open the tank drain valve completely (located at the bottom of the tank). This will prevent pressure from building up.
- Allow the compressor to run for 20 minutes with the drain valve open. This helps seat the piston rings.
- After 20 minutes, turn the power switch to "OFF" and close the drain valve.
5.2 Standard Operation:
- Power On: Ensure the drain valve is closed. Turn the power switch to "ON". The compressor will begin to fill the tank.
- Pressure Build-up: The compressor will run until the tank pressure reaches its maximum (150 PSI), then it will shut off automatically.
- Adjust Output Pressure: Turn the regulator knob clockwise to increase output pressure and counter-clockwise to decrease it. Monitor the "TOOL" gauge for the desired pressure.
- Connect Air Tool: Pull back the collar on the quick coupler, insert the air tool's plug, and release the collar to secure the connection.
- Use Tool: Operate your pneumatic tool as per its own instruction manual. The compressor will cycle on and off automatically to maintain tank pressure as air is consumed.
- Disconnect Tool: Before disconnecting, ensure the air tool is not under pressure. Pull back the quick coupler collar to release the plug.
- Power Off: When finished, turn the power switch to "OFF".
- Drain Tank: Slowly open the drain valve to release all air pressure from the tank. Once pressure is at zero, leave the valve open to drain any accumulated moisture. Close the valve before next use.

Figure 5.1: Common applications for the Stealth Air Compressor. This image illustrates various pneumatic tools and tasks the compressor can support, including inflating, cleaning, caulk gun, roofing nailer, drill, paint sprayer, stapler pinner, brad/finishing nailer, wrench, chisel, and spray gun.
6. Maintenance
Regular maintenance ensures the longevity and safe operation of your air compressor.
Daily Maintenance:
- Drain Tank: Always drain condensation from the air tank after each use. This prevents rust and extends tank life.
- Inspect for Leaks: Check all connections and hoses for air leaks. A soapy water solution can be used to detect leaks.
Weekly/Monthly Maintenance:
- Clean Air Filter: The compressor is oil-free, but the air filter should be inspected and cleaned or replaced if dirty to ensure proper airflow to the pump.
- Inspect Power Cord: Check the power cord for any signs of damage, fraying, or exposed wires.
- Check Fasteners: Ensure all nuts, bolts, and screws are tight.
Coupler & Plug Kit Maintenance:
- Clean: Keep couplers and plugs free from dirt and debris.
- Lubricate (Optional): A small amount of pneumatic tool oil can be applied to the moving parts of couplers to ensure smooth operation, but avoid over-lubrication, especially if using with non-lubricated air tools.
- Inspect for Wear: Replace any worn or damaged couplers or plugs to maintain an airtight seal and prevent air leaks.
7. Troubleshooting
This section addresses common issues you might encounter with your air compressor.
| Problem | Possible Cause | Solution |
|---|---|---|
| Compressor does not start or runs intermittently. |
|
|
| Compressor runs continuously or cycles too frequently. |
|
|
| Low air pressure at the tool. |
|
|
| Excessive noise or vibration. |
|
|
8. Specifications
| Feature | Specification |
|---|---|
| Model (Compressor) | SAQ-11215 |
| Model (Coupler & Plug Kit) | S-314MKIT |
| Tank Capacity | 12 Gallons |
| Horsepower (HP) | 1.5 HP |
| Maximum Pressure | 150 PSI |
| CFM @ 90 PSI | 4.0 CFM |
| CFM @ 40 PSI | 5.0 CFM |
| Noise Level | 68 dB |
| Motor Type | Induction Motor |
| Oil-Free | Yes |
| Tank Material | Q235B Steel |
| Voltage | 12 Volts |
| Coupler Style | M-Style (Industrial) |
| Coupler & Plug NPT Size | 1/4" NPT |
9. Warranty and Support
For warranty information, technical support, or to order replacement parts, please contact Stealth customer service. Refer to the product packaging or the manufacturer's official website for the most current contact details.
When contacting support, please have your product model number (SAQ-11215 for the compressor, S-314MKIT for the coupler kit) and date of purchase readily available.
Related documentsSAQ-11215, S-314MKIT


Ask a question about this manual
Ask about setup, troubleshooting, compatibility, parts, safety, or missing instructions. Manuals+ will review the question and use this page’s manual context to help answer it.