Introduction
This manual provides essential information for the assembly, operation, maintenance, and troubleshooting of your Yokomo 1/12 Rookie Speed Type-A GT1 Pan Car Kit (Model GT1-01). Please read these instructions carefully before beginning assembly or operation to ensure proper function and longevity of your model.
This product is a kit and requires assembly. The body included in the kit is unpainted. Essential components such as the motor, battery, and RC mechanisms (receiver, servo, ESC) are not included and must be purchased separately.
1. Setup and Assembly
The Yokomo GT1-01 is a 1/12 scale 2WD racing car kit designed for assembly. Follow the detailed assembly guide provided in the kit packaging for step-by-step instructions. Ensure all parts are correctly installed and secured.

Figure 1.1: Overview of the Yokomo GT1-01 kit, showing the unpainted body and the assembled chassis with electronics installed (electronics not included in kit).
1.1 Chassis Assembly
Begin by assembling the main chassis components. Pay close attention to the orientation of parts and the tightness of screws. Over-tightening can damage plastic components.

Figure 1.2: Bottom view of the GT1-01 chassis, illustrating the flat design and screw placements for various components.
1.2 Front Suspension and Steering
Assemble the front suspension and steering linkages. Ensure smooth movement of all pivot points. Proper adjustment of the steering system is crucial for precise control.
- Install the front bumper and body posts securely.
- Attach the steering knuckles and tie rods.
- Ensure the servo is mounted correctly and connected to the steering linkage.

Figure 1.3: Detail of the front bumper and body post mounting points, secured with pins.

Figure 1.4: Detailed view of the front steering knuckle assembly, showing the pivot and linkage connection.
1.3 Rear Drive and Motor Installation
The GT1-01 features a direct drive system. Install the motor, ensuring proper gear mesh with the spur gear. Secure the rear axle and differential assembly.

Figure 1.5: View of the motor mounted within the rear drive assembly, showing the gear mesh.
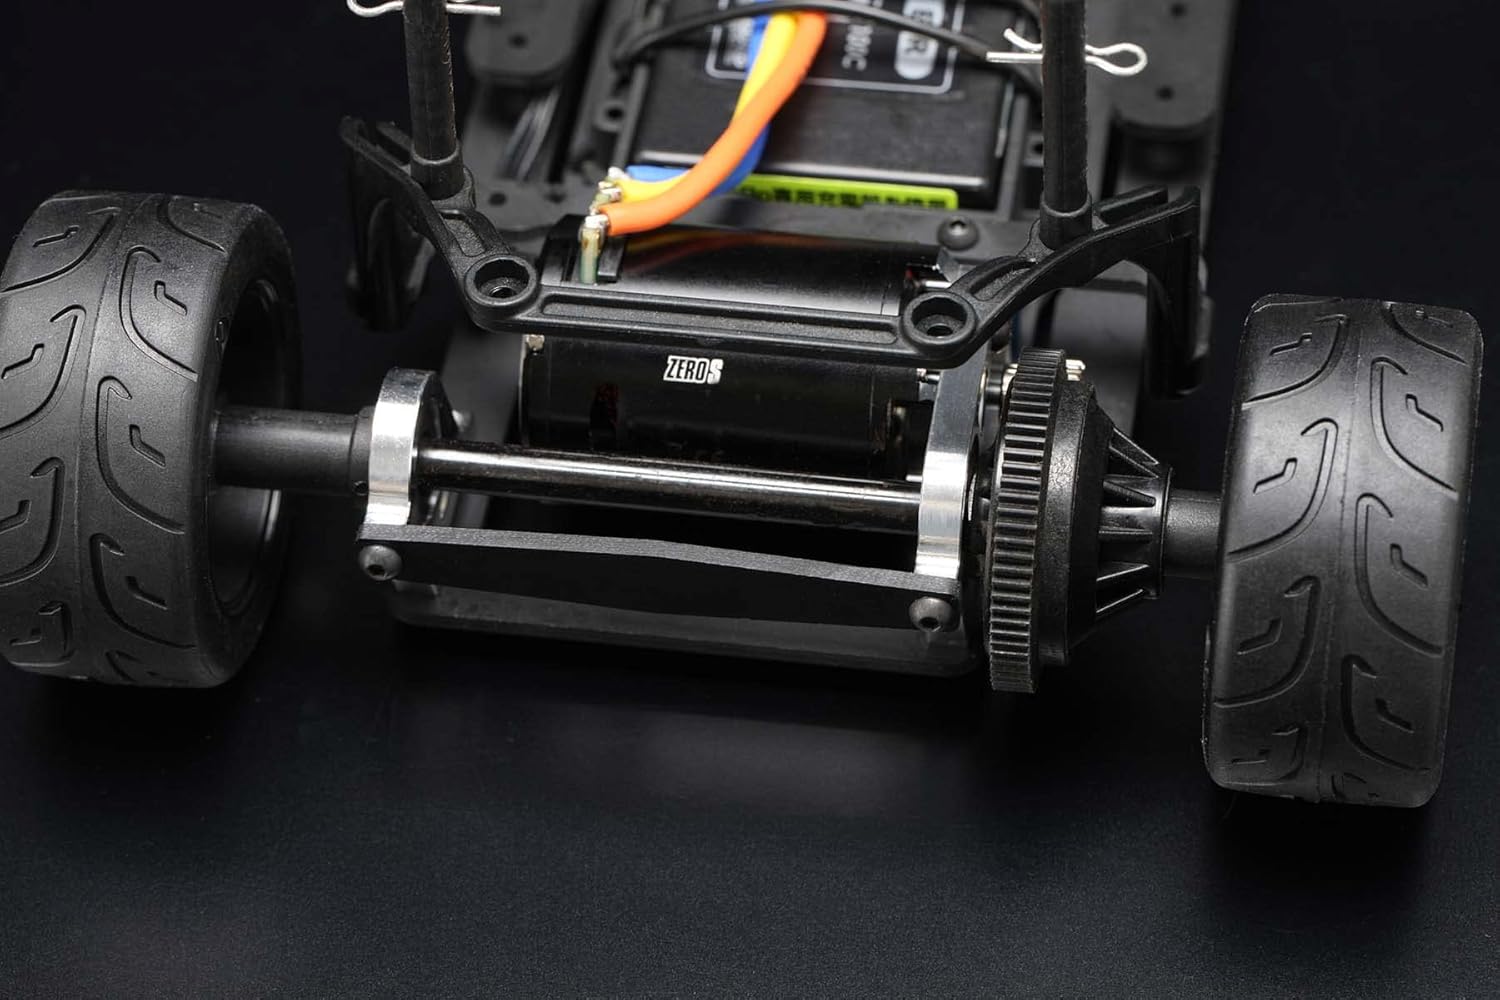
Figure 1.6: Rear perspective of the chassis, highlighting the motor, differential, and rear wheel attachment points.
1.4 Electronics Installation
Install your chosen Electronic Speed Controller (ESC), receiver, and battery. Ensure all wiring is neat, secure, and does not interfere with moving parts. Refer to the individual manuals for your specific electronic components for detailed installation and setup.

Figure 1.7: Top view of the chassis showing the typical layout for the ESC, receiver, and battery.

Figure 1.8: Detail of the battery retention system and the wiring connections to the ESC.
1.5 Wheel and Tire Installation
Mount the semi-slick tread radial tires onto the wheels and attach them to the axles. Ensure wheel nuts are tightened securely but not excessively, allowing the wheels to spin freely.

Figure 1.9: Detailed view of the semi-slick radial tire mounted on a wheel.
2. Operating Instructions
Once assembled and all electronics are properly installed and calibrated, your Yokomo GT1-01 is ready for operation. Always operate your RC car in a safe and open environment, away from people, pets, and obstacles.
- Pre-Run Check: Before each use, inspect all screws for tightness, check battery charge, and verify proper function of steering and throttle.
- Power On Sequence: Turn on your transmitter first, then the receiver/ESC on the car.
- Driving: The direct drive system and semi-slick tires provide excellent performance. Practice gentle throttle and steering inputs to familiarize yourself with the car's handling characteristics.
- Power Off Sequence: Turn off the receiver/ESC on the car first, then your transmitter.
Avoid operating the car in wet conditions or on excessively dusty surfaces, as this can damage electronics and moving parts.
3. Maintenance
Regular maintenance will extend the life and performance of your GT1-01 kit. Perform these checks after every few runs or as needed:
- Cleaning: Remove dirt and debris from the chassis, suspension, and drivetrain using a soft brush or compressed air.
- Screw Check: Inspect all screws for looseness and tighten as necessary. Pay particular attention to screws holding critical components like the motor mount and suspension arms.
- Tire Inspection: Check tires for wear, cuts, or damage. Replace worn tires to maintain optimal grip and handling.
- Drivetrain: Inspect gears for wear and ensure smooth operation. Lubricate moving parts as recommended by the assembly manual.
- Battery Care: Follow the manufacturer's instructions for charging, discharging, and storing your battery to ensure safety and longevity.
4. Troubleshooting
If you encounter issues with your GT1-01, refer to the following common troubleshooting steps:
| Problem | Possible Cause | Solution |
|---|---|---|
| Car does not respond to controls. |
|
|
| Steering is erratic or unresponsive. |
|
|
| Motor runs but wheels do not turn. |
|
|
For more complex issues, consult the detailed assembly manual or contact Yokomo customer support.
5. Specifications
| Feature | Detail |
|---|---|
| Model Number | GT1-01 |
| Scale | 1/12 |
| Drive Type | 2WD, Direct Drive |
| Product Dimensions | 3.94 x 3.94 x 3.94 inches (approximate, as packaged) |
| Item Weight | 2.66 pounds (approximate, as packaged) |
| Assembly Required | Yes (Kit) |
| Additional Items Required | Motor, ESC, Receiver, Servo, Battery, Charger, Transmitter, Paint for body. |
6. Warranty and Support
For specific warranty information regarding your Yokomo GT1-01 Pan Car Kit, please refer to the documentation included with your purchase or contact the retailer where the product was acquired. Warranty terms may vary by region and retailer.
For technical support, spare parts, or further assistance, please visit the official Yokomo website or contact their customer service department. Contact information can typically be found on the Yokomo official website.


