
1. Introduction
This manual provides detailed instructions for the safe and efficient operation, setup, and maintenance of your Canglan Technology GD-200 Portable Chamfering Machine. Please read this manual thoroughly before using the machine to ensure proper function and to prevent injury or damage.
2. Safety Instructions
Always follow basic safety precautions to reduce the risk of fire, electric shock, and personal injury.
- Wear appropriate personal protective equipment (PPE) such as safety glasses, gloves, and hearing protection.
- Ensure the work area is clean, well-lit, and free from obstructions.
- Keep children and bystanders away from the operating machine.
- Do not operate the machine in damp or wet conditions.
- Always disconnect power before performing any adjustments, maintenance, or blade changes.
- Secure the workpiece properly before chamfering.
- Use only genuine replacement parts and accessories.
- Do not force the machine; let the tool do the work.
- Inspect the power cord for damage before each use.
3. Product Overview
The Canglan Technology GD-200 is a portable chamfering machine designed for linear beveling of various metal workpieces. It offers adjustable chamfering angles from 15° to 45° and is suitable for large workpieces without heat treatment, as well as batch processing of small parts, molds, and sheet metal.
3.1 Key Features
- Portability: Designed for easy transport and use in various work environments.
- Versatile Chamfering: Capable of chamfering and beveling angles from 15° to 45°.
- Efficient Operation: Linear chamfering design allows for quick and efficient work.
- User-Friendly: Simple controls and intuitive interface for ease of use.
- Reliable Power: Operates on 220V for stable power supply and consistent performance.
- Durable Blades: Uses 3.6 x 12.7 mm four-blade tungsten steel blades for easy replacement and long life.
3.2 Components
Familiarize yourself with the main components of the chamfering machine:
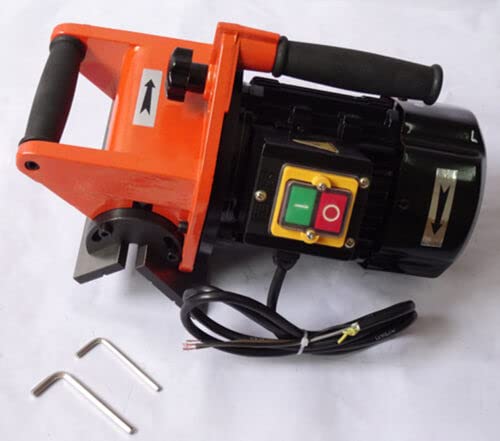
Figure 1: Front view of the GD-200 Portable Chamfering Machine. This image shows the main body of the machine with its red handle and the chamfering head at the top, featuring the blade housing and guide rails.
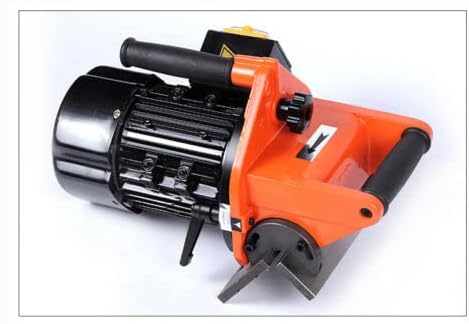
Figure 2: Side view of the GD-200 Portable Chamfering Machine. This image displays the machine from a different angle, highlighting the motor housing, the orange protective casing, and the ergonomic handles for better grip and control during operation.
- Main Body: Houses the motor and internal mechanisms.
- Handle: For carrying and guiding the machine.
- Chamfering Head: Contains the cutting blade and guide rails.
- Power Switch: On/Off control.
- Angle Adjustment Knob: To set the desired chamfering angle.
- Depth Adjustment Knob: To set the chamfering depth.
4. Specifications
| Feature | Specification |
|---|---|
| Model | GD-200 (Portable) |
| Power Supply | 220V / 50Hz (380V / 50Hz optional) |
| Power | 750 W |
| Rail Length | 200 mm |
| Chamfer Depth | 0 - 6 mm |
| Blade Specifications | 3.6 x 12.7 mm four-blade tungsten steel blade |
| Chamfer Angle Adjustment Range | 15° - 45° |
| Weight | 12 kg |
| Manufacturer | Canglan Technology |
5. Setup
Before operating the chamfering machine, ensure it is properly set up.
- Unpacking: Carefully remove the machine from its packaging. Inspect for any shipping damage.
- Power Connection: Connect the machine to a compatible 220V / 50Hz power outlet. Ensure the power switch is in the "OFF" position before plugging in.
- Workpiece Preparation: Secure the workpiece firmly on a stable surface. Ensure there is enough clearance for the machine to move along the edge to be chamfered.
- Blade Inspection: Verify that the tungsten steel blades are securely installed and free from damage. Refer to Section 7.1 for blade replacement if necessary.
6. Operating Instructions
Follow these steps for safe and effective chamfering:
- Set Chamfer Angle: Use the angle adjustment knob to set the desired chamfering angle between 15° and 45°.
- Set Chamfer Depth: Adjust the depth adjustment knob to achieve the required chamfer depth (0-6 mm). Perform a test cut on a scrap piece if unsure.
- Positioning: Place the machine's guide rails against the workpiece material. The machine should be stable and aligned with the edge to be chamfered.
- Power On: Turn the power switch to the "ON" position. Allow the motor to reach full speed before engaging the workpiece.
- Chamfering: Gently and steadily move the machine along the edge of the workpiece in the direction indicated by any directional arrows on the machine. Apply consistent pressure.
- Power Off: Once the chamfering is complete, turn the power switch to the "OFF" position and wait for the blade to stop completely before setting the machine down or handling the workpiece.
- Inspection: Inspect the chamfered edge for accuracy and finish.
Note: The sliding steel mold, after heat treatment, ensures high quality and durability for consistent results.
7. Maintenance
Regular maintenance ensures the longevity and optimal performance of your chamfering machine.
- Cleaning: After each use, disconnect the power and clean the machine, especially the chamfering head and guide rails, from metal chips and dust using a brush or compressed air.
- Blade Inspection: Regularly inspect the tungsten steel blades for wear, chips, or damage. Dull or damaged blades can affect performance and safety.
- Storage: Store the machine in a dry, clean, and secure location, away from direct sunlight and moisture.
- Lubrication: Periodically apply a light machine oil to moving parts as recommended by the manufacturer (if applicable, consult a service professional).
7.1 Blade Replacement
The 3.6 x 12.7 mm four-blade tungsten steel blades are designed for easy replacement.
- Disconnect Power: Ensure the machine is unplugged from the power source.
- Access Blades: Locate the screws securing the blade housing on the chamfering head.
- Remove Old Blades: Carefully loosen and remove the screws. Extract the worn blades. Use gloves to avoid injury.
- Install New Blades: Insert new 3.6 x 12.7 mm four-blade tungsten steel blades, ensuring they are correctly oriented and seated.
- Secure Blades: Tighten the screws firmly to secure the new blades. Do not overtighten.
- Test: Briefly power on the machine (without a workpiece) to ensure the blades are spinning freely and without unusual noise.
8. Troubleshooting
This section addresses common issues you might encounter.
| Problem | Possible Cause | Solution |
|---|---|---|
| Machine does not power on. | No power supply; faulty power cord; tripped circuit breaker. | Check power connection; inspect power cord; reset circuit breaker. |
| Poor chamfer quality (rough, uneven). | Dull or damaged blades; incorrect angle/depth setting; improper feeding speed. | Replace blades (Section 7.1); adjust angle/depth; maintain consistent, moderate feeding speed. |
| Excessive vibration or noise. | Loose blades; damaged motor; foreign object in blade area. | Check and tighten blades; disconnect power and inspect for obstructions; if motor damage is suspected, contact support. |
| Machine overheats. | Continuous heavy use; blocked ventilation. | Allow machine to cool down; ensure ventilation slots are clear. Avoid prolonged heavy use. |
9. Warranty and Support
This product is sold by Canglan Technology. For any issues or support, please contact the seller directly through the platform where the purchase was made.
A 30-day free return policy is available for this product. Please refer to the purchase platform's return policy for detailed terms and conditions.
For technical assistance or inquiries regarding parts, please reach out to Canglan Technology customer service.