1. Product Overview
This document provides instructions for the HUMARH Handheld Body Shell, a replacement part specifically designed for the Shure PGX2 Wireless Microphone. This body shell is intended to replace a broken or damaged outer casing of your existing PGX2 microphone, allowing for repair rather than full microphone replacement.
Important Note: This product is only the body shell. The microphone's internal mainboard, electronics, and other functional components are NOT included. It is crucial to verify your microphone model is a Shure PGX2 before proceeding with installation.
2. Product Components
The HUMARH Handheld Body Shell package typically includes the following components:
- Main Body Casing (upper and lower sections)
- Battery Compartment Cover
- Internal Frame/Support Structure
- Small Screws (for assembly)

Figure 2.1: View of the disassembled body shell components, including the main casing, internal frame, and small parts.

Figure 2.2: An alternative perspective of the body shell components laid out, showing the various pieces required for assembly.
3. Installation Guide
Replacing the body shell requires careful handling of the microphone's internal components. It is recommended to perform this procedure in a clean, well-lit area.
Tools Required:
- Small Phillips Head Screwdriver
- Pry Tool (optional, for separating existing casing)
Installation Steps:
- Preparation: Ensure your Shure PGX2 Wireless Microphone is powered off and remove any batteries.
- Disassembly of Old Shell: Carefully locate and remove all screws holding the existing body shell together. Gently separate the old casing halves.
- Extract Internal Components: With extreme care, remove the microphone's internal mainboard and any other electronic components from the old shell. Avoid touching sensitive circuits.
- Transfer Components to New Shell: Place the extracted internal components into the new HUMARH body shell. Ensure all components align correctly with the designated slots and mounting points within the new shell.
- Secure Internal Frame: If your new shell includes an internal frame, ensure it is properly seated and secured around the mainboard.
- Reassemble New Shell: Carefully align the two halves of the new body shell. Ensure no wires are pinched and all components are securely in place before closing.
- Fasten Screws: Insert and gently tighten the provided small screws to secure the new body shell. Do not overtighten, as this can strip the plastic.
- Install Battery Cover: Attach the battery compartment cover.
- Final Check: Insert batteries and power on the microphone to ensure proper function and secure assembly.
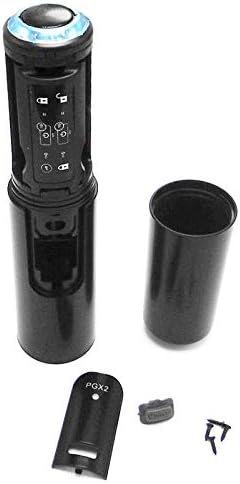
Figure 3.1: The HUMARH Handheld Body Shell assembled, ready for use with the Shure PGX2 Wireless Microphone's internal components.
4. Operating Considerations
Once the HUMARH Handheld Body Shell is correctly installed, the operation of your Shure PGX2 Wireless Microphone remains unchanged. The shell provides the physical housing and protection for the microphone's internal electronics. Ensure that all buttons, switches, and battery access points function freely and correctly after assembly.
5. Maintenance
To ensure the longevity and appearance of your HUMARH Handheld Body Shell:
- Cleaning: Wipe the exterior with a soft, dry, or slightly damp cloth. Avoid using harsh chemicals, abrasive cleaners, or solvents, as these can damage the plastic finish.
- Storage: Store the microphone in a cool, dry place, away from direct sunlight and extreme temperatures.
- Handling: While the shell is designed to be durable, avoid dropping the microphone or subjecting it to excessive force, which could cause new damage.
6. Troubleshooting
If you encounter issues after installing the new body shell, consider the following:
- Shell Does Not Close Properly:
Ensure all internal components are correctly seated and aligned. Check for any wires or components that might be obstructing the closure. Do not force the shell closed. - Microphone Not Functioning After Installation:
This indicates an issue with the internal electronics or their connection. Re-open the shell and carefully inspect all connections, ensuring the mainboard is securely in place and no wires are disconnected or pinched. Verify batteries are correctly inserted and charged. - Buttons/Switches Not Responding:
Check if the buttons or switches on the mainboard are correctly aligned with the corresponding openings or mechanisms on the new body shell.
If problems persist, it may indicate an issue with the microphone's internal components, which are not part of this replacement shell.
7. Specifications
| Feature | Detail |
|---|---|
| Brand | HUMARH |
| Compatible Model | Shure PGX2 Wireless Microphone |
| Color | Black |
| Item Weight | 3.1 ounces |
| Package Dimensions | 7.28 x 1.65 x 1.5 inches |
| Manufacturer | Shaoxing Kontive Drive Technology Co., Ltd |
8. Warranty and Support
This product includes a warranty card. Please refer to the warranty card provided in the packaging for specific details regarding warranty coverage and terms.
For technical support or inquiries regarding the HUMARH Handheld Body Shell, please contact the manufacturer or your point of purchase. Ensure you have your purchase details and product information available when seeking support.
