1. Introduction
This manual provides detailed instructions for the setup, operation, and maintenance of your ORIA Digital Alarm Clock (Model OUS-HY-WA109B). Please read this manual thoroughly before using the product to ensure proper function and safety.
1.1 Package Contents
- ORIA Digital Alarm Clock (Model OUS-HY-WA109B)
- USB Power Cable
- User Manual

Figure 1: Package contents including the ORIA Digital Alarm Clock, USB cable, and user manual.
2. Safety Information
- Do not expose the device to extreme temperatures, direct sunlight, or high humidity.
- Keep the device away from water or other liquids.
- Use only the provided USB cable or a certified equivalent for power.
- Do not attempt to disassemble or repair the device yourself. Contact customer support for assistance.
- Dispose of batteries according to local regulations.
3. Setup
3.1 Powering the Device
The ORIA Digital Alarm Clock offers dual power options:
- DC Cable Power (Recommended): Connect the provided USB power cable to the DC 5V port on the back of the clock and plug the other end into a USB power adapter (not included) or a USB port. The display will remain continuously on.
- Battery Power (Backup/Power Saving Mode): Insert 3 AAA batteries (not included) into the battery compartment on the back of the clock. In battery mode, the screen will automatically turn off after 8 seconds to conserve power. Touch the top button to wake up the screen for 8 seconds.
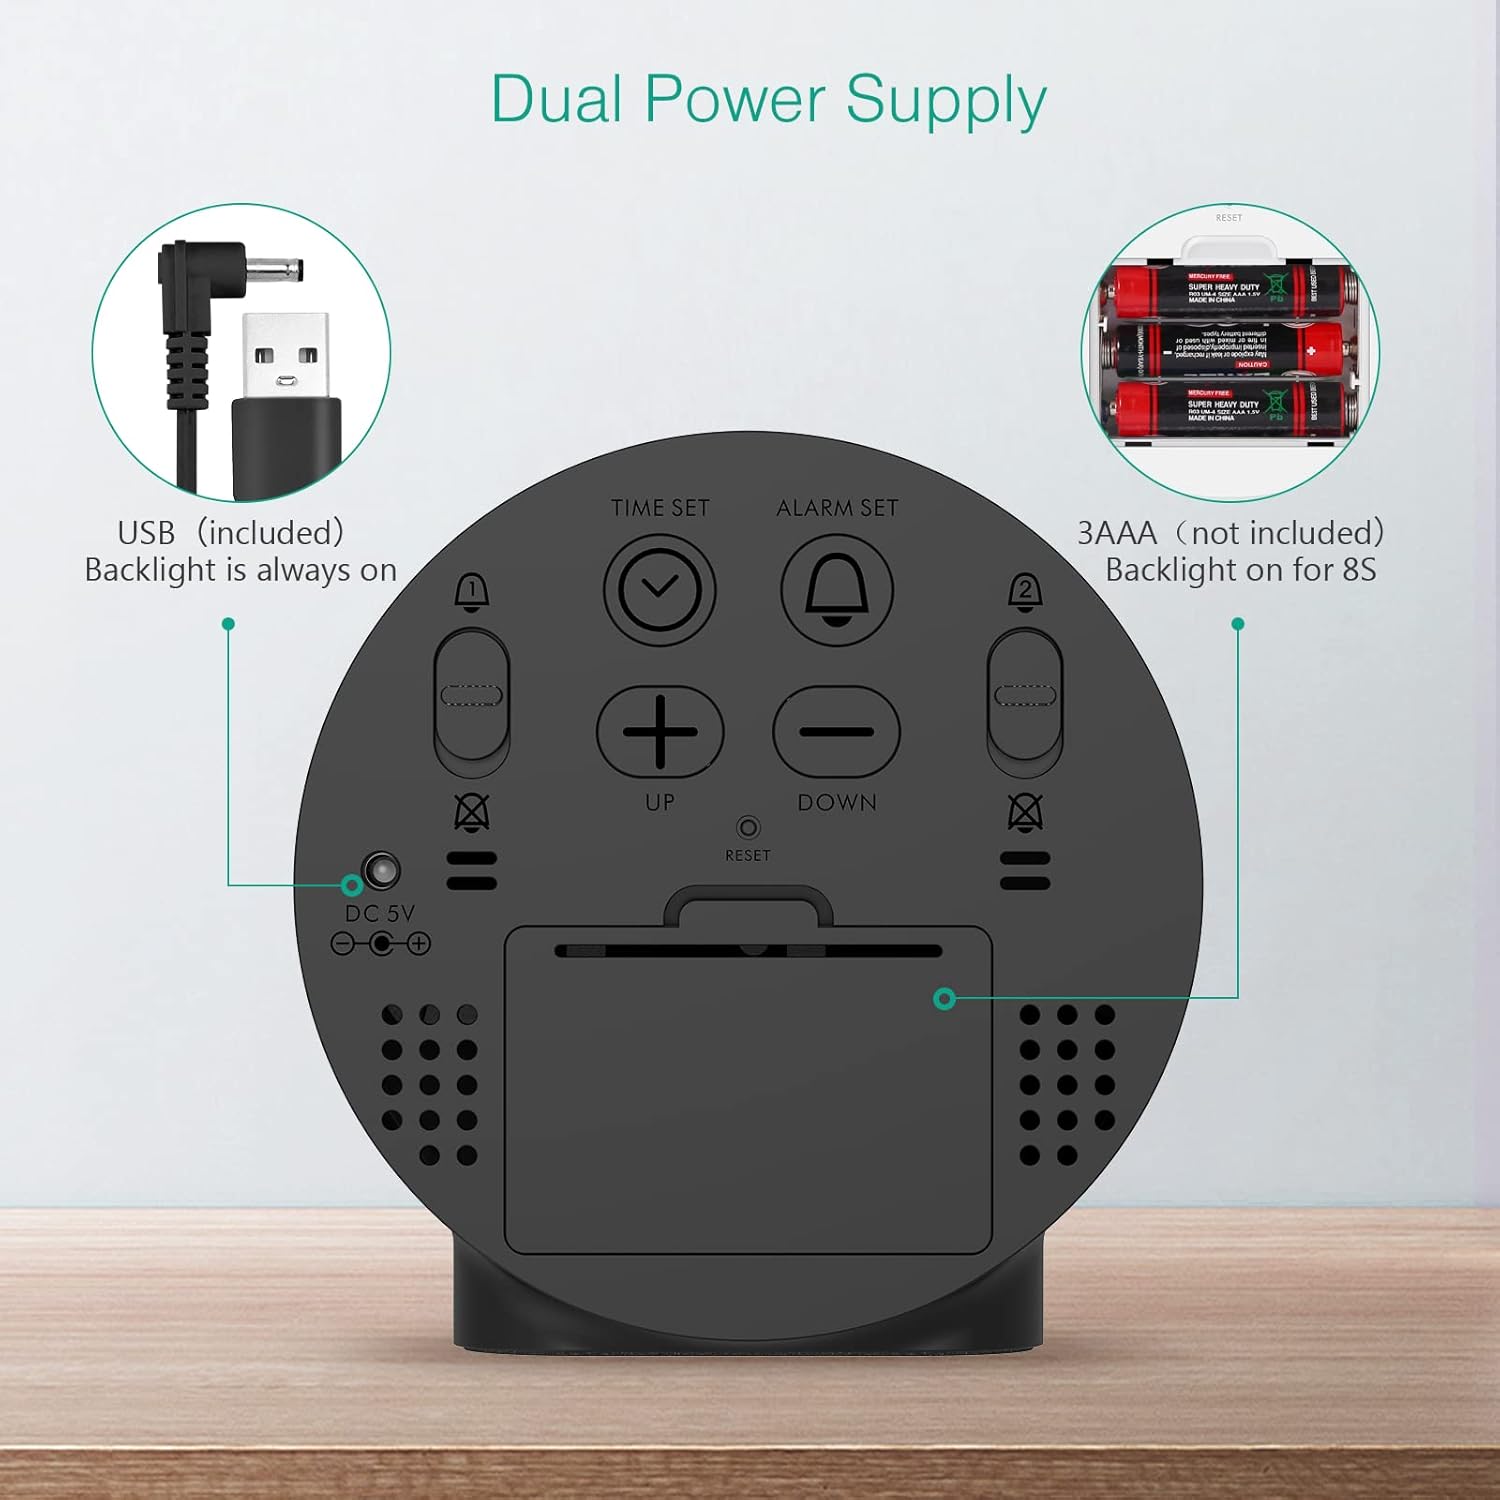
Figure 2: Back panel illustrating the USB power input and battery compartment for dual power supply.
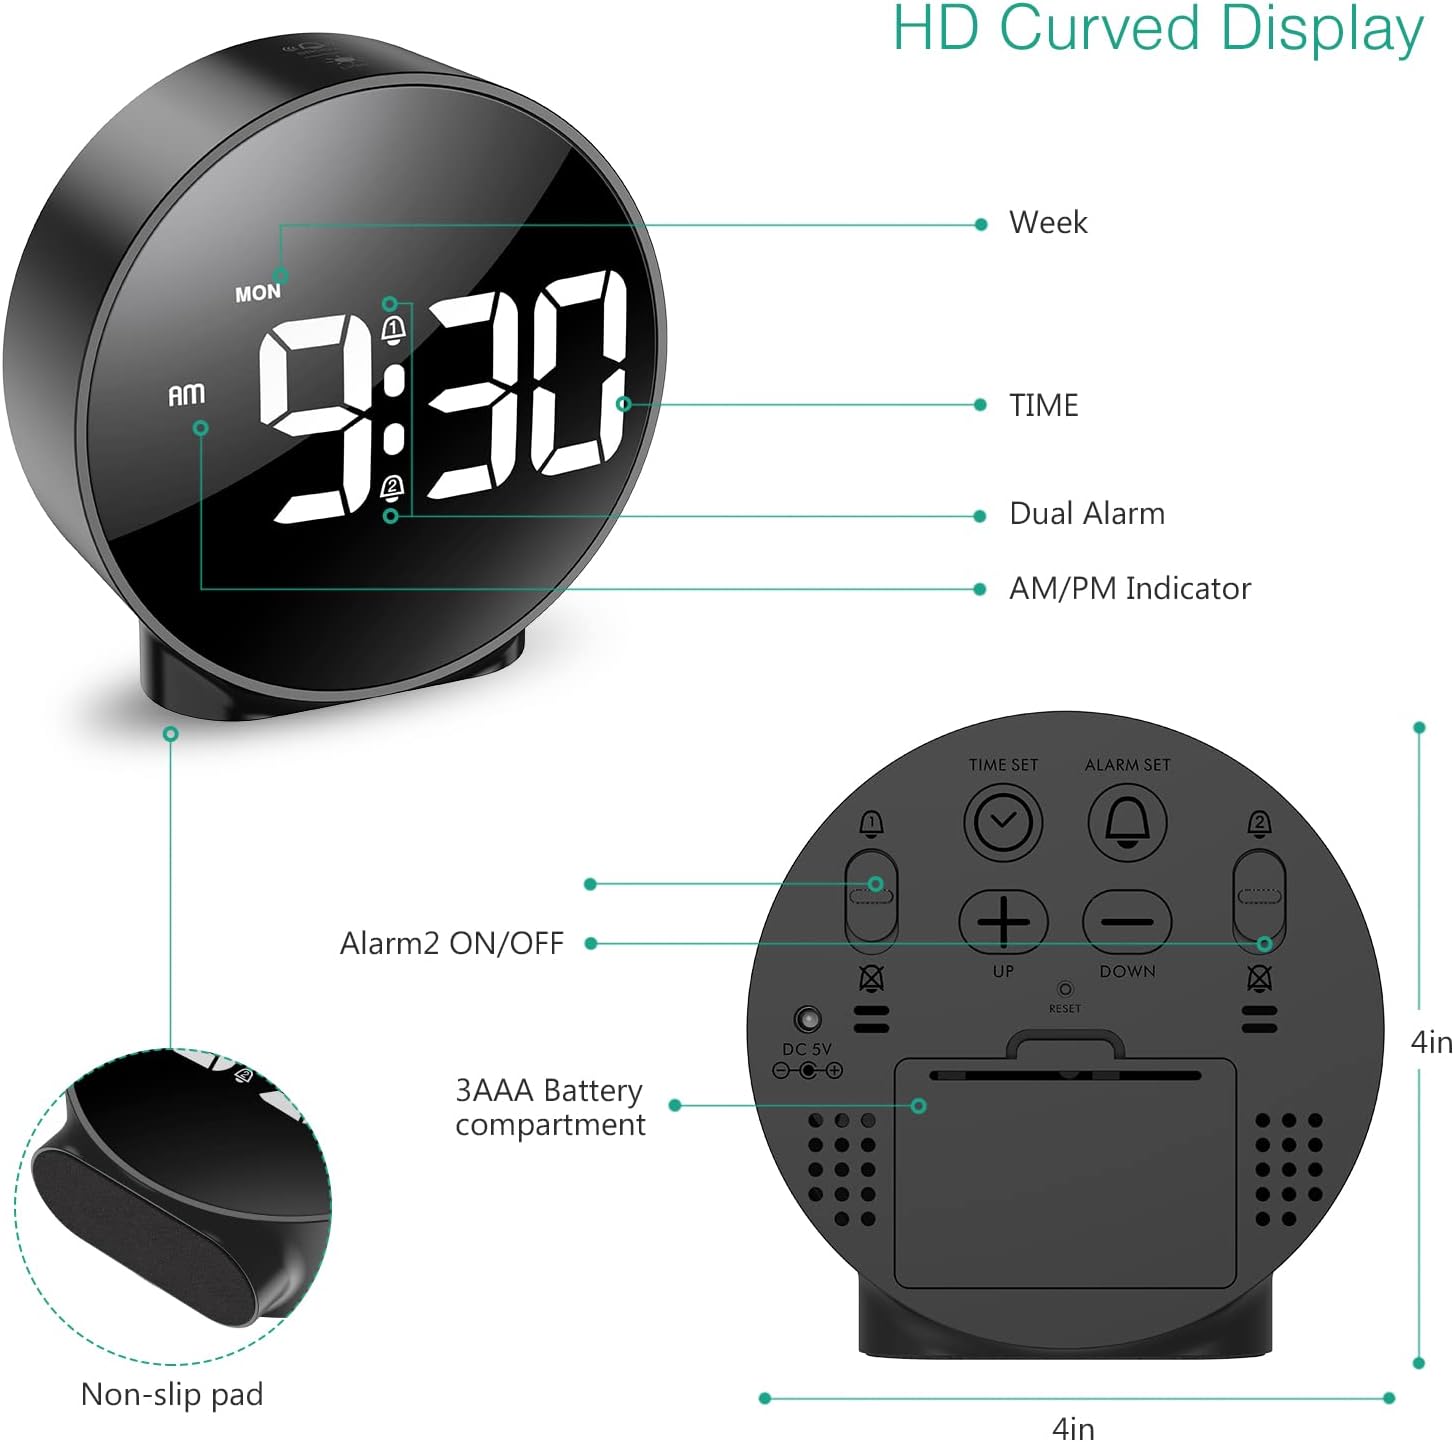
Figure 3: Detailed view of the clock's back panel, highlighting the DC 5V input, battery compartment, and control buttons.
4. Operating Instructions
4.1 Setting the Time (12/24Hr Format)
- Press and hold the TIME SET button on the back of the clock for 3 seconds to enter time setting mode. The hour digits will start flashing.
- Use the UP or DOWN buttons to adjust the hour.
- Press TIME SET again to confirm the hour and move to minute setting. The minute digits will flash.
- Use the UP or DOWN buttons to adjust the minute.
- Press TIME SET again to confirm the minute and exit time setting mode.
- To switch between 12-hour and 24-hour format, press the 12/24HR button.
4.2 Setting Alarms (Dual Alarms)
The clock supports two independent alarms (Alarm 1 and Alarm 2) with 5 alarm modes.
- Press and hold the ALARM SET button (for Alarm 1) or ALARM 2 ON/OFF button (for Alarm 2) for 3 seconds to enter alarm setting mode. The hour digits will flash.
- Use the UP or DOWN buttons to adjust the alarm hour.
- Press the respective ALARM SET or ALARM 2 ON/OFF button again to confirm the hour and move to minute setting. The minute digits will flash.
- Use the UP or DOWN buttons to adjust the alarm minute.
- Press the respective ALARM SET or ALARM 2 ON/OFF button again to confirm the minute and select the alarm mode. The display will show the current mode (e.g., "1-1" for one day).
- Use the UP or DOWN buttons to cycle through the 5 alarm modes:
- 1-1: Alarm sounds once.
- 1-5: Alarm sounds Monday to Friday.
- 1-6: Alarm sounds Monday to Saturday.
- 1-7: Alarm sounds Monday to Sunday.
- 6-7: Alarm sounds Saturday to Sunday.
- Press the respective ALARM SET or ALARM 2 ON/OFF button one last time to confirm the alarm mode and exit alarm setting.
- To turn an alarm ON or OFF, short press the respective ALARM SET or ALARM 2 ON/OFF button. An alarm icon will appear on the display when activated.
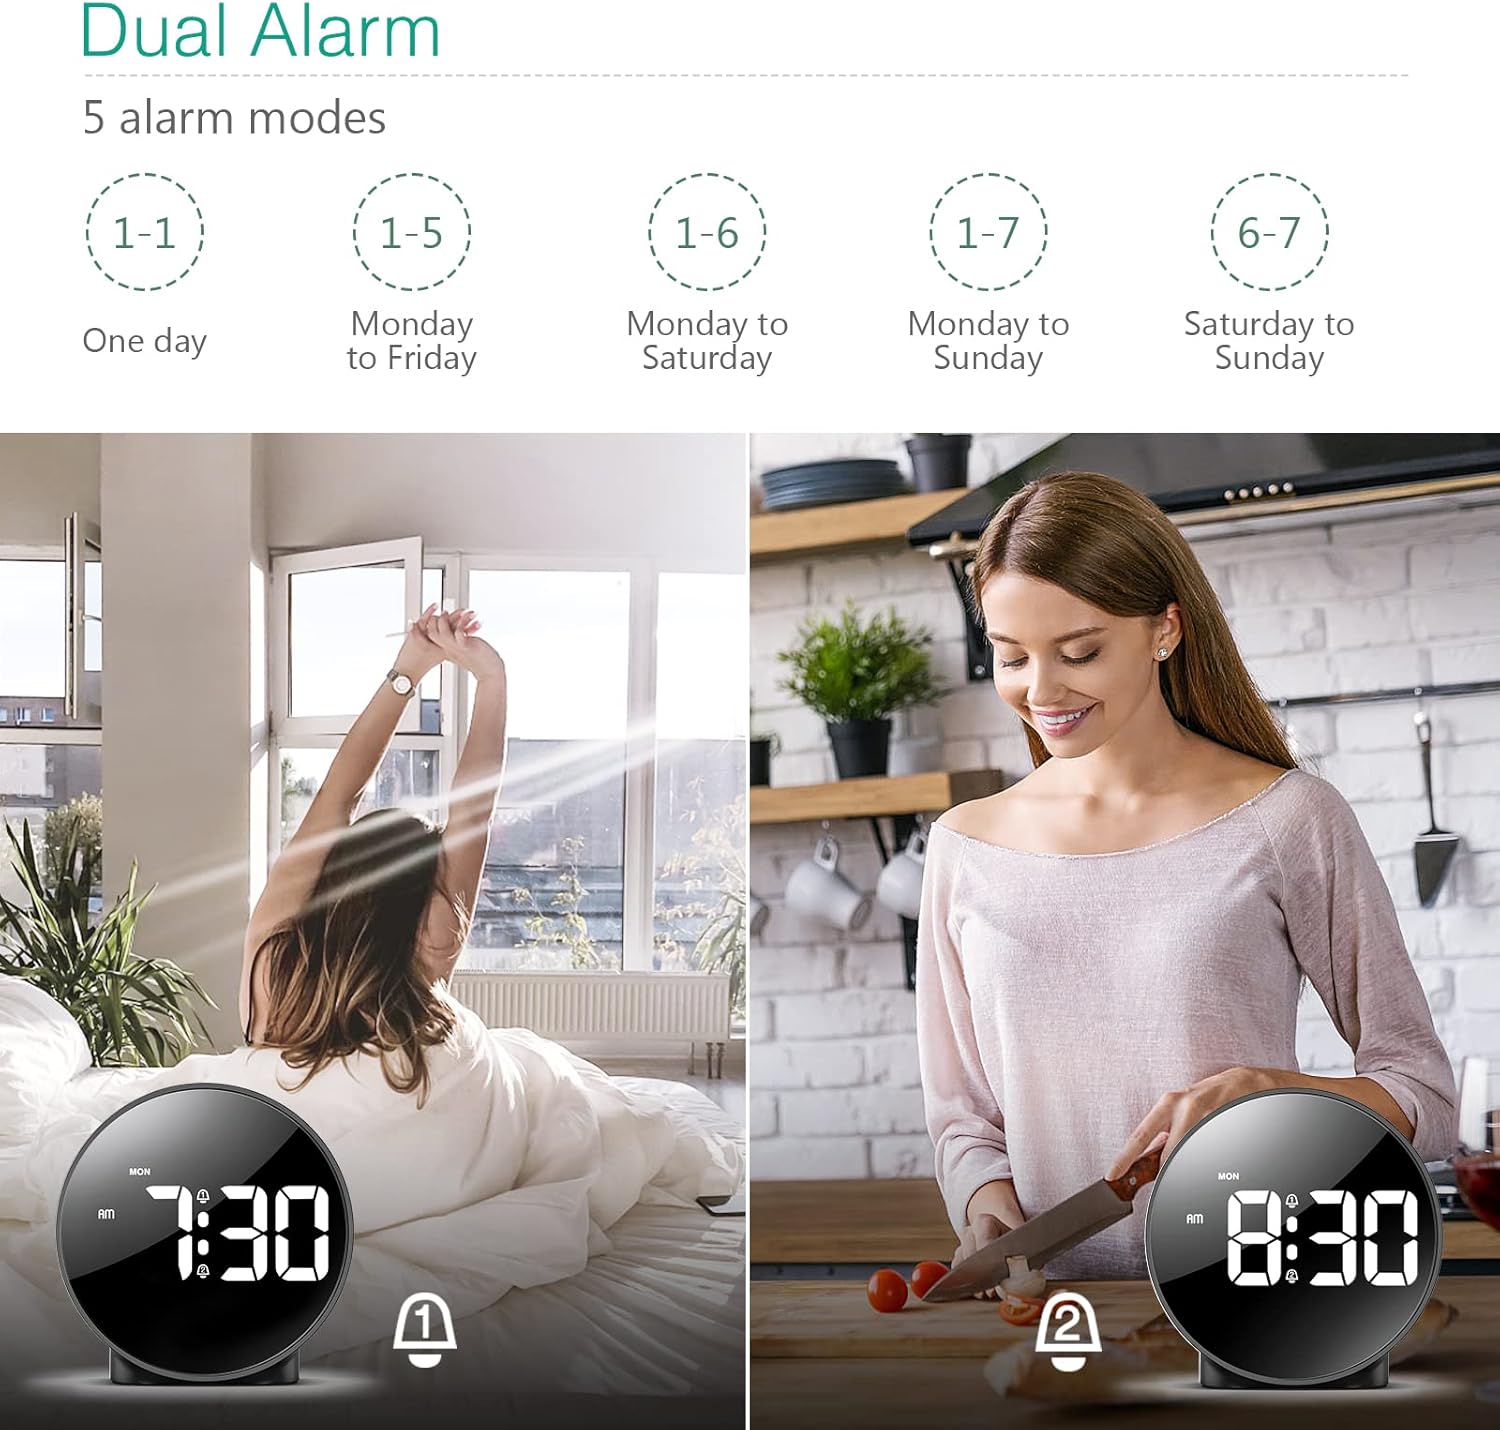
Figure 4: Illustration of the dual alarm functionality with various scheduling modes.
4.3 Snooze Function
When an alarm sounds, press the large SNOOZE/LIGHT button on the top of the clock to activate the snooze function. The alarm will pause for 5 minutes and then sound again. You can repeat this process multiple times.

Figure 5: Activating the snooze function by touching the top of the clock.
4.4 Adjusting Brightness
The clock features 4 levels of adjustable brightness. Short press the SNOOZE/LIGHT button on the top of the clock to cycle through the brightness levels (100%, 80%, 60%, and 0% (off)).

Figure 6: Visual representation of the four adjustable brightness levels of the clock display.
4.5 Daylight Saving Time (DST)
The clock supports Daylight Saving Time adjustment. Refer to the included mini-manual for specific instructions on how to activate or deactivate DST.
5. Features
- HD LED Display: Large, high-definition curved display for clear time reading.
- Dual Alarms with 5 Modes: Set two independent alarms with flexible scheduling options (one-day, weekdays, weekends, or every day).
- Adjustable Brightness: Four levels of display brightness, including an off mode, to suit various environments and preferences.
- Snooze Function: Provides an additional 5 minutes of sleep with a simple touch.
- 12/24 Hour Format: Easily switch between standard and military time displays.
- Dual Power Supply: Operates via USB cable for continuous display or AAA batteries for power-saving mode (display turns off after 8 seconds).
- Compact Design: Suitable for various locations such as bedrooms, living rooms, offices, or for travel.
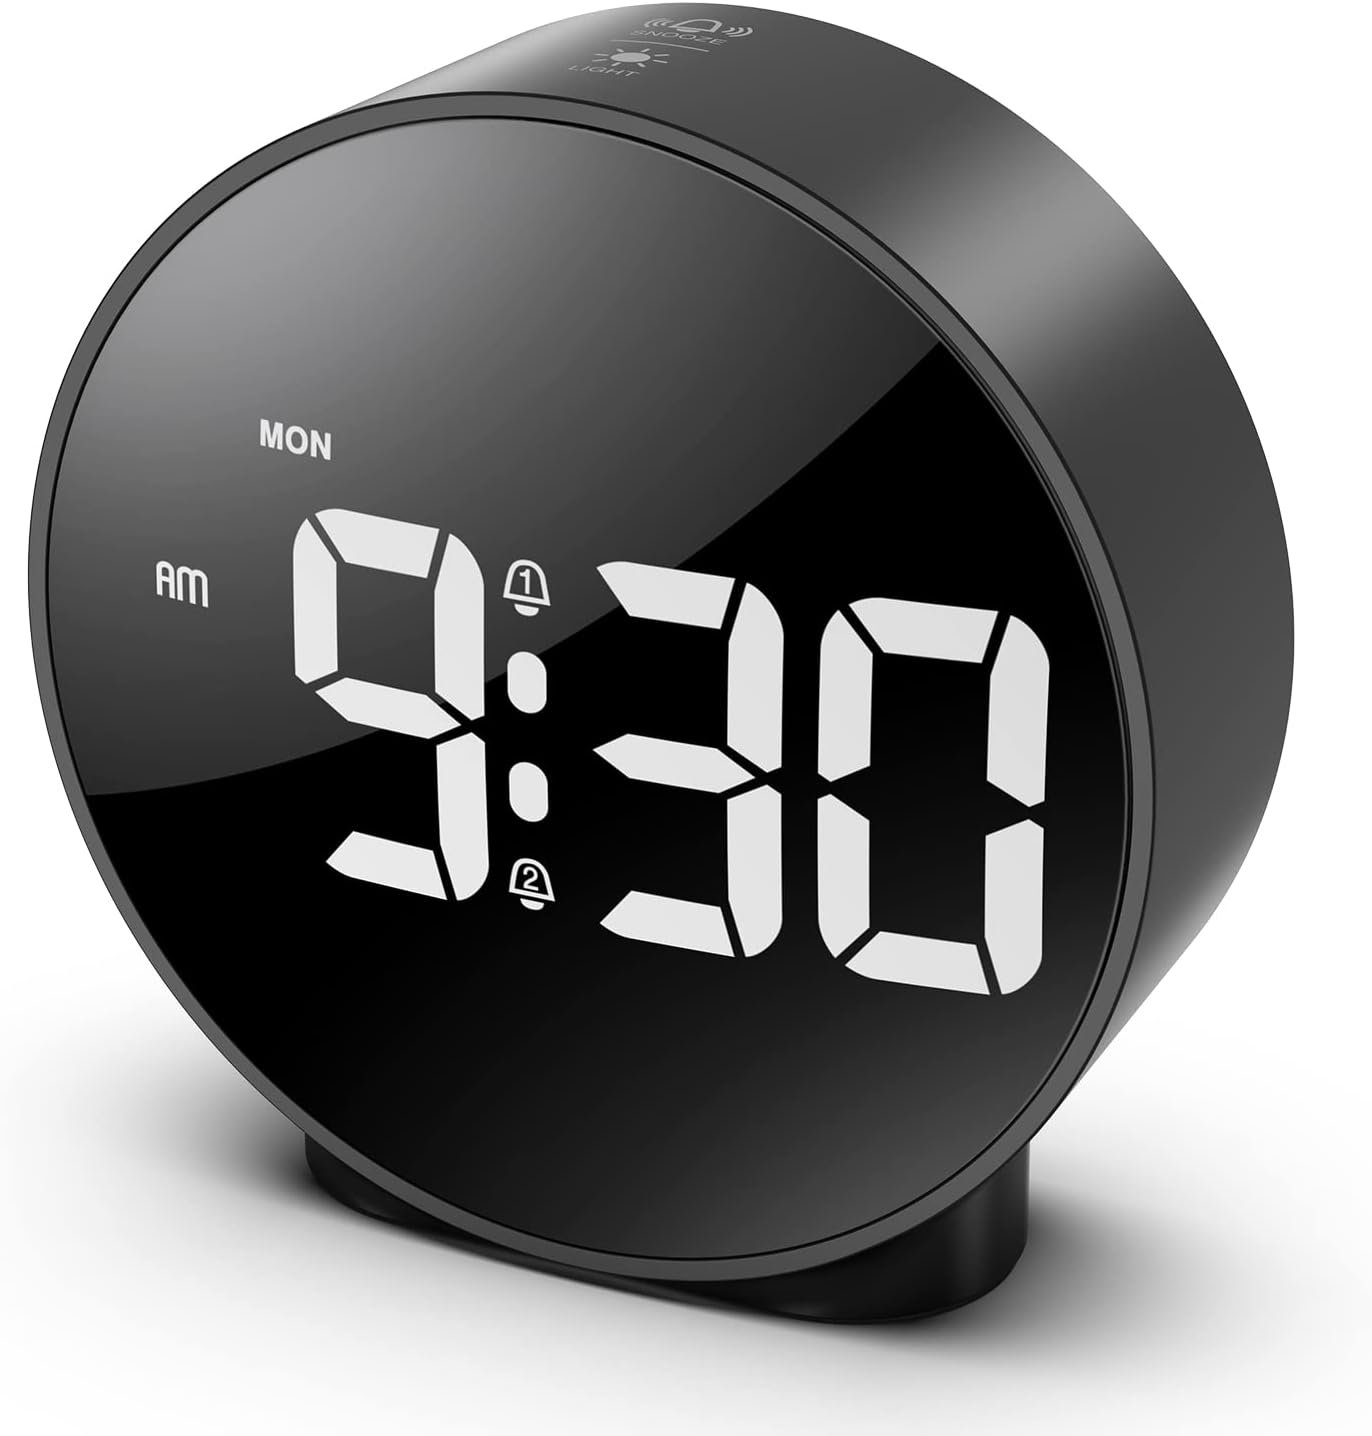
Figure 7: The ORIA Digital Alarm Clock showcasing its clear HD LED display.
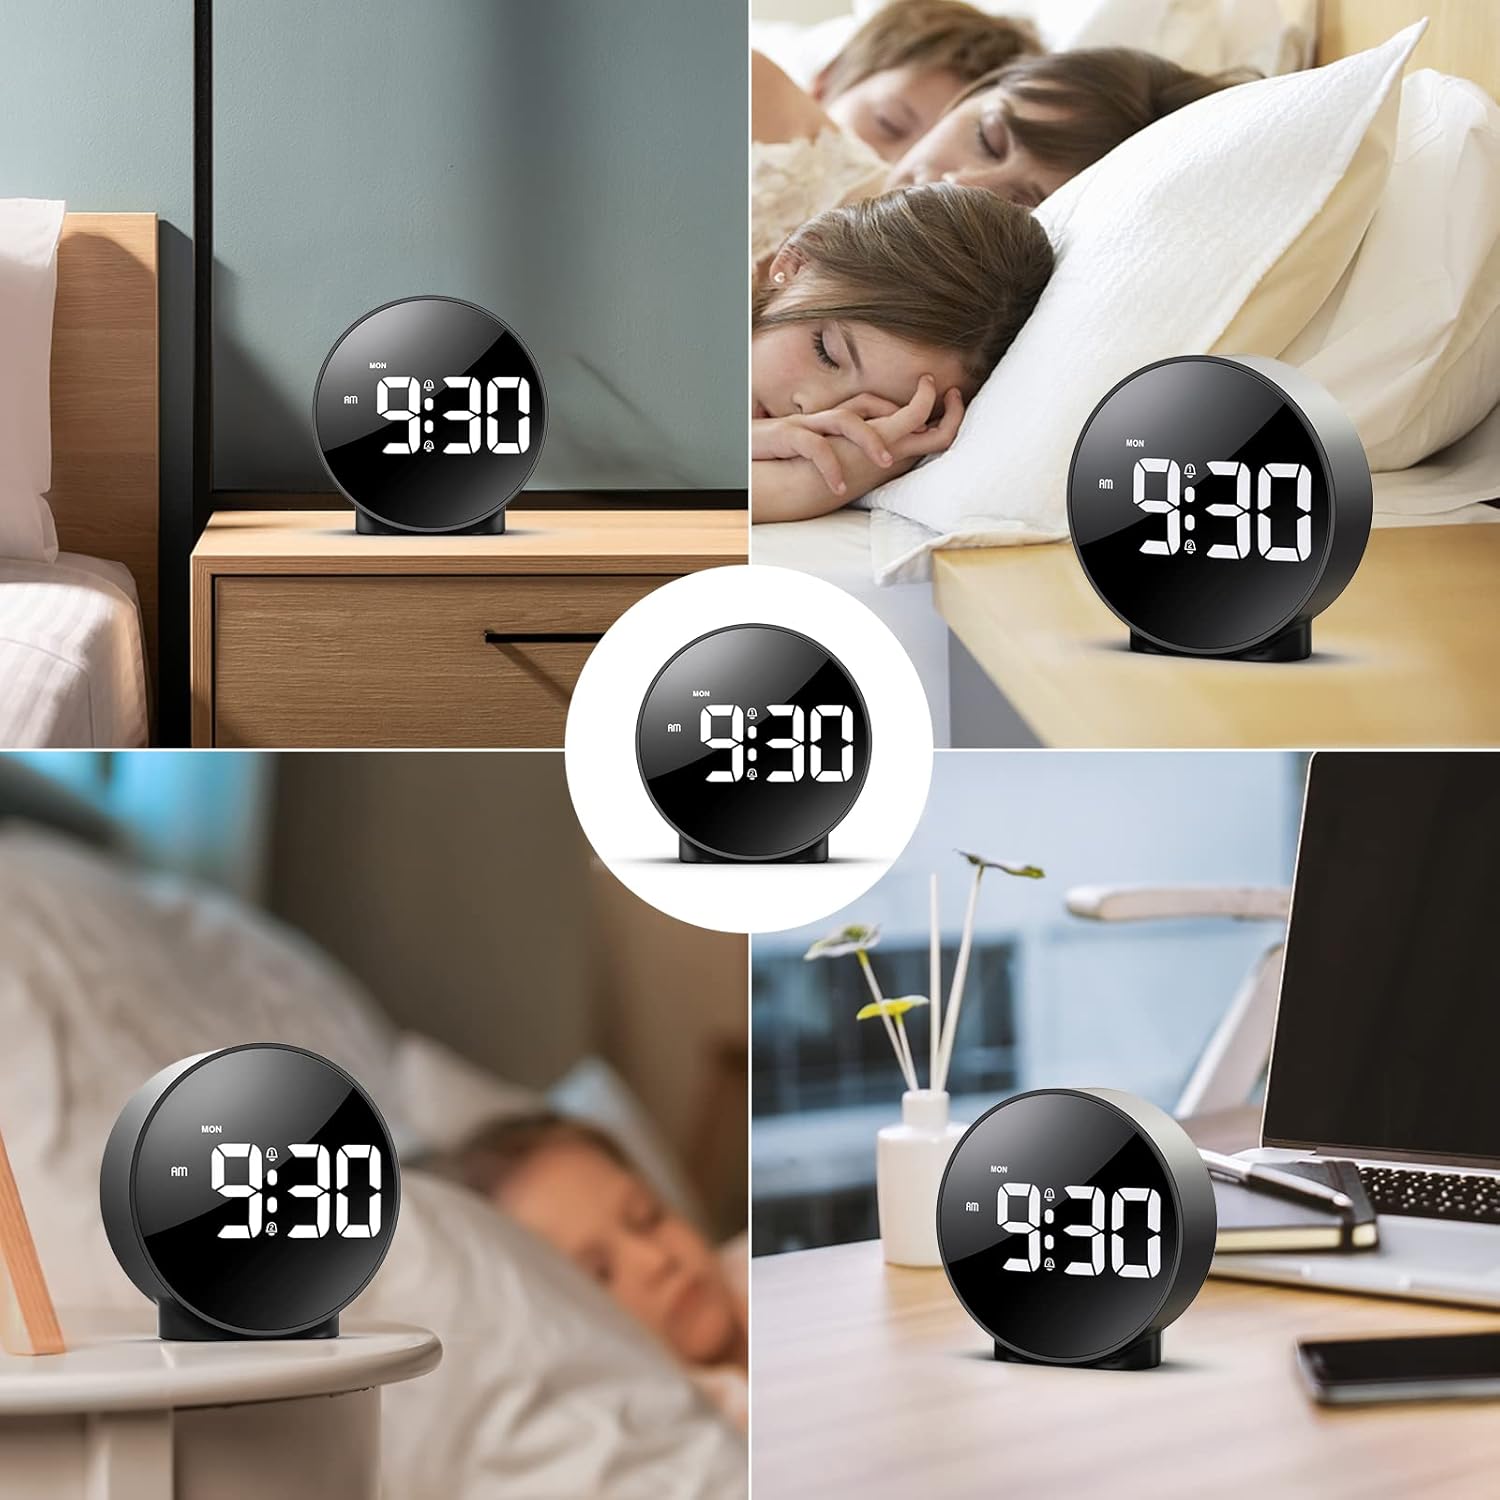
Figure 8: The versatile ORIA Digital Alarm Clock integrated into different environments like a bedroom, office, and living room.
6. Maintenance
- Clean the clock with a soft, dry cloth. Do not use abrasive cleaners or solvents.
- If not in use for an extended period, remove the batteries to prevent leakage.
7. Troubleshooting
- Display is off in battery mode: This is normal for power saving. Touch the top button to activate the display for 8 seconds. For continuous display, use the USB power cable.
- Buttons not responding: Try resetting the clock by pressing the small RESET button located on the back panel using a thin object (e.g., a paperclip).
- Alarm not sounding: Ensure the alarm is activated (alarm icon visible on display) and the volume is not set to zero.
- Incorrect time/date: Re-enter time setting mode and adjust the time and date as per Section 4.1.
8. Specifications
| Brand | ORIA |
| Model Number | OUS-HY-WA109B |
| Color | Black Case & White Digit |
| Display Type | Digital LED |
| Product Dimensions | 4.29"W x 4.8"H |
| Item Weight | 5.9 ounces (0.17 Kilograms) |
| Power Source | Corded Electric & Battery Powered (3x AAA, not included) |
| Material | Plastic |
| Special Features | Alarm, LED Display, Adjustable Brightness, Dual Alarms, Snooze |
9. Warranty and Support
- 1-Year Warranty: The product is covered by a 1-year limited warranty.
- 90-Day Free Replacements: Enjoy free replacements for eligible issues within 90 days of purchase.
- 30-Day Free Returns: Returns are accepted within 30 days of purchase.
- 24/7 Customer Support: For any inquiries or assistance, please contact ORIA customer support.
- Lifetime Technical Support: Benefit from lifetime technical support for your product.
For further assistance, please visit the ORIA Store on Amazon.