
1. Introduction
The hobbyant DTX03 is a compact and versatile 5.8GHz FPV video transmitter (VTX) with an integrated Digital Video Recorder (DVR) function. It features 72 channels across 9 bands and offers switchable output power levels of 0mW, 25mW, 50mW, and 200mW. Designed for RC drones, this VTX supports both NTSC and PAL video systems and records video in AVI format to a Micro SD card. This manual provides essential information for the proper setup, operation, and maintenance of your DTX03 VTX.

Image 1: Top view of the hobbyant DTX03 DVR FPV Transmitter, showing the main board, antenna, and connected wiring harness.
2. Specifications
| Brand Name | hobbyant |
| Item Name | DTX03 DVR FPV VTX |
| Output Power | 0 / 25mW / 50mW / 200mW (Switchable) |
| Input Voltage | 3.2-5.5V |
| Current Consumption | 630mA-390mA (25mW), 750mA-450mA (50mW), 970mA-550mA (200mW) |
| Video System | NTSC / PAL |
| Video Format | AVI |
| Output Signal Strength | 14±1db |
| Output Impedance | 55Ω |
| Audio Carrier | 10KΩ |
| Audio Carrier Level | -28-30dBc |
| Micro SD Card Support | Max 32GB (Class 10 recommended) |
| Operating Temperature | -10 to 60℃ |
| Antenna Dimensions | Diameter 22mm × Diameter 29mm |
| Antenna Type | 4-lobe Right-Hand Circular Polarized |
| Frequency | 5.8GHz, 9 Bands, 72 Channels (Raceband: 5325-5945 MHz) |
| Dimensions (L*W) | 28 * 18.04mm |
| Weight | 6.97g |
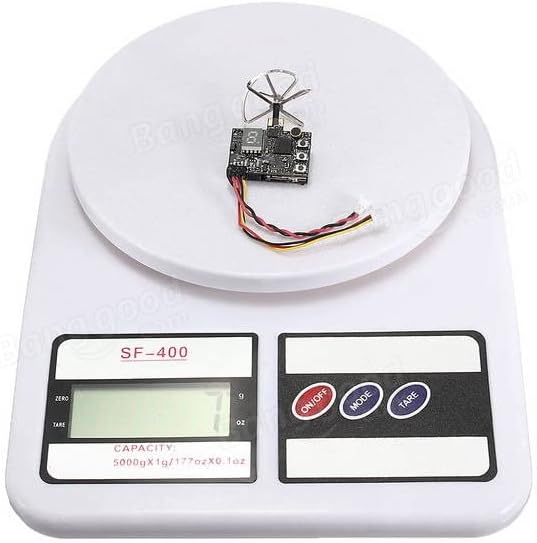
Image 2: The DTX03 VTX placed on a digital scale, illustrating its compact size and light weight of 6.97 grams.
3. Setup
Follow these steps to properly set up your DTX03 VTX:
- Power Connection: Connect the VTX to a stable power source within the specified input voltage range of 3.2-5.5V. Ensure correct polarity to prevent damage.
- Video Input: Connect your FPV camera's video output to the VTX's video input. The VTX supports both NTSC and PAL video systems.
- Antenna Attachment: Securely attach the provided 4-lobe right-hand circular polarized antenna to the VTX. Ensure it is tightened sufficiently but do not overtighten.
- Micro SD Card Insertion: For DVR functionality, insert a Class 10 Micro SD card (up to 32GB) into the designated slot. Ensure it is inserted correctly until it clicks into place.
- Mounting: Mount the VTX securely on your RC drone, ensuring it is protected from vibrations and potential crash damage. Consider airflow for heat dissipation.
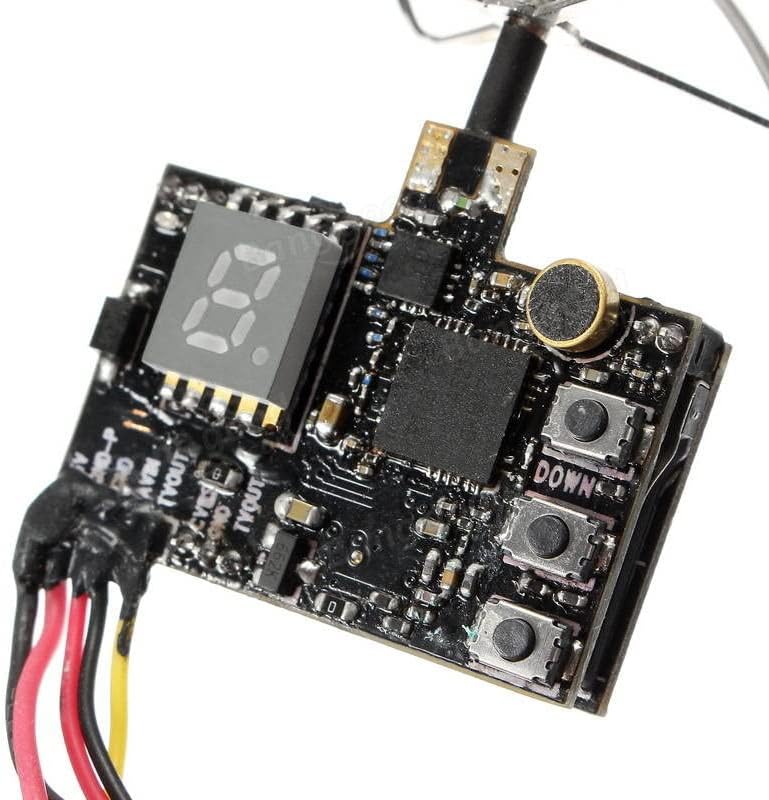
Image 3: A detailed view of the DTX03 VTX, highlighting the control buttons (CS1, CS2, CS3) and the digital LED display for settings and status.
4. Operation
The DTX03 VTX is operated using three control buttons, typically labeled CS1, CS2, and CS3, and a digital LED display.
4.1. Menu Settings
- To enter the settings menu, long press the CS2 key.
- Use CS1 and CS3 keys to scroll through menu options or adjust values.
- To exit the settings menu and return to the main display, long press the CS2 key again.
4.2. Video Recording (DVR)
- Ensure a Class 10 Micro SD card (max 32GB) is inserted.
- To start or stop video recording, short press the CS2 key. The LED display will indicate recording status.
4.3. Video Playback
- To enter the video playback page, long press the CS1 key.
- Use the CS1 and CS3 keys to navigate (select up/down) through recorded video files.
- Press the CS2 button to play or pause the selected video.
- To exit video playback and return to the main display, long press the CS1 key again.
4.4. Power Adjustment
- When the VTX is powered on, a blue LED display showing "0" indicates the VTX output power is currently off.
- To enter power adjustment mode, long press any button until the digital display starts flashing.
- Short press the button to cycle through the available power levels: 25mW, 50mW, 200mW.
- It is recommended to set the output power to 0mW when not actively flying to avoid frequency interference with other pilots.
4.5. Channel Adjustment
- To change the channel (CH), short press a button. The digital display will change synchronously, cycling through channels 1 to 8.
- To change the frequency band, long press a button until the digital display flashes. Then, short press to cycle through the available bands.
5. Maintenance
Proper maintenance ensures the longevity and reliable performance of your DTX03 VTX:
- Cleaning: Regularly clean the VTX board and connectors using a soft, dry brush or compressed air to remove dust and debris. Avoid using liquid cleaners directly on the electronics.
- Storage: Store the VTX in a dry, cool environment, away from direct sunlight and extreme temperatures.
- Connection Integrity: Periodically check all wiring and connectors for signs of wear, corrosion, or loose connections. Replace damaged components immediately.
- Antenna Care: Ensure the antenna is not bent or damaged. A damaged antenna can significantly reduce signal range and quality.
- Firmware: Check the manufacturer's website for any available firmware updates that may improve performance or add features. Follow update instructions carefully.
6. Troubleshooting
If you encounter issues with your DTX03 VTX, consider the following troubleshooting steps:
- No Video Signal:
- Check power connections to the VTX and camera.
- Verify that the VTX and your FPV receiver are on the same frequency and band.
- Ensure the antenna is securely connected to the VTX and is not damaged.
- Confirm the camera is functioning correctly and its video output is connected to the VTX.
- Poor Video Quality (Static/Interference):
- Increase the VTX output power if operating at 25mW (ensure local regulations allow higher power).
- Check for nearby sources of electromagnetic interference (e.g., motors, ESCs, other electronic devices).
- Ensure antennas on both VTX and receiver are correctly oriented and undamaged.
- Verify that the VTX is not overheating.
- DVR Not Recording:
- Ensure a compatible Micro SD card (Class 10, max 32GB) is inserted correctly.
- Check if the SD card is full; if so, delete old recordings or replace the card.
- Format the SD card if it's new or causing issues (format on a computer first, then in the VTX if an option exists).
- Confirm that the recording function is activated via the CS2 button.
- VTX Overheating:
- Ensure adequate airflow around the VTX, especially when operating at higher power levels.
- Avoid prolonged operation on the ground without airflow.
- Consider adding a small heatsink if overheating persists in flight.
7. Warranty and Support
For warranty information, technical support, or service inquiries regarding your hobbyant DTX03 DVR 5.8G 72CH Switchable VTX FPV Transmitter, please refer to the documentation provided at the time of purchase or contact your retailer. Specific warranty terms and support channels may vary by region and seller.