
1. Safety Information
Always read and understand all safety warnings, instructions, illustrations, and specifications provided with this power tool. Failure to follow all instructions listed below may result in electric shock, fire, and/or serious injury.
General Power Tool Safety Warnings
- Work Area Safety: Keep work area clean and well lit. Cluttered or dark areas invite accidents. Do not operate power tools in explosive atmospheres, such as in the presence of flammable liquids, gases or dust. Power tools create sparks which may ignite the dust or fumes. Keep children and bystanders away while operating a power tool. Distractions can cause you to lose control.
- Electrical Safety: Power tool plugs must match the outlet. Never modify the plug in any way. Do not use any adapter plugs with earthed (grounded) power tools. Unmodified plugs and matching outlets will reduce risk of electric shock. Avoid body contact with earthed or grounded surfaces, such as pipes, radiators, ranges and refrigerators. There is an increased risk of electric shock if your body is earthed or grounded. Do not expose power tools to rain or wet conditions. Water entering a power tool will increase the risk of electric shock. Do not abuse the cord. Never use the cord for carrying, pulling or unplugging the power tool. Keep cord away from heat, oil, sharp edges or moving parts. Damaged or entangled cords increase the risk of electric shock.
- Personal Safety: Stay alert, watch what you are doing and use common sense when operating a power tool. Do not use a power tool while you are tired or under the influence of drugs, alcohol or medication. A moment of inattention while operating power tools may result in serious personal injury. Use personal protective equipment. Always wear eye protection. Protective equipment such as dust mask, non-skid safety shoes, hard hat, or hearing protection used for appropriate conditions will reduce personal injuries. Prevent unintentional starting. Ensure the switch is in the off-position before connecting to power source and/or battery pack, picking up or carrying the tool. Carrying power tools with your finger on the switch or energizing power tools that have the switch on invites accidents.
- Power Tool Use and Care: Do not force the power tool. Use the correct power tool for your application. The correct power tool will do the job better and safer at the rate for which it was designed. Do not use the power tool if the switch does not turn it on and off. Any power tool that cannot be controlled with the switch is dangerous and must be repaired. Disconnect the plug from the power source and/or remove the battery pack, if detachable, from the power tool before making any adjustments, changing accessories, or storing power tools. Such preventive safety measures reduce the risk of starting the power tool accidentally. Store idle power tools out of the reach of children and do not allow persons unfamiliar with the power tool or these instructions to operate the power tool. Power tools are dangerous in the hands of untrained users. Maintain power tools and accessories. Check for misalignment or binding of moving parts, breakage of parts and any other condition that may affect the power tool’s operation. If damaged, have the power tool repaired before use. Many accidents are caused by poorly maintained power tools. Keep cutting tools sharp and clean. Properly maintained cutting tools with sharp cutting edges are less likely to bind and are easier to control. Use the power tool, accessories and tool bits etc. in accordance with these instructions, taking into account the working conditions and the work to be performed. Use of the power tool for operations different from those intended could result in a hazardous situation.
- Battery Tool Use and Care: Recharge only with the charger specified by the manufacturer. A charger that is suitable for one type of battery pack may create a risk of fire when used with another battery pack. Use power tools only with specifically designated battery packs. Use of any other battery packs may create a risk of injury and fire. When battery pack is not in use, keep it away from other metal objects, like paper clips, coins, keys, nails, screws or other small metal objects, that can make a connection from one terminal to another. Shorting the battery terminals together may cause burns or a fire. Under abusive conditions, liquid may be ejected from the battery; avoid contact. If contact accidentally occurs, flush with water. If liquid contacts eyes, additionally seek medical help. Liquid ejected from the battery may cause irritation or burns.
Angle Grinder Specific Safety Warnings
- This power tool is intended to function as a grinder, sander, wire brush or cut-off tool. Read all safety warnings, instructions, illustrations and specifications provided with this power tool. Failure to follow all instructions listed below may result in electric shock, fire and/or serious injury.
- Do not use accessories which are not specifically designed and recommended by the tool manufacturer. Just because the accessory can be attached to your power tool, it does not assure safe operation.
- The rated speed of the accessory must be at least equal to the maximum speed marked on the power tool. Accessories running faster than their rated speed can break and fly apart.
- The outside diameter and the thickness of your accessory must be within the capacity rating of your power tool. Incorrectly sized accessories cannot be adequately guarded or controlled.
- The arbor size of wheels, flanges, backing pads or any other accessory must properly fit the spindle of the power tool. Accessories with arbor holes that do not match the mounting hardware of the power tool will run out of balance, vibrate excessively and may cause loss of control.
- Do not use a damaged accessory. Before each use inspect the accessory such as abrasive wheels for chips and cracks, backing pad for cracks, tear or excess wear, wire brush for loose or broken wires. If power tool or accessory is dropped, inspect for damage or install an undamaged accessory. After inspecting and installing an accessory, position yourself and bystanders away from the plane of the rotating accessory and run the power tool at maximum no-load speed for one minute. Damaged accessories will normally break apart during this test time.
- Wear personal protective equipment. Depending on application, use face shield, safety goggles or safety glasses. As appropriate, wear dust mask, hearing protectors, gloves and workshop apron capable of stopping small abrasive or workpiece fragments. The eye protection must be capable of stopping flying debris generated by various operations. The dust mask or respirator must be capable of filtrating particles generated by your operation. Prolonged exposure to high intensity noise may cause hearing loss.
- Keep bystanders a safe distance away from work area. Anyone entering the work area must wear personal protective equipment. Fragments of workpiece or of a broken accessory may fly away and cause injury beyond immediate area of operation.
- Hold the power tool by insulated gripping surfaces, when performing an operation where the cutting accessory may contact hidden wiring or its own cord. Cutting accessory contacting a “live” wire may make exposed metal parts of the power tool “live” and could give the operator an electric shock.
- Position the cord clear of the spinning accessory. If you lose control, the cord may be cut or snagged and your hand or arm may be pulled into the spinning accessory.
- Never lay the power tool down until the accessory has come to a complete stop. The spinning accessory may grab the surface and pull the power tool out of your control.
- Do not run the power tool while carrying it at your side. Accidental contact with the spinning accessory could snag your clothing, pulling the accessory into your body.
- Regularly clean the power tool’s air vents. The motor’s fan will draw the dust inside the housing and excessive accumulation of powdered metal may cause electrical hazards.
- Do not operate the power tool near flammable materials. Sparks could ignite these materials.
- Do not use accessories that require liquid coolants. Using water or other liquid coolants may result in electrocution or shock.
2. Product Overview and Components
Familiarize yourself with the various parts of your WORKSITE Cordless Angle Grinder to ensure safe and efficient operation.

Figure 2.1: Labeled diagram of the WORKSITE Cordless Angle Grinder, highlighting key components such as the Gurad Adjusting Lever, On/Off Switch, Battery, Spindle Lock Button, Spindle, Wheel Guard, Side Handle, and Grinding Wheel.
Key Components:
- Gurad Adjusting Lever: Used to quickly adjust the position of the wheel guard for optimal protection.
- On/Off Switch: Controls the power to the grinder. Ensure it is in the 'Off' position before connecting or disconnecting the battery.
- Battery: The removable 20V Lithium-ion battery pack that powers the tool.
- Spindle Lock Button: Engages the spindle lock to prevent rotation, allowing for safe and easy accessory changes.
- Spindle: The rotating shaft where grinding wheels, cutting wheels, or other accessories are mounted.
- Wheel Guard: A protective cover that shields the user from sparks, debris, and accidental contact with the rotating wheel.
- Side Handle: An auxiliary handle that can be attached in multiple positions (3-position) for improved control, comfort, and versatility during operation.
- Grinding Wheel: The abrasive disc used for grinding, cutting, or polishing various materials.

Figure 2.2: Illustration showing the internal 4-pole motor design for higher efficiency and longer life, alongside the heat dissipation system with multiple vents for uniform cooling.
3. Specifications
The following table outlines the technical specifications for the WORKSITE Cordless Angle Grinder Model CAG330.
| Specification | Value |
|---|---|
| Brand | WORKSITE |
| Model Number | CAG330 |
| Power Source | Battery Powered |
| Battery Type | Lithium Ion (4.0Ah included) |
| Voltage | 20 Volts (120 Volts for charger input) |
| Maximum Rotational Speed | 9000 RPM |
| Wheel Diameter | 4.5 Inches |
| Motor Type | 4-Pole Motor (Brushed) |
| Item Weight | 3.7 Kilograms (approx. 8.14 pounds) |
| Material | Metal |
| Color | 2-grey |
| Special Features | Compact, Lightweight, Variable-Speed (implied by 9000 RPM max, though not explicitly variable speed control listed) |
| Included Components | 1pc 4.0Ah Lithium-ion Battery, 1pc Cordless angle grinder, 1pc charger, 1pc side handle, 1pc wrench |
4. Setup
4.1 Battery Charging
Before first use, fully charge the 4.0Ah Lithium-ion battery pack. Ensure the charger is connected to a standard 120V AC outlet.

Figure 4.1: The 4.0 Ah Lithium-ion battery being charged by the fast charger. The charger features indicator lights to show charging status.
- Connect the charger to a suitable power outlet.
- Slide the battery pack onto the charger until it clicks into place.
- Observe the indicator lights on the charger. A solid green light typically indicates a full charge.
- Once fully charged, remove the battery from the charger.
4.2 Attaching the Auxiliary Handle
The auxiliary handle provides improved control and comfort. It can be attached in three different positions depending on your application and handedness.

Figure 4.2: The angle grinder demonstrating the flexibility of the 3-position non-slip rubber handle, allowing for less vibration and more convenient operation.
- Identify the threaded holes on the grinder head. There are typically three positions available.
- Screw the auxiliary handle firmly into the desired position. Ensure it is tightened securely before operation.
4.3 Installing/Changing Grinding Wheels and Guards
Always ensure the battery is removed from the tool before installing or changing accessories.
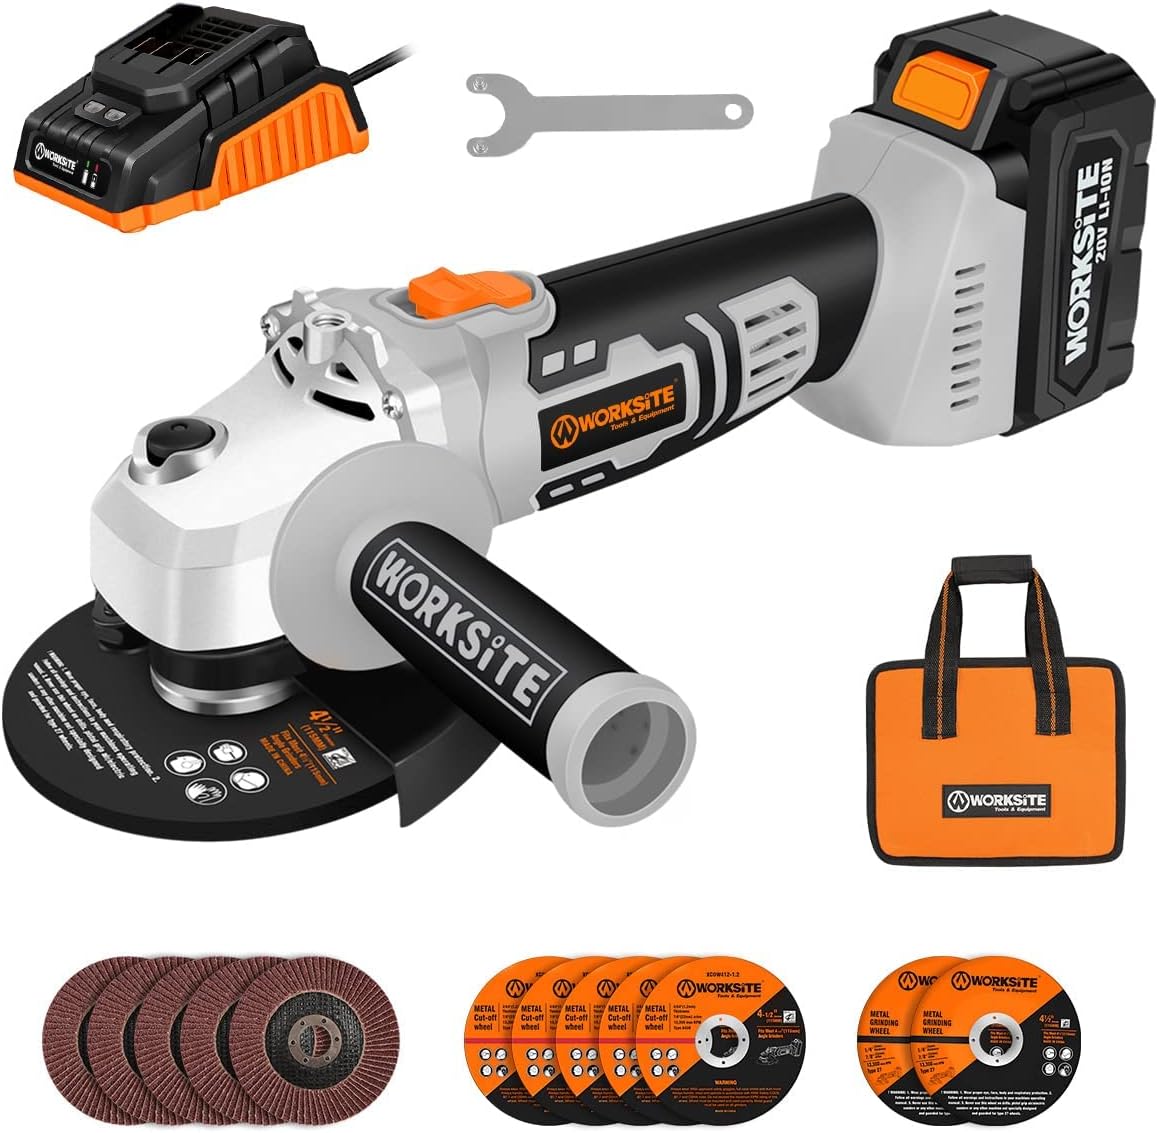
Figure 4.3: The complete WORKSITE Cordless Angle Grinder kit, showing the grinder, battery, charger, wrench, and various grinding/cutting/flap discs. This image illustrates the assembled tool with a wheel and guard in place.
- Guard Adjustment: The tool-free guard design allows for quick adjustments. Use the Gurad Adjusting Lever to position the guard for optimal protection, directing sparks away from you.
- Wheel Installation: Press and hold the spindle lock button to prevent the spindle from rotating.
- Place the inner flange onto the spindle.
- Position the desired grinding, cutting, or flap disc onto the spindle, ensuring it sits flush against the inner flange.
- Screw the outer flange (or clamping nut) onto the spindle.
- Use the provided wrench to firmly tighten the outer flange, ensuring the disc is securely clamped. Release the spindle lock button.
- Verify that the wheel is properly seated and the guard is in a safe position before inserting the battery.
5. Operating Instructions
Always wear appropriate personal protective equipment, including eye protection, hearing protection, and gloves, before operating the angle grinder.
5.1 General Operation
- Ensure the battery is fully charged and securely inserted into the grinder.
- Hold the grinder firmly with both hands, using the main handle and the auxiliary side handle.
- To start the grinder, slide the On/Off switch to the 'On' position. The motor will quickly reach its maximum speed of 9000 RPM.
- To stop the grinder, slide the On/Off switch to the 'Off' position. Wait for the wheel to come to a complete stop before setting the tool down.
5.2 Cutting Operations
Use appropriate cutting wheels for the material. Ensure the workpiece is securely clamped.

Figure 5.1: The versatility of the angle grinder demonstrated through its use in cutting, grinding, and polishing applications on various metal workpieces.
- Select a thin cutting disc suitable for the material (e.g., metal, tile).
- Position the guard to protect against sparks and debris.
- Start the grinder and allow it to reach full speed before contacting the workpiece.
- Apply light, consistent pressure, allowing the wheel to do the work. Do not force the cut.
- Maintain a stable grip and control the tool's movement along the cutting line.
5.3 Grinding Operations
Grinding is used for material removal, shaping, and deburring.

Figure 5.2: The compact yet powerful WORKSITE angle grinder effectively grinding a metal workpiece, generating sparks, demonstrating its capability for material removal.
- Select a grinding disc appropriate for the material and task.
- Hold the grinder at a slight angle (typically 15-30 degrees) to the workpiece surface.
- Move the grinder smoothly and consistently across the surface, applying even pressure.
- Avoid digging the edge of the disc into the material, which can cause kickback.
5.4 Polishing Operations
For polishing, use appropriate polishing pads or flap discs.

Figure 5.3: A user operating the WORKSITE angle grinder, demonstrating its maximum 9000 RPM speed trigger during a task that generates sparks, indicating high-speed performance.
- Attach a suitable flap disc or polishing pad.
- Hold the grinder flat against the surface or at a very shallow angle.
- Move the tool in overlapping passes to achieve a uniform finish.
- Monitor the surface to prevent overheating or excessive material removal.
6. Maintenance
Regular maintenance ensures the longevity and safe operation of your angle grinder. Always disconnect the battery before performing any maintenance.
6.1 Cleaning
- After each use, clean the tool's exterior with a soft, damp cloth. Do not use harsh chemicals or abrasive cleaners.
- Regularly clear dust and debris from the air vents to prevent overheating and maintain motor efficiency. Use compressed air if available.
- Inspect the wheel guard for any damage or excessive wear.
6.2 Battery Care and Storage
- Store batteries in a cool, dry place, away from direct sunlight and extreme temperatures.
- Do not store batteries in a discharged state for extended periods. Recharge them periodically if not in use.
- Protect battery terminals from shorting by keeping them away from metal objects.
6.3 Accessory Replacement
- Replace grinding, cutting, or flap discs when they become worn, chipped, or damaged. Using damaged accessories can be extremely dangerous.
- Always use accessories that are rated for the grinder's maximum RPM and are compatible with its arbor size.
7. Troubleshooting
This section provides solutions to common issues you might encounter with your WORKSITE Cordless Angle Grinder.
| Problem | Possible Cause | Solution |
|---|---|---|
| Grinder does not start | Battery not charged Battery not properly inserted On/Off switch not fully engaged Tool malfunction | Charge the battery fully. Ensure battery is clicked securely into place. Confirm switch is pushed completely to 'On'. Contact customer support if other solutions fail. |
| Loss of power during operation | Battery low Overload protection activated Excessive pressure applied | Recharge the battery. Allow tool to cool down. Reduce load. Reduce pressure on the workpiece. Let the tool do the work. |
| Excessive vibration | Disc not properly installed Damaged or unbalanced disc Loose auxiliary handle | Ensure disc is securely clamped and centered. Replace the disc with a new, undamaged one. Tighten the auxiliary handle. |
| Overheating | Blocked air vents Continuous heavy use Motor overload | Clean air vents thoroughly. Allow tool to cool down between uses. Reduce load and pressure. |
8. Warranty and Support
WORKSITE is committed to providing high-quality tools. For specific warranty details, including coverage period and terms, please refer to the warranty card included with your product or visit the official WORKSITE website.
Customer Support
If you encounter any issues not covered in this manual, require replacement parts, or need technical assistance, please contact WORKSITE customer support through their official channels. You can typically find contact information on the product packaging, warranty card, or the WORKSITE brand store on Amazon or their official website.
For more information and to explore other WORKSITE products, visit the WORKSITE Store on Amazon.
