1. Introduction
The Innex Ideao Hub 24 Inch P-Cap Touchscreen Monitor is designed to enhance collaboration, presentations, and creative work. Featuring a QHD (2560x1440P) display with 10-point touch capability and MPP2.0 active stylus support, it transforms your workspace into an interactive environment. Its versatile ergonomic stand allows for various adjustments, including swiveling, lifting, tilting, and portrait mode, ensuring optimal viewing and interaction.
This manual provides detailed instructions for setting up, operating, and maintaining your Ideao Hub monitor, along with troubleshooting tips and product specifications.

Figure 1.1: The Ideao Hub monitor facilitating teamwork and collaboration.
2. What's in the Box
Upon unboxing your Ideao Hub monitor, please ensure all the following items are present:
- Ideao Hub 24 Inch Touchscreen Monitor
- Monitor Stand (Base and Neck components)
- USB Type-C Cable
- HDMI Cable
- USB 3.0 A-B Cable (for touch functionality with HDMI/VGA/DVI-D connections)
- AC/DC Power Adapter
- Power Cables (various regional types included)
- Quick Start Guide
- Pen Holder
- Screwdriver
- Backup Screws (for stand assembly)
Video 2.1: An unboxing video demonstrating the contents of the Ideao Hub package.
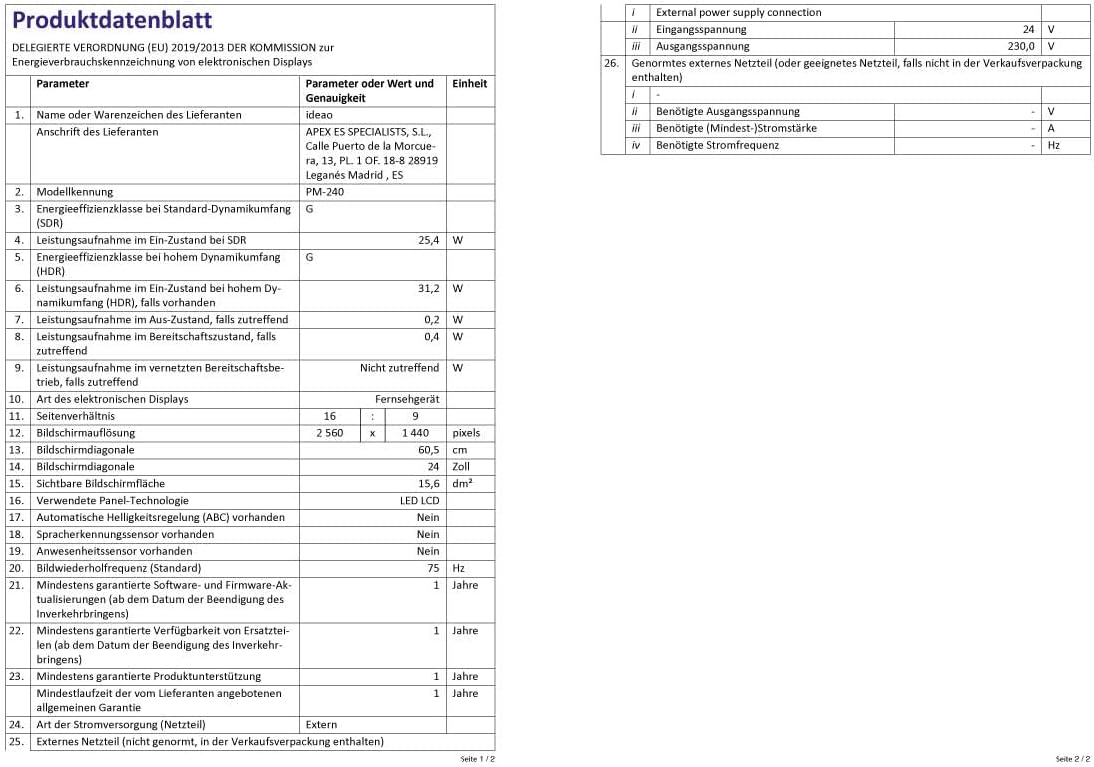
Figure 2.1: Overview of all included accessories and monitor components.
3. Setup
3.1 Attaching the Stand
- Carefully remove the monitor from its packaging, keeping it within the original styrofoam for protection.
- Identify the stand neck and stand base components.
- Attach the stand neck to the back of the monitor using the provided screws and screwdriver. Ensure it is securely fastened.
- Attach the stand base to the stand neck, tightening the thumb screw clockwise until firm.
Video 3.1: A video demonstrating the assembly process of the Ideao Hub monitor stand.
3.2 Connecting to a PC or Laptop
The Ideao Hub offers versatile connectivity options. Choose the method that best suits your device:
- USB Type-C (Single Cable Solution): If your PC or laptop supports DisplayPort Alternate Mode and Power Delivery via its USB Type-C port, you can use a single USB Type-C cable for video, audio, data, touch, and power. Connect one end of the USB Type-C cable to the monitor's USB Type-C port and the other end to your computer's compatible USB Type-C port.
- HDMI/VGA/DVI-D with USB A-B (Dual Cable Solution): If your computer does not support the full functionality of USB Type-C, you will need two cables. Connect the HDMI, VGA, or DVI-D cable from your computer to the corresponding input on the monitor for video and audio. Then, connect the USB 3.0 A-B cable from your computer's USB-A port to the monitor's USB-B port to enable touch functionality.

Figure 3.1: Rear view of the Ideao Hub with labeled connectivity ports.

Figure 3.2: Laptop connected to the Ideao Hub for extended display and touch.
3.3 Powering On
Connect the AC/DC power adapter to the monitor's power input and then plug it into a wall outlet. The power button is located on the bottom right of the back of the monitor. Tap the power button once. The Ideao Hub logo will appear, followed by the screen display from your connected laptop or PC.
The power LED light is located at the bottom of the Ideao Hub. No light means no power. A red light indicates power standby. A blue light means a display source is currently detected.
4. Operating the Monitor
4.1 Touch and Stylus Interaction
The Ideao Hub supports 10-point multi-touch and an MPP2.0 active stylus for precise and intuitive interaction. This allows for smooth writing, drawing, and annotation directly on the screen.
- Smooth Touch Control: Use one finger to scroll or swipe, two fingers to zoom in and out, and three fingers for gestures similar to a touchpad.
- Windows Ink Compatibility: Directly annotate on documents such as Microsoft Word, Excel, PowerPoint, and Whiteboard with the stylus.
- Palm Rejection: Rest your palm comfortably on the screen while writing without interfering with the touch input.

Figure 4.1: Multi-touch gestures on the Ideao Hub screen.
Video 4.1: Demonstration of 10-point touch and Windows Ink writing with the Ideao Hub and pen.
4.2 Ergonomic Stand Adjustments
The versatile ergonomic stand allows for various adjustments to suit your working style and environment:
- Tilt & Lift: Adjust the screen angle and height for comfortable viewing, whether sitting or standing.
- Swivel: Rotate the screen left or right to share content with others in the room.
- Portrait Mode: Flip the monitor into portrait orientation, ideal for viewing long documents, programming code, or for 1-on-1 online meetings.

Figure 4.2: Ergonomic stand adjustments for optimal viewing and interaction.
4.3 On-Screen Display (OSD) Settings
To access the OSD menu, swipe down from the top right edge of the screen with two fingers. The menu provides options to adjust various display settings:
- Signal Sources: Select input source (HDMI, Type-C, DVI-D, VGA).
- Brightness and Contrast: Adjust display brightness and contrast levels. Preset settings for gaming and movie modes are available.
- Color Temperature: Choose between Warm, Natural, Cool presets, or customize RGB values.
- Aspect Ratio: Change the display aspect ratio.
- Sound Volume: Adjust the monitor's built-in speaker volume.
- HDR (High Dynamic Range): Enable HDR mode for brighter and richer colors. Note that HDR mode overrides brightness, contrast, and color temperature settings.
- Reset Settings: Reset all settings to factory defaults.
To exit the OSD menu, press the exit icon. While the OSD menu is active, touch or write functionality on other areas of the display is temporarily suspended.
5. Maintenance
To ensure the longevity and optimal performance of your Ideao Hub monitor, follow these maintenance guidelines:
- Cleaning the Screen: Use a soft, lint-free cloth lightly dampened with water or a non-abrasive screen cleaner. Avoid harsh chemicals or abrasive materials that could damage the screen surface.
- Cleaning the Casing: Wipe the monitor casing with a soft, dry cloth.
- Ventilation: Ensure the monitor's ventilation openings are clear and unobstructed to prevent overheating.
- Storage: When not in use for extended periods, store the monitor in a cool, dry place, ideally in its original packaging.
6. Troubleshooting
If you encounter any issues with your Ideao Hub monitor, please refer to the following common troubleshooting steps:
- No Display:
- Ensure the power cable is securely connected to both the monitor and the power outlet.
- Verify the video cable (USB-C, HDMI, VGA, DVI-D) is properly connected to both the monitor and your computer.
- Check the input source selection in the OSD menu to ensure it matches your connected cable.
- Confirm your computer's display settings are configured to output to an external monitor.
- Touch Functionality Not Working:
- If using a dual-cable setup, ensure the USB A-B cable is securely connected to both the monitor and your computer.
- If using a single USB Type-C cable, verify that your computer's USB Type-C port supports touch data transfer.
- Check your computer's device manager for any unrecognized touch devices or driver issues.
- Flickering or Distorted Image:
- Check the video cable for any damage or loose connections. Try a different cable if possible.
- Adjust the display resolution and refresh rate on your computer to match the monitor's supported specifications.
- Reset the monitor's OSD settings to factory defaults.
If the issue persists after trying these steps, please contact Innex customer support for further assistance.


