
1. Product Overview
The Wnoke WK001 Pet Nail Grinder is designed for safe and efficient nail trimming for various pet sizes. It features a diamond grinding wheel, low-noise operation, LED lighting, and a rechargeable cordless design for user convenience and pet comfort.

Image: Wnoke WK001 Pet Nail Grinder.
Package Contents:
- Wnoke Pet Nail Grinder
- Pet Nail Clippers
- USB Charging Cable
- Dust Collecting Cap
- User Manual (this document)
Component Identification:
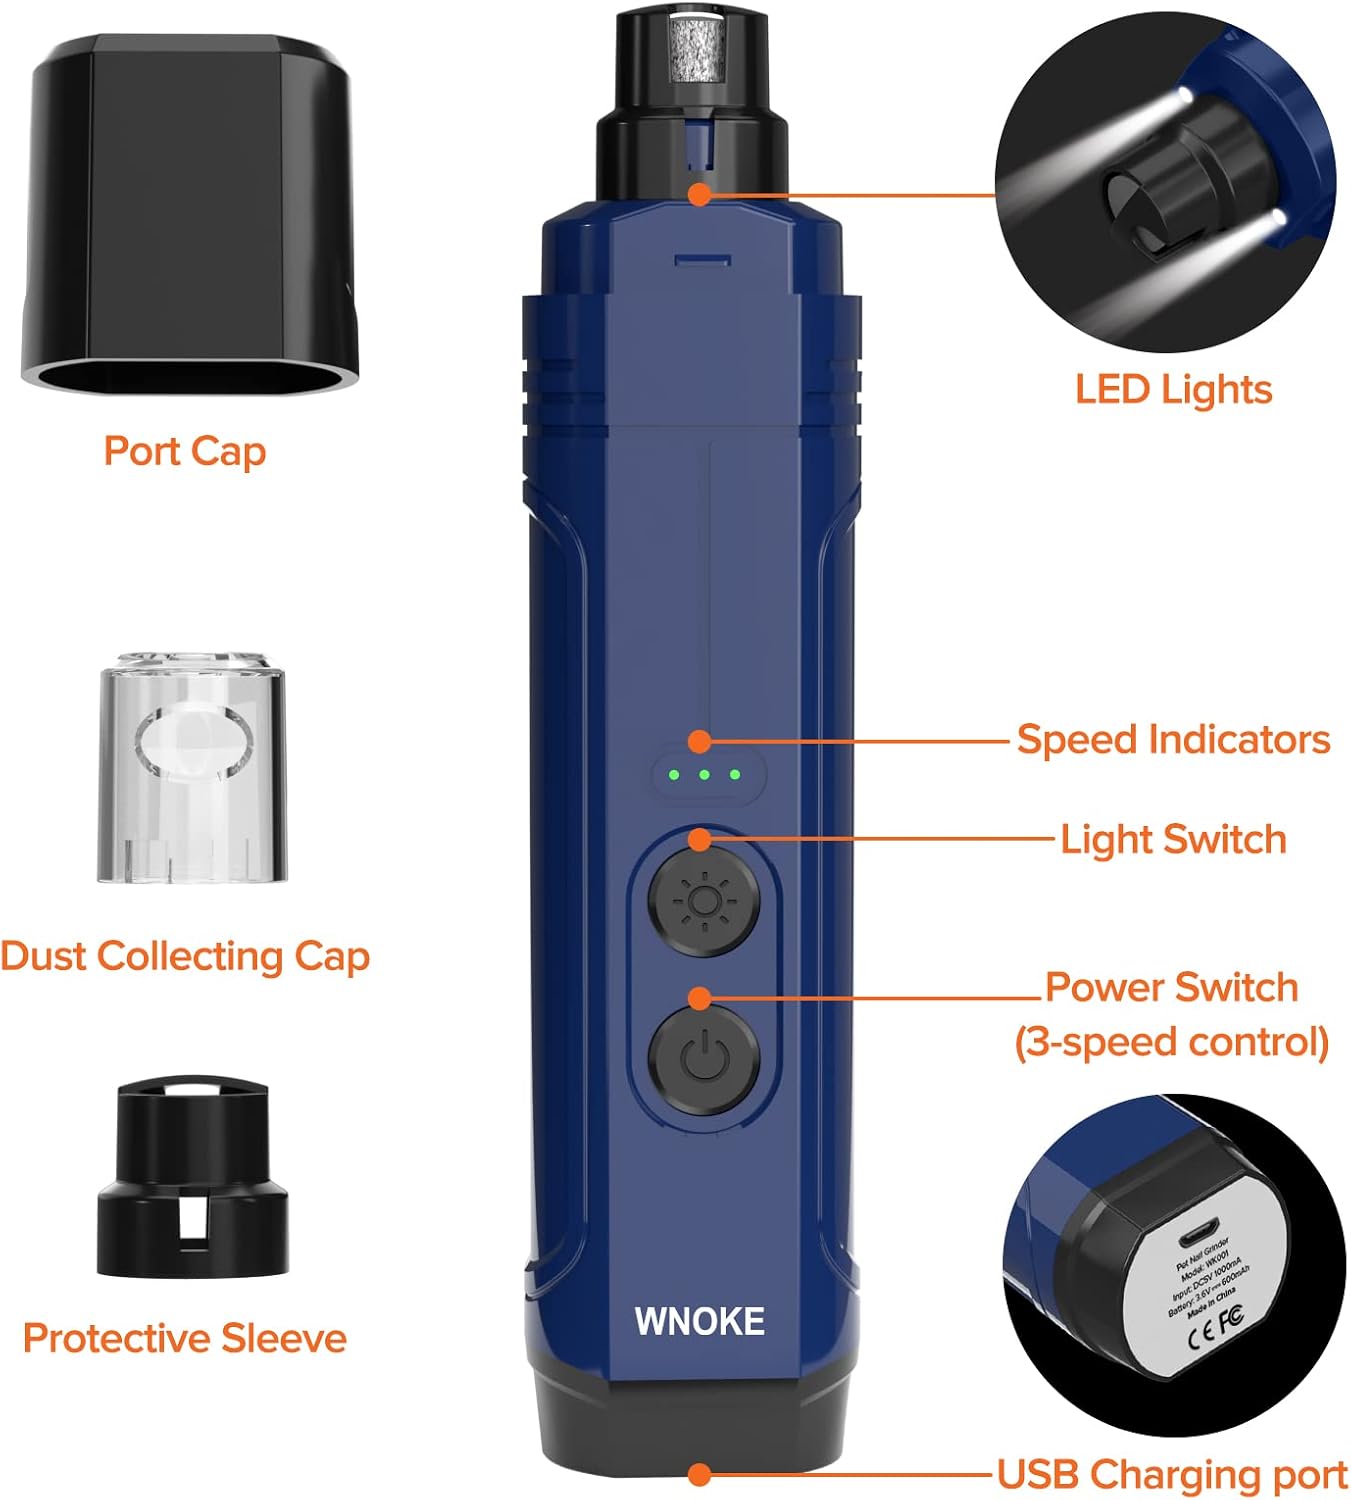
Image: Detailed diagram of the Wnoke WK001 Pet Nail Grinder, showing the Port Cap, LED Lights, Speed Indicators, Light Switch, Power Switch (3-speed control), Dust Collecting Cap, Protective Sleeve, and USB Charging Port.
- Port Cap: Protects the grinding head when not in use.
- LED Lights: Illuminates the pet's nail for better visibility of the quick.
- Speed Indicators: Displays the selected grinding speed.
- Light Switch: Activates or deactivates the LED lights.
- Power Switch (3-speed control): Turns the grinder on/off and cycles through speed settings.
- Dust Collecting Cap: Gathers nail dust during grinding.
- Protective Sleeve: Provides grip and protection.
- USB Charging Port: For recharging the internal battery.
2. Setup
2.1 Charging the Grinder
Before first use, fully charge the nail grinder. Connect the provided USB charging cable to the grinder's USB charging port and plug the other end into a compatible USB power source (e.g., laptop, power adapter, power bank). The speed indicators will show charging status and turn solid when fully charged.

Image: The Wnoke WK001 Pet Nail Grinder connected to a laptop via USB for charging. A full charge takes approximately 3 hours and provides up to 3 hours of operation.
2.2 Attaching the Dust Collecting Cap
To minimize nail dust dispersion, attach the dust collecting cap to the grinding head before use. Ensure it is securely fitted.

Image: The Wnoke WK001 Pet Nail Grinder with the dust collecting cap attached, demonstrating how it prevents nail dust from spreading.
2.3 Selecting the Appropriate Grinding Port
The grinder features multiple grinding ports suitable for different pet nail sizes. Choose the port that best fits your pet's nail to ensure effective and safe grinding.

Image: The Wnoke WK001 Pet Nail Grinder illustrating three grinding methods: a large opening for large pets, a medium opening for medium-sized pets, and a small opening for small pets.
3. Operating Instructions
3.1 Preparing Your Pet
Acclimate your pet to the grinder's sound and vibration before use. Allow them to sniff the device while it's off, then turn it on briefly to let them get used to the low noise. Reward calm behavior with treats.

Image: The Wnoke WK001 Pet Nail Grinder's dual LED lights illuminating a dog's paw, making it easier to see the quick of the nail for safer trimming.
The grinder operates with ultra-quiet and light vibration, designed to prevent startling pets during grinding.
Image: The Wnoke WK001 Pet Nail Grinder demonstrating its ultra-quiet operation with low vibration, ensuring pets remain calm during the grooming process.
3.2 Powering On and Speed Selection
- Press the Power Switch once to turn on the grinder at the lowest speed.
- Press the Power Switch again to cycle to the medium speed.
- Press the Power Switch a third time to select the highest speed.
- Press the Power Switch a fourth time to turn the grinder off.
- Use the Light Switch to turn the LED lights on or off as needed for better visibility.
3.3 Grinding Technique
Hold your pet's paw gently but firmly. Carefully insert one nail into the chosen grinding port. Grind the nail for only a few seconds at a time, then release and check the progress. Repeat as necessary. Avoid grinding too much at once to prevent reaching the quick, which can cause pain and bleeding. The LED light helps to identify the quick.
The diamond grinding wheel ensures safer and more effective trimming.

Image: Internal view of the Wnoke WK001 Pet Nail Grinder highlighting the powerful motor and diamond grinding wheel, designed for safer and more effective pet nail trimming.
Always grind from the bottom of the nail upwards, at a 45-degree angle, to maintain the natural shape of the nail.
4. Maintenance
4.1 Cleaning the Grinding Head
After each use, remove the dust collecting cap and gently brush away any accumulated nail dust from the grinding head. You may use a soft cloth or a small brush. Do not rinse the grinding head directly under water.
4.2 Storing the Grinder
Store the grinder in a dry, cool place, away from direct sunlight and out of reach of children and pets. Ensure the port cap is on to protect the grinding head.
5. Troubleshooting
5.1 Grinder Not Turning On
- Ensure the device is fully charged. Connect it to a power source and allow it to charge for at least 3 hours.
- Check if the power switch is pressed firmly.
5.2 Ineffective Grinding
- Ensure the grinding head is clean and free of debris. Clean it as described in the Maintenance section.
- Select a higher speed setting if necessary.
- Confirm you are using the correct grinding port size for your pet's nails.
5.3 Pet Discomfort During Grinding
- Re-acclimate your pet to the grinder. Start with short sessions and offer rewards.
- Ensure you are not grinding too deeply or hitting the quick. Use the LED light for better visibility.
- Maintain a gentle but firm grip on the paw.
6. Specifications
| Model Number | WK001 |
| Manufacturer | Wnoke |
| Product Dimensions | 16.26 x 3.71 x 3.35 cm |
| Weight | 180 g |
| Power Source | USB Rechargeable Battery |
| Grinding Wheel Material | Diamond |
| Speed Settings | 3 Speeds |
7. Warranty and Support
For warranty information or technical support, please contact Wnoke customer service through your purchase platform or the contact details provided with your product packaging. Please retain your proof of purchase for warranty claims.