1. Introduction
The Mi-Heat Mi-300S RF Wireless Programmable Thermostat kit is designed for efficient and comfortable control of heating and cooling systems. This manual provides detailed instructions for the installation, operation, and maintenance of your new thermostat.
1.1 Product Overview
The Mi-300S RF system consists of a battery-powered transmitter (thermostat unit) and two mains-powered receivers. Communication between these units is wireless via a 433 MHz radio frequency, offering a range of up to 20 meters. This system is suitable for both new installations and renovations, providing flexible placement options.

Figure 1: Mi-Heat Mi-300S RF Wireless Programmable Thermostat Kit (Transmitter and two Receivers)
1.2 Key Features
- Wireless connection via 433 MHz with a range of up to 20 meters.
- Daily and weekly programming with 4 switching times.
- Multiple operating modes: Comfort, Eco, and Holiday.
- Switching capability between heating and cooling modes.
- Potential-free switching contact with a maximum switching capacity of 7 A.
- Transmitter powered by 2 AAA batteries; receivers powered by 230V/50Hz mains.
- Supports up to 3 wireless receivers controlled by a single transmitter.
- Flexible placement: wall-mounted or table-standing transmitter.
1.3 Package Contents
- 1 x Mi-300S RF Thermostat Transmitter
- 2 x Mi-300S RF Thermostat Receivers
- 1 x Table Stand for Transmitter
- 1 x Mounting Material (screws, wall plugs)
- 1 x User Manual (German, please refer to this English translation)
2. Safety Information
Please read all safety instructions carefully before installation and operation. Failure to follow these instructions may result in electric shock, fire, or damage to the product.
- Electrical Installation: Installation of the receiver unit involves mains voltage (230V). All electrical work must be performed by a qualified electrician in accordance with local regulations.
- Power Disconnection: Always disconnect the main power supply before performing any wiring or maintenance on the receiver unit.
- Battery Safety: Use only the specified battery type (2x AAA for the transmitter). Do not mix old and new batteries, or different types of batteries. Dispose of used batteries responsibly.
- Environment: Do not expose the device to extreme temperatures, humidity, or direct sunlight. Keep away from water.
- Children: Keep the device out of reach of children.
3. Components Overview
3.1 Transmitter (Thermostat Unit)
The transmitter is the main control unit, featuring an LCD display and control buttons. It measures the ambient temperature and sends commands wirelessly to the receivers.

Figure 2: Transmitter Display Features
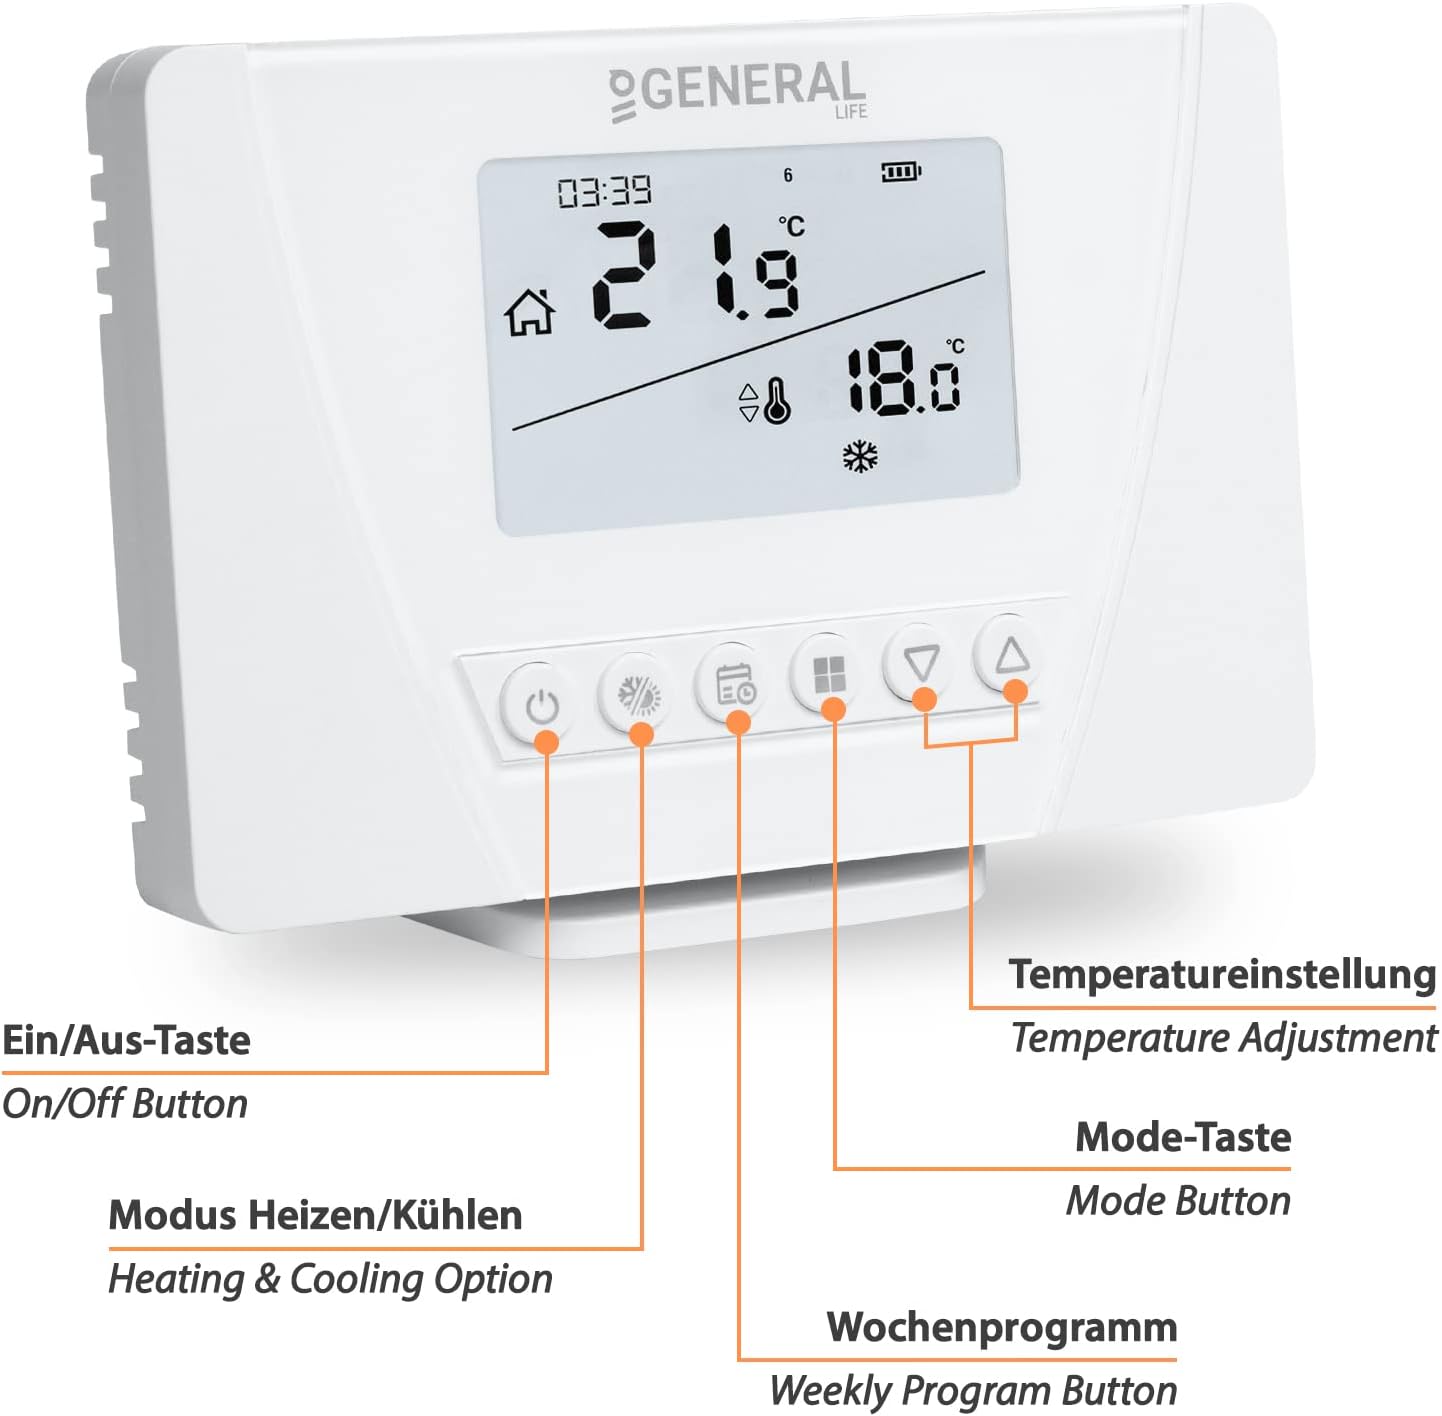
Figure 3: Transmitter Control Buttons

Figure 4: Transmitter Dimensions
3.2 Receiver Unit
The receiver unit connects to your heating or cooling appliance and receives commands from the transmitter. It has a manual operation button, a pairing button, and an LED indicator.

Figure 5: Receiver Unit Features

Figure 6: Receiver Dimensions
4. Setup
4.1 Transmitter Installation
- Insert Batteries: Open the battery compartment on the back of the transmitter and insert 2 AAA batteries, observing the correct polarity.
- Placement: The transmitter can be placed on a table using the provided stand or mounted on a wall using the included mounting material. Choose a central location away from direct heat sources, drafts, or direct sunlight for accurate temperature measurement.
4.2 Receiver Wiring and Placement
WARNING: Ensure the main power supply is disconnected before performing any wiring.
- Wiring: Connect the receiver to your heating or cooling appliance and the 230V mains power supply. Refer to the wiring diagrams below for common applications. The receiver provides a potential-free switching contact, allowing it to control various devices with a maximum load of 7A.
- Placement: Position the receiver within the 20-meter wireless range of the transmitter. Avoid placing it near large metal objects or other sources of radio interference.

Figure 7: Receiver Wiring Diagrams (Infrared Heating and Heating Boiler/Actuator)
4.3 Pairing Transmitter and Receiver(s)
The system allows pairing up to 3 receivers with one transmitter.
- Ensure both the transmitter (with batteries) and the receiver (powered by mains) are switched on.
- On the receiver, press and hold the Pairing Button (labeled with a chain link icon) for approximately 3 seconds until the LED indicator starts flashing.
- On the transmitter, press and hold the Mode Button (often labeled with a house icon or 'M') for 3 seconds to enter pairing mode. The display will show a pairing indicator.
- Once successfully paired, the receiver's LED will stop flashing and remain solid, and the transmitter's display will confirm the connection.
- Repeat the process for additional receivers if you have more than one.

Figure 8: Wireless Range and Multiple Receiver Control
5. Operating Instructions
5.1 Basic Operation
- Power On/Off: Press the On/Off Button (power symbol) to turn the thermostat on or off.
- Temperature Adjustment: Use the Up (triangle) and Down (inverted triangle) buttons to adjust the desired set temperature.
- Heating/Cooling Mode: Press the Heating & Cooling Option Button (snowflake/sun icon) to switch between heating and cooling modes.
5.2 Programming (Daily/Weekly)
The thermostat supports daily and weekly programming with up to 4 switching times per day.
- Press the Weekly Program Button (calendar icon) to enter programming mode.
- Use the Mode Button to select the day or group of days you wish to program (e.g., weekdays, weekends, or individual days).
- Use the Up/Down Buttons to set the desired time and temperature for each of the 4 switching periods.
- Confirm each setting by pressing the Weekly Program Button again or wait for the system to automatically save and exit.
5.3 Operating Modes
The thermostat offers several operating modes for different needs:
- Comfort Mode: Maintains a consistently comfortable temperature.
- Eco Mode: Sets a lower, energy-saving temperature.
- Holiday Mode: Maintains a set temperature for an extended period, ideal for when you are away.
- Manual Mode: Allows temporary temperature adjustments that override the current program until the next programmed event.
To switch between modes, press the Mode Button repeatedly until the desired mode is displayed.
6. Maintenance
- Cleaning: Clean the thermostat and receiver units with a soft, dry cloth. Do not use abrasive cleaners or solvents.
- Battery Replacement: When the low battery indicator appears on the transmitter's display, replace the 2 AAA batteries promptly to ensure continuous operation.
- Firmware Updates: There are no user-serviceable firmware updates for this device.
7. Troubleshooting
| Problem | Possible Cause | Solution |
|---|---|---|
| Transmitter display is blank. | Batteries are dead or incorrectly inserted. | Replace batteries (2x AAA) and ensure correct polarity. |
| Receiver not responding to transmitter. | Units are not paired, out of range, or experiencing interference. | Re-pair the units (Section 4.3). Move transmitter closer to receiver. Check for sources of interference (e.g., large metal objects, other 433 MHz devices). |
| Heating/Cooling unit not turning on/off. | Incorrect wiring, receiver not powered, or appliance issue. | Verify receiver is powered (LED on). Check wiring connections (Section 4.2). Ensure the heating/cooling appliance is functional. |
| Temperature reading seems inaccurate. | Transmitter placed in an unsuitable location. | Relocate the transmitter away from direct sunlight, drafts, or heat sources. |
8. Specifications
| Feature | Specification |
|---|---|
| Model | Mi-300S |
| Manufacturer Reference | 1510-005 |
| Transmitter Power Source | 2 x AAA Batteries |
| Receiver Power Source | 230V / 50Hz Mains |
| Wireless Frequency | 433 MHz |
| Wireless Range | Up to 20 meters (unobstructed) |
| Max. Switching Capacity | 7 A |
| Controller Type | Push-button |
| Specific Uses | Heating, Cooling |
| Backlight | Yes |
| Transmitter Dimensions (L x W x H) | 12.5 x 8.5 x 2 cm |
| Receiver Dimensions (L x W x H) | 9 x 9 x 2.5 cm |
| Total Weight | 400 Grams |
9. Warranty and Support
This product comes with a standard manufacturer's warranty. For specific warranty terms and conditions, please refer to the documentation provided at the time of purchase or contact your retailer. For technical support or inquiries, please contact the manufacturer or your point of purchase.


