1. Introduction
The Uniview UNV 1HDD 8CH 2MP XVR (Model: XVR301-08G3) is a high-performance digital video recorder designed for surveillance systems. It supports 4/8 channels and is compatible with various camera types including TVI, AHD, CVI, CVBS, and IP cameras, offering adaptive access. This XVR supports H.265/H.264 video formats, audio over coaxial cable, and provides HDMI and VGA outputs up to 1920x1080 resolution. This manual provides essential information for the proper installation, operation, and maintenance of your XVR system.
2. Safety Information
- Power Supply: Use only the specified power adapter. Ensure the power supply voltage matches the device requirements.
- Ventilation: Do not block ventilation openings. Ensure proper airflow to prevent overheating.
- Environment: Avoid exposing the device to extreme temperatures, humidity, dust, or corrosive liquids. Do not place heavy objects on the device.
- Installation: Install the device on a stable, level surface. Avoid direct sunlight or heat sources.
- Servicing: Do not attempt to disassemble or repair the device yourself. Refer all servicing to qualified personnel.
- Hard Drive: Handle the hard drive with care during installation to prevent damage.
3. Package Contents
Please check the package contents upon opening. If any items are missing or damaged, contact your dealer immediately.
- Uniview UNV 1HDD 8CH 2MP XVR Unit (XVR301-08G3)
- Power Adapter
- USB Mouse
- SATA Cable for HDD (if HDD not pre-installed)
- Power Cable for HDD (if HDD not pre-installed)
- Quick Start Guide
4. Product Overview
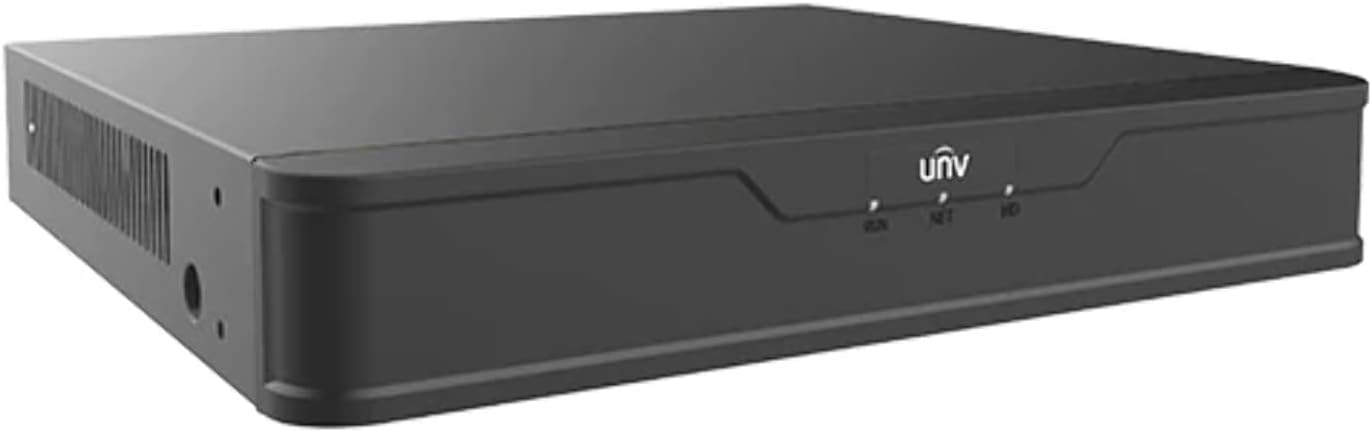
4.1 Front Panel

The front panel of the XVR features the Uniview logo and three indicator lights: RUN (system status), NET (network activity), and HD (hard drive activity). These indicators provide quick visual feedback on the device's operational status.
4.2 Side Panels
The side panels of the XVR are equipped with ventilation grilles to ensure proper heat dissipation and maintain optimal operating temperature for the internal components.

This view shows the opposite side panel, also featuring ventilation grilles, crucial for maintaining internal temperature and ensuring the longevity of the device.
4.3 Rear Panel (Typical Ports)
The rear panel typically includes:
- Video Inputs (BNC): 4 or 8 channels for connecting analog cameras (TVI, AHD, CVI, CVBS).
- Video Outputs: HDMI and VGA ports for connecting a monitor.
- Audio Inputs/Output: RCA connectors for audio.
- Network Port (RJ45): For connecting to a local area network (LAN).
- USB Ports: For connecting a mouse, USB flash drive for backup, or external storage.
- Power Input: For connecting the power adapter.
5. Setup
5.1 Hardware Installation
- Install Hard Disk Drive (HDD): If an HDD is not pre-installed, open the XVR casing, connect the SATA data and power cables to the HDD, and secure the HDD within the enclosure using screws. Close the casing.
- Connect Cameras: Connect your TVI, AHD, CVI, CVBS, or IP cameras to the BNC video input ports on the rear panel. Ensure secure connections.
- Connect Monitor: Connect a monitor to either the HDMI or VGA output port on the rear panel.
- Connect Mouse: Plug the USB mouse into one of the USB ports.
- Connect Network (Optional): For remote viewing or network features, connect an Ethernet cable from the XVR's RJ45 port to your router or network switch.
- Connect Power: Connect the power adapter to the XVR's power input port, then plug the adapter into a power outlet.
5.2 Initial Configuration
- Power On: The XVR will automatically power on once connected to power.
- Setup Wizard: Upon first boot, a setup wizard will guide you through initial configurations such as language, date/time, network settings, and password creation.
- Set Password: Create a strong password for the administrator account. This is crucial for security. Do not use simple or easily guessable passwords.
- Network Settings: Configure network settings (DHCP or Static IP) to enable network access and remote viewing.
- HDD Initialization: If a new HDD is installed, the system may prompt you to initialize or format it. Follow the on-screen instructions.
6. Operating
6.1 Live View
After logging in, the system will display the live view of connected cameras. You can switch between single-camera view and multi-camera grid views. Use the mouse to navigate the interface.
6.2 Recording Management
Access the 'Record' menu to configure recording schedules (continuous, motion detection, alarm-triggered) and recording parameters for each channel. Ensure the HDD is properly initialized for recording.
6.3 Playback
Navigate to the 'Playback' menu to review recorded footage. You can search by date, time, and event type. Use the playback controls (play, pause, fast forward, rewind) to review footage.
6.4 Network Access and Remote Viewing
Once the XVR is connected to the network and configured, you can access it remotely via a web browser or a dedicated mobile application. Refer to the software manual for detailed instructions on setting up remote access.
7. Maintenance
- Regular Cleaning: Gently clean the exterior of the XVR with a soft, dry cloth. Do not use liquid cleaners. Ensure ventilation openings are free from dust.
- Firmware Updates: Periodically check the official Uniview website for firmware updates. Updating firmware can improve performance, add features, and fix bugs. Follow update instructions carefully.
- Data Backup: Regularly back up important recorded footage to an external USB drive or network storage to prevent data loss.
- Password Security: Change your administrator password periodically to maintain system security.
- System Health Check: Monitor the hard drive status and system logs regularly for any anomalies.
8. Troubleshooting
| Problem | Possible Cause | Solution |
|---|---|---|
| No video output on monitor | Loose cable connection; Incorrect video output settings; Monitor issue. | Check HDMI/VGA cable connections. Ensure monitor is powered on and set to correct input. Try a different monitor or cable. |
| No recording | HDD not initialized or faulty; Recording schedule not set; Camera not connected. | Initialize/format HDD in system settings. Verify recording schedule. Check camera connections. |
| Cannot access XVR over network | Incorrect IP address; Network cable disconnected; Firewall blocking access. | Verify XVR's IP address and network settings. Check network cable connection. Disable firewall temporarily or configure port forwarding. |
| Forgot password | Password lost. | Refer to the password reset procedure in the full user manual or contact Uniview technical support. |
9. Specifications
| Feature | Detail |
|---|---|
| Model | XVR301-08G3 |
| Channels | 8-channel BNC input |
| Video Compression | H.265/H.264 |
| Video Input Modes | TVI, AHD, CVI, CVBS, IP cameras (adaptive access) |
| Video Output | 1-ch HDMI, 1-ch VGA (up to 1920x1080) |
| Audio over Coaxial | Supported |
| HDD Support | 1 SATA HDD |
| Network Protocols | ONVIF, RTSP (mainstream cameras) |
| Dimensions | Approx. 8 x 8 x 8 inches (Package Dimensions) |
| Weight | Approx. 3 pounds (Item Weight) |
10. Warranty and Support
This Uniview product is covered by a limited warranty. Please refer to the warranty card included with your product or visit the official Uniview website for detailed warranty terms and conditions. The warranty typically covers defects in materials and workmanship under normal use.
For technical support, troubleshooting assistance, or warranty claims, please contact your authorized Uniview dealer or visit the Uniview official support portal. When contacting support, please have your product model number (XVR301-08G3) and serial number ready.


