Introduction
This manual provides detailed instructions for the installation, operation, and maintenance of your WSDCAM Bike Alarm and Smart Tail Light. Please read this manual thoroughly before using the product to ensure proper function and safety.
Package Contents
The package includes the following items:
- 1 x Bike Alarm Set
- 1 x Bike Tail Light Alarm Set
- 1 x Remote Control
- Mounting Accessories (Zip ties, Bracket, Double-sided tape)
- USB Charging Cable
Product Features
- Anti-theft Vibration Alarm: Deters thieves with a loud alarm triggered by movement.
- Smart Bike Tail Light: Enhances visibility with multiple light modes.
- Auto Brake Light: Built-in G-sensor detects braking and illuminates brightly to alert others.
- Adjustable Sensitivity: 7 levels of vibration sensitivity for the alarm.
- Adjustable Volume: Up to 113dB loud alarm with 3 adjustable volume levels.
- Remote Control: Conveniently arm/disarm the alarm and change light modes.
- Waterproof Design: Suitable for various weather conditions.
- Rechargeable Battery: USB rechargeable for convenience.
Setup and Installation
The WSDCAM Bike Alarm and Smart Tail Light offers three primary installation methods to suit your preference and bicycle design.

Figure 1: Three Installation Methods. This image illustrates how the device can be attached to a bicycle seat post using zip ties, a bracket, or double-sided adhesive tape.
- Zip Ties Installation: Secure the device to the seat post or frame using the provided zip ties. Ensure it is tightly fastened to prevent movement.
- Bracket Installation: Attach the mounting bracket to the seat post using the screws. Then, slide or clip the device onto the bracket until it locks securely.
- Double-sided Tape Installation: Clean the desired mounting surface on your bike. Apply the double-sided tape to the back of the device and firmly press it onto the bike surface for several seconds. This method is suitable for flat surfaces.
Ensure the device is mounted in a position where the tail light is clearly visible from the rear and the alarm is not obstructed.
Operating Instructions
Tail Light Modes
The smart tail light features four distinct lighting modes, easily selectable via the remote control. Two of these modes are intelligent auto modes.
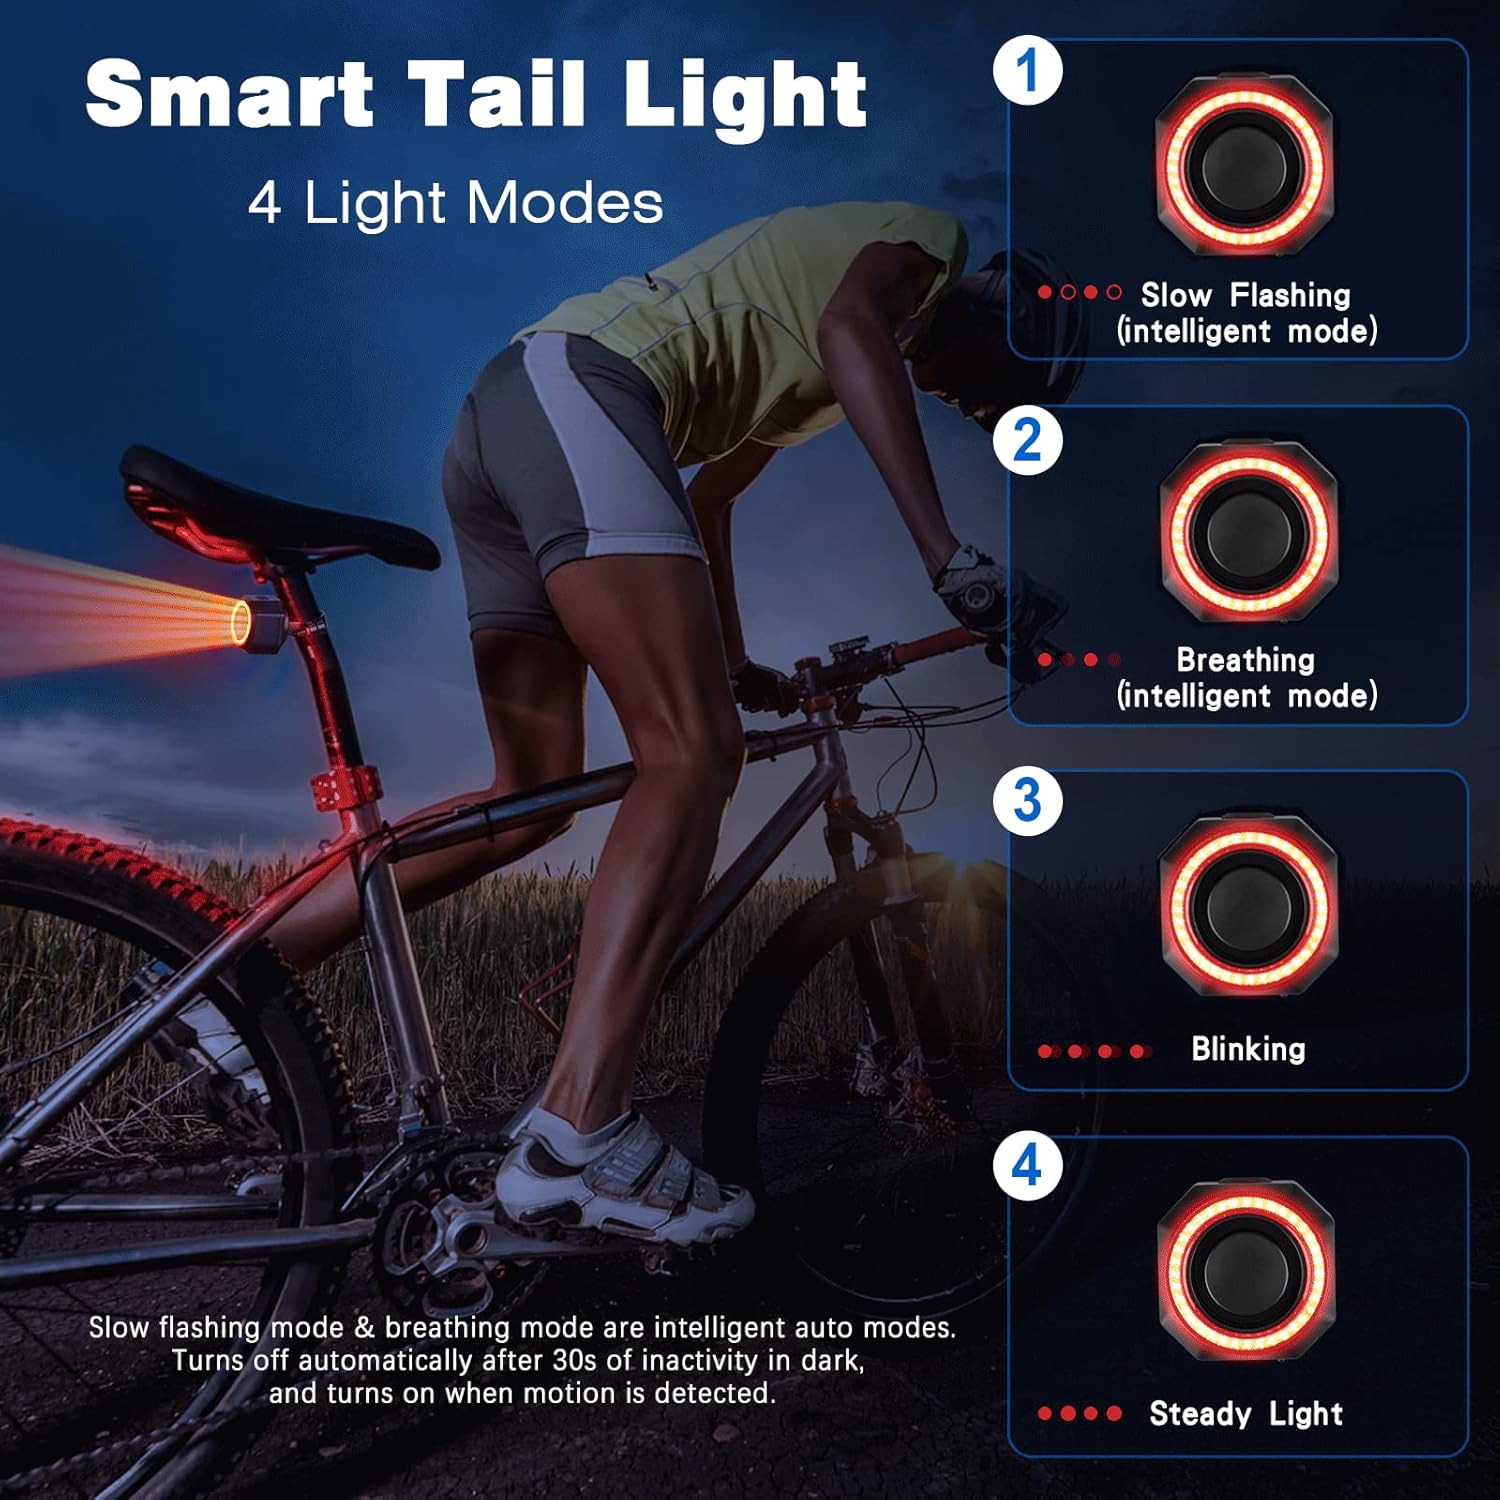
Figure 2: Smart Tail Light 4 Light Modes. This image displays the four available light patterns: Slow Flashing (intelligent mode), Breathing (intelligent mode), Blinking, and Steady Light.
- Slow Flashing (Intelligent Mode): The light flashes slowly. In intelligent auto modes, the light turns off automatically after 30 seconds of inactivity in dark conditions and turns on when motion is detected.
- Breathing (Intelligent Mode): The light gently fades in and out. Similar to slow flashing, this mode also features intelligent auto on/off functionality based on darkness and motion.
- Blinking: The light blinks rapidly.
- Steady Light: The light remains continuously on.
Auto Brake Light Function
The tail light is equipped with a G-sensor that detects when you brake or slow down. Upon detection, the light will automatically highlight for 2 seconds to alert drivers behind you, significantly reducing the risk of rear-end collisions.

Figure 3: Smart Brake Light in action. This image depicts a cyclist on a road, with the tail light brightly illuminated, indicating the automatic brake light function is active to warn following vehicles.
Arming and Disarming the Alarm
Use the provided remote control to arm and disarm the anti-theft alarm. Refer to the remote control's specific buttons for arming (typically a locked padlock icon) and disarming (unlocked padlock icon).
- Arm: Press the arm button on the remote. The device will emit a confirmation sound, indicating the alarm is active. Any vibration detected will trigger the alarm.
- Disarm: Press the disarm button on the remote. The device will emit a confirmation sound, indicating the alarm is deactivated.
Charging
The WSDCAM Bike Alarm and Smart Tail Light are equipped with power-saving technology and rechargeable batteries. Use the original USB cable and a 5V adapter for charging.

Figure 4: Charging Indicators. This image displays the charging status: a red light indicates the device is charging, and the light turning off indicates a full charge.
- Charging: Connect the device to a power source using the USB cable. A red indicator light will illuminate.
- Fully Charged: The red indicator light will turn off when the battery is fully charged.
Sensitivity and Volume Adjustment
Alarm Sensitivity Adjustment
The anti-theft alarm features 7 levels of adjustable sensitivity, allowing you to customize how easily the alarm is triggered by vibration.

Figure 5: Alarm Sensitivity. This image highlights the 110dB loud alarm and its 7 adjustable sensitivity settings, which can be configured to detect vibrations from a gentle touch to a strong impact.
Refer to the product's specific instructions (often involving button presses on the device or remote) to cycle through the sensitivity levels. A higher level means greater sensitivity.
Alarm Volume Adjustment
The alarm volume can be adjusted to 3 different levels, with a maximum output of 113dB.

Figure 6: Alarm Volume Levels. This image illustrates the alarm unit and indicates that it has 3 adjustable volume levels, reaching up to 113dB.
Consult the product's specific instructions for adjusting the alarm volume, which typically involves a dedicated button on the remote or the device itself.
Maintenance
- Cleaning: Wipe the device with a soft, damp cloth. Do not use harsh chemicals or abrasive cleaners.
- Storage: Store the device in a cool, dry place when not in use for extended periods.
- Charging: Recharge the battery regularly, even if not frequently used, to maintain battery health.
- Water Exposure: While waterproof, avoid prolonged submersion or high-pressure water jets.
Troubleshooting
| Problem | Possible Cause | Solution |
|---|---|---|
| Alarm not sounding | Battery low; Alarm not armed; Sensitivity too low. | Charge the device; Arm the alarm using the remote; Increase sensitivity level. |
| Tail light not working | Battery low; Incorrect light mode selected. | Charge the device; Cycle through light modes using the remote. |
| Remote not responding | Remote battery low; Out of range; Interference. | Replace remote battery (if applicable); Move closer to the device; Avoid areas with strong signal interference. |
| Brake light not activating | Insufficient deceleration; Sensor obstruction. | Ensure clear deceleration for sensor activation; Check for any obstructions around the sensor area. |
Specifications
| Feature | Detail |
|---|---|
| Brand | WSDCAM |
| Model Number | B0BB2FBC5P |
| Compatible Devices | Bicycles |
| Alarm Volume | Up to 113dB (3 levels adjustable) |
| Alarm Sensitivity | 7 levels adjustable |
| Tail Light Brightness | Up to 160 lumens |
| Tail Light Modes | 4 (Slow Flashing, Breathing, Blinking, Steady Light) |
| Brake Light | Automatic (G-sensor) |
| Connectivity | Wireless (Remote Control) |
| Power Source | Rechargeable via USB |
Warranty and Support
WSDCAM products are designed for reliability and performance. For warranty information, technical support, or any inquiries regarding your product, please refer to the contact information provided with your purchase or visit the official WSDCAM website.
Manufacturer: wsdcam
First Available: August 18, 2022
For further assistance, please contact WSDCAM customer service.


