1. Introduction
This manual provides detailed instructions for the installation, operation, and maintenance of your new Hibbent 10-inch Square Rainfall and Handheld Shower Head Combo. Please read this manual thoroughly before installation and use to ensure proper function and longevity of the product. Keep this manual for future reference.
2. Safety Information
- Always turn off the main water supply before beginning any plumbing work.
- Wear appropriate personal protective equipment, such as safety glasses, during installation.
- Ensure all connections are tight to prevent leaks. Do not overtighten.
- If you are unsure about any step, consult a qualified plumber.
- Do not use harsh chemicals or abrasive cleaners on the product finish.
3. Package Contents
Verify that all components listed below are included in your package:
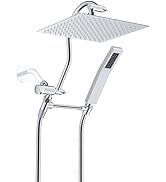
- 10-inch Square Rainfall Shower Head
- 7-Spray Settings Handheld Shower Head (Matte Black finish)
- 12-inch Adjustable Curved Shower Extension Arm with integrated 3-Way Diverter Valve
- 71-inch Stainless Steel Shower Hose
- Adhesive Showerhead Holder
- Teflon Tape
- Washers
- Water Restrictor (optional for installation)

4. Installation Instructions
The Hibbent shower head combo is designed for easy installation with standard 1/2-inch pipe threads. No specialized tools are typically required, but a wrench may be helpful for tightening connections.
- Prepare the Shower Arm: Remove your existing shower head. Clean any old sealant or debris from the shower arm threads.
- Apply Teflon Tape: Wrap Teflon tape around the threads of your existing shower arm (approximately 3-5 wraps clockwise).
- Install Curved Shower Extension Arm: Screw the curved shower extension arm onto your existing shower arm. Ensure the 3-way diverter is positioned correctly for easy access. Hand-tighten first, then use a wrench to secure, being careful not to overtighten. The integrated 3-way diverter and shower arm are designed to connect together, preventing leaks and wobbling.
- Install Rainfall Shower Head: Apply Teflon tape to the threads of the curved extension arm. Screw the 10-inch rainfall shower head onto the extension arm. Adjust the angle as desired and tighten the locking mechanism.
- Connect Shower Hose: Attach one end of the 71-inch stainless steel shower hose to the outlet on the 3-way diverter. Ensure a washer is in place before tightening.
- Attach Handheld Shower Head: Attach the other end of the shower hose to the handheld shower head. Ensure a washer is in place before tightening.
- Install Adhesive Showerhead Holder: Clean and dry the desired wall surface. Peel off the backing from the adhesive holder and firmly press it onto the wall. Allow it to set for 24 hours before placing the handheld shower head in it.
- Test for Leaks: Turn on the main water supply and check all connections for leaks. If any leaks are present, tighten the connections slightly.


5. Operation
Your Hibbent shower system offers versatile showering options:
- Switching Water Flow: Use the 3-way diverter valve on the extension arm to direct water flow to the rainfall shower head, the handheld shower head, or both simultaneously.
- Adjusting Rainfall Shower Head: The solid brass ball joint on the rainfall shower head allows you to adjust its angle for optimal coverage. The curved extension arm can also be adjusted for height and angle to achieve vertical water flow.
- Handheld Shower Head Settings: The 5-inch handheld shower head features 7 spray settings. Rotate the dial on the shower head to select your preferred spray mode: Water Saving Massage, Fast Massage, Rain, High-efficiency Spray, Rain & Massage, Powerful Massage, or Soft Drench Spray.
- Water Flow Regulator: The handheld shower head includes a water flow regulator to adjust water pressure and conserve water.

6. Maintenance
- Cleaning Nozzles: The rainfall and handheld shower heads feature soft rubber spray nozzles. To prevent lime scale build-up and maintain optimal spray performance, gently rub the nozzles with your finger or a soft brush to dislodge any mineral deposits.
- Cleaning the Finish: Clean the matte black finish with a soft, damp cloth. Avoid using abrasive cleaners, scouring pads, or chemicals that could damage the finish.
- Hose Care: Periodically check the shower hose for any signs of wear or damage. The stainless steel hose is designed for durability but proper care extends its lifespan.
7. Troubleshooting
| Problem | Possible Cause | Solution |
|---|---|---|
| Low Water Pressure | Water restrictor installed; clogged nozzles; low household water pressure. | Remove water restrictor (if desired); clean nozzles; check household water supply. |
| Leaks at Connections | Loose connections; insufficient Teflon tape; worn washers. | Tighten connections; reapply Teflon tape; replace washers. |
| Handheld Shower Head Not Switching Settings | Mineral build-up in the spray selector. | Soak the handheld shower head in a vinegar solution to dissolve mineral deposits. |
8. Specifications
| Feature | Detail |
|---|---|
| Brand | Hibbent |
| Model Number | SHHS10inABS28811-Square-curved-2.5-MB |
| Style | Square-10 Inch |
| Shape | Square |
| Material | Acrylonitrile Butadiene Styrene, Brass, Stainless Steel |
| Finish Type | Matte Black |
| Installation Type | Wall Mounted |
| Flow Rate Description | 1.75 Gallons Per Minute (GPM) |
| Number of Handheld Settings | 7 |
| Hose Length | 71 Inches |
| Item Weight | 4.82 pounds |
| Product Dimensions | 6"L x 5"W (Rainfall Head) |
9. Warranty and Support
For warranty information or technical support, please refer to the product packaging or contact Hibbent customer service directly. Keep your purchase receipt as proof of purchase.


