1. Introduction
The Banana Pi BPI-M64 is an open-platform single board computer designed for development and building projects. It offers a robust platform for various applications, supporting both Android and Linux operating systems. This manual provides essential information for setting up, operating, and maintaining your BPI-M64.
2. Safety Information
- Ensure proper ventilation to prevent overheating.
- Use only the recommended power supply (DC 5V/2A) to avoid damage.
- Avoid exposing the board to moisture or extreme temperatures.
- Handle the board by its edges to prevent electrostatic discharge (ESD) damage.
- Do not attempt to modify the hardware unless you are an experienced professional.
3. Package Contents
Upon opening your Banana Pi BPI-M64 package, please verify that all components are present:
- Banana Pi BPI-M64 Single Board Computer
- MicroSD card (if included in your kit)
- eMMC flash (if included in your kit)
- (Other accessories may vary based on specific kit)
4. Hardware Overview
The BPI-M64 features a compact design with various ports and interfaces for connectivity and expansion. Familiarize yourself with the layout of the board:
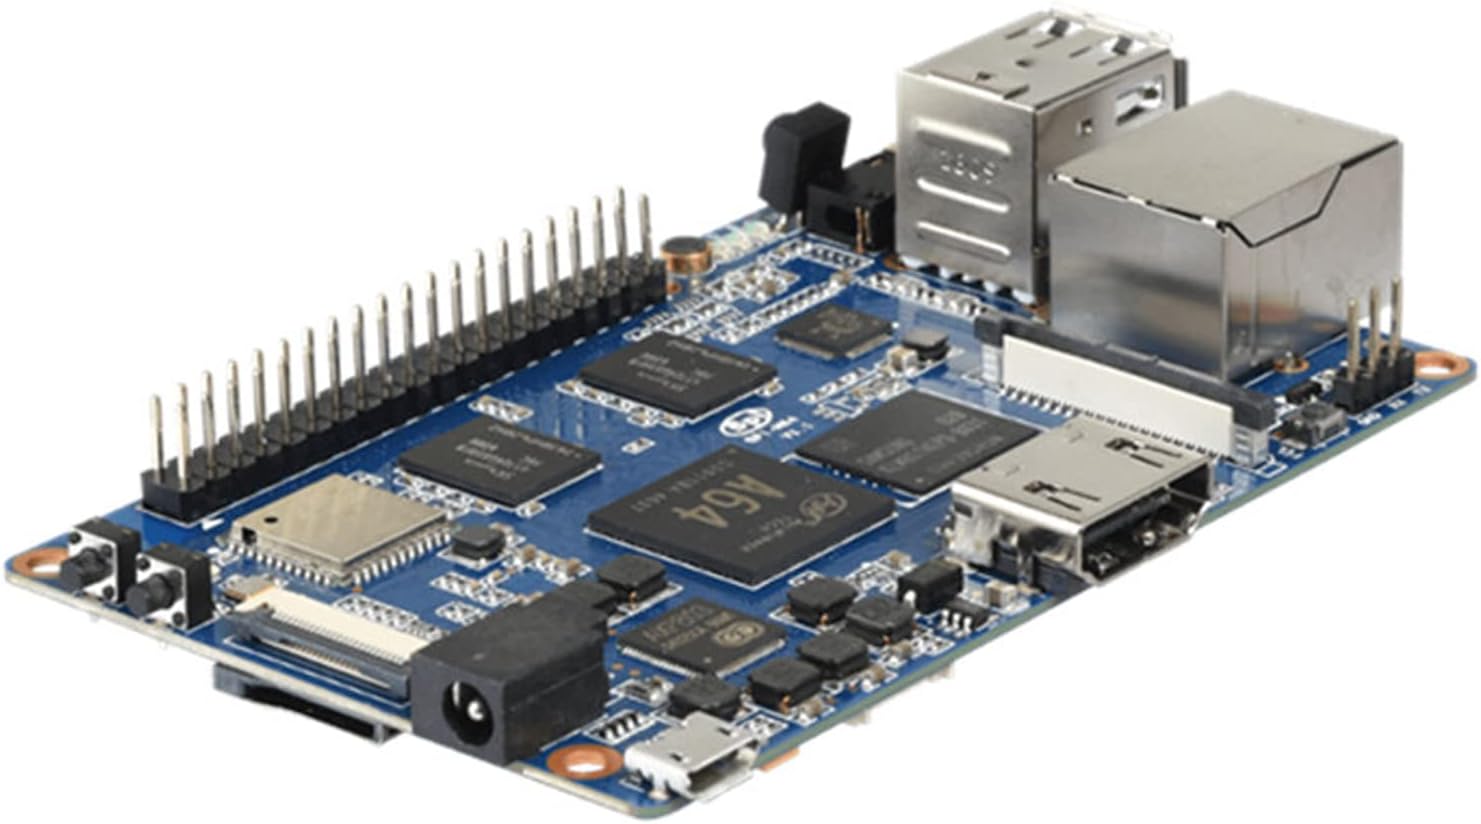
Figure 4.1: Top view of the Banana Pi BPI-M64 Single Board Computer.
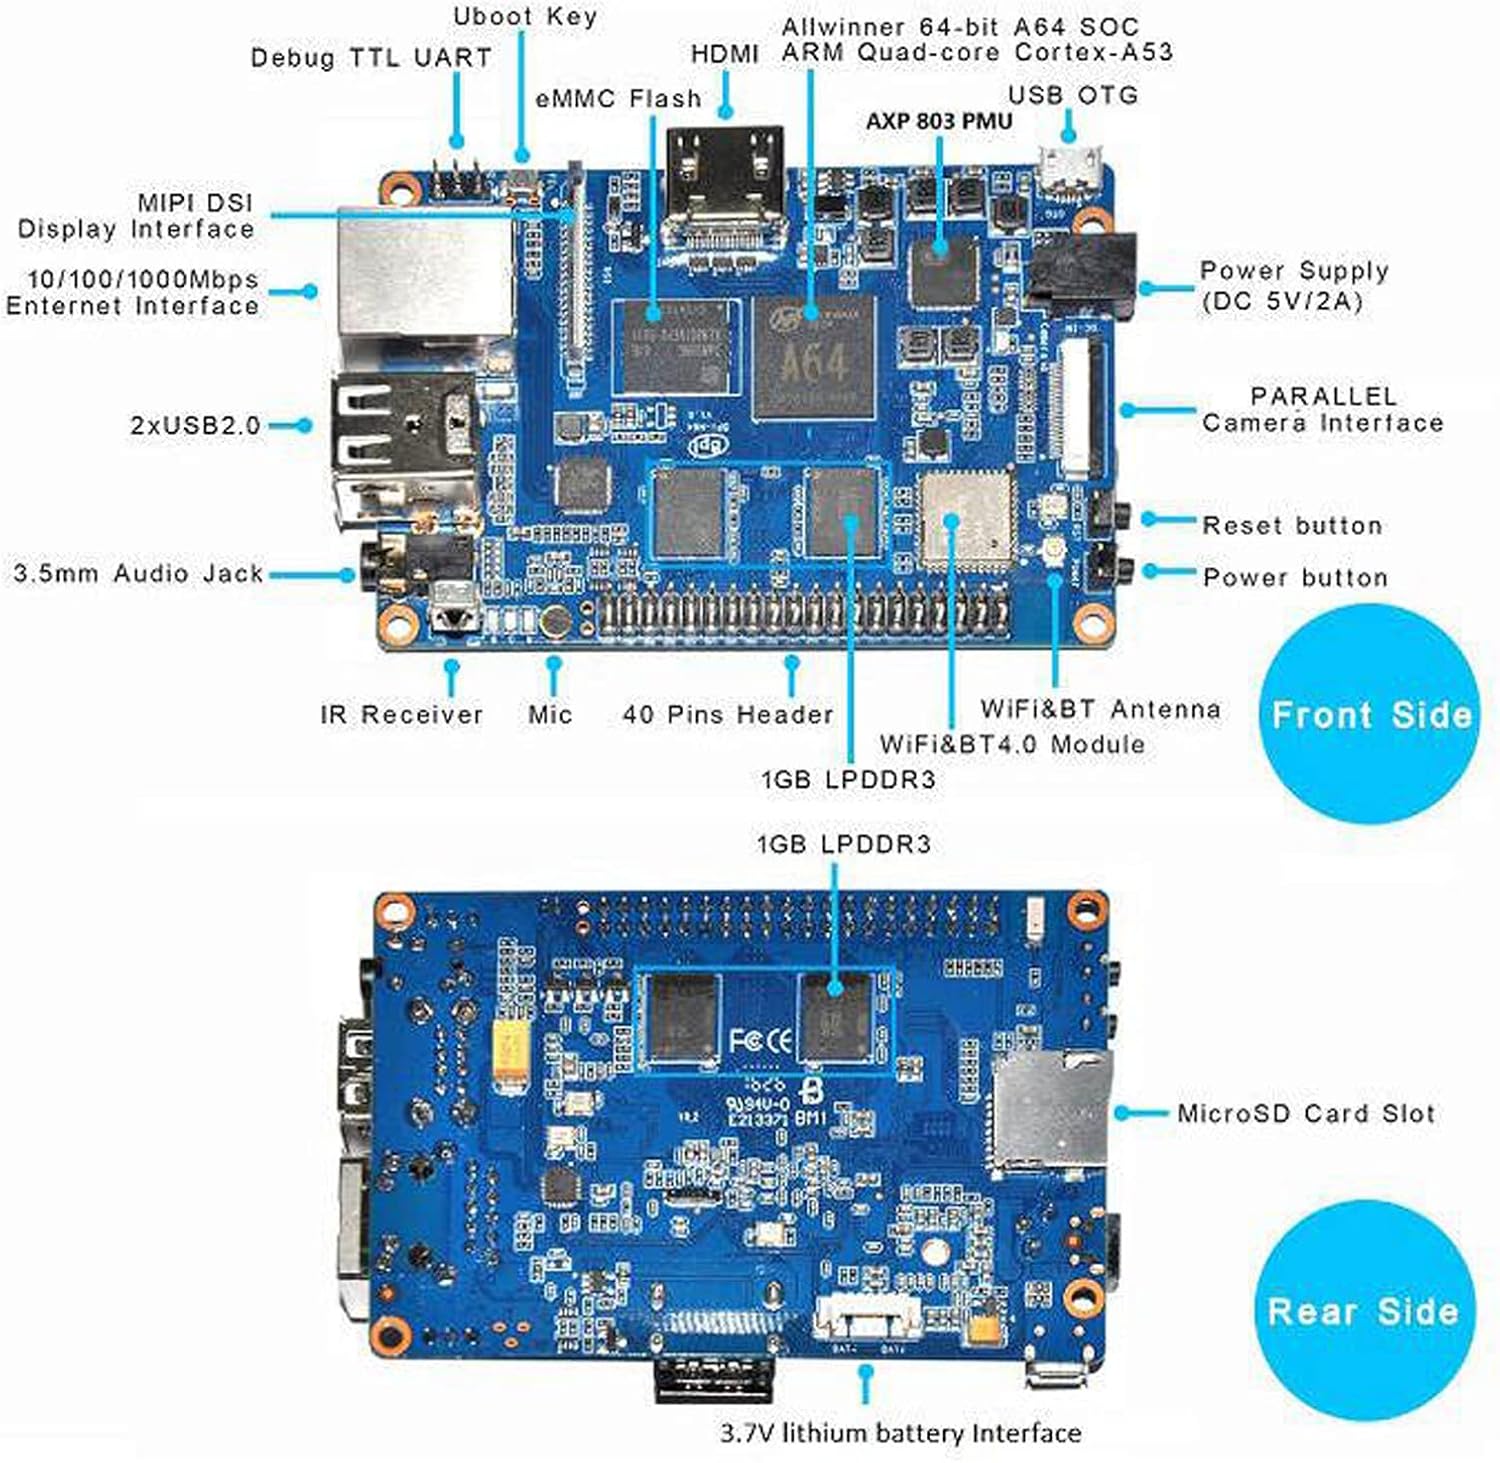
Figure 4.2: Labeled diagram of the BPI-M64 showing key components and ports including the Allwinner A64 SoC, USB ports, HDMI, Ethernet, GPIO header, and WiFi/Bluetooth module.
Key Components:
- CPU: Allwinner A64 64-bit Quad-core ARM Cortex A53 1.2 GHz
- GPU: Dual-core Mali 400 MP2
- RAM: 2GB LPDDR3 SDRAM
- Storage: MicroSD slot (up to 256GB), 8GB eMMC flash (optional 16/32/64GB)
- Connectivity: 10/100/1000 Mb Ethernet, WiFi (AP6212) & Bluetooth 4.0 (802.11BGN)
- Video Output: 4K x 2K HDMI port
- USB Ports: 3x USB 2.0 Host, 1x USB OTG
- Audio: 3.5mm Stereo Output mini-jack with microphone support
- Expansion: 40-pin GPIO header, CSI camera interface, DSI display interface
- Power: 3.7V Lithium Battery Charging Circuit, DC 5V/2A via DC Power or Micro USB (OTG)
5. Setup
5.1 Initial Connections
- Insert MicroSD Card/eMMC: If using a MicroSD card for the operating system, insert it into the designated slot. If using eMMC, ensure it is properly installed.
- Connect Display: Connect an HDMI cable from the BPI-M64's HDMI port to your monitor or TV.
- Connect Peripherals: Plug in your USB keyboard and mouse into the USB 2.0 host ports.
- Connect Network (Optional): For wired network access, connect an Ethernet cable to the Gigabit Ethernet port.
- Power On: Connect a 5V/2A power adapter to the DC power jack or the Micro USB OTG port. The board should power on automatically.
6. Operating System Installation
The Banana Pi BPI-M64 supports various operating systems, including Android, Debian Linux, Ubuntu Linux, and Raspbian images. Detailed instructions and images can be found on the official Banana Pi Wiki:
6.1 Flashing OS Images
For flashing operating system images to your MicroSD card or eMMC, standard tools like Rufus or Etcher may not always be compatible, especially for Android images. It is often recommended to use specific tools provided by the manufacturer or community, such as "PhoenixCard" for Allwinner-based boards.
When using PhoenixCard, select the appropriate image file and ensure you choose the correct drive for your MicroSD card. Follow the tool's instructions carefully. If you encounter "Burn Failed" errors, try using a different MicroSD card, as some cards may have compatibility issues during the flashing process.
7. Operating Instructions
7.1 General Usage
Once an operating system is successfully installed and booted, you can interact with the BPI-M64 like any other computer. Use your connected keyboard and mouse for navigation and input. Connect to networks via Ethernet or the onboard WiFi.
7.2 GPIO and Expansion
The 40-pin GPIO header provides extensive options for connecting external hardware and sensors. These pins can be configured for various functions including UART, I2C, SPI, and PWM. Refer to the Banana Pi Wiki for detailed pinout diagrams and programming guides.
The board also includes CSI camera and DSI display interfaces for connecting compatible camera modules and displays.
7.3 USB Debugging (for Android)
If running Android, you may need to enable Developer Options and USB Debugging for advanced development or app installation via ADB (Android Debug Bridge). To do this:
- Go to Settings.
- Navigate to About device or About tablet/phone.
- Tap on the Build number seven times to enable Developer Options.
- Return to Settings, then go to Developer options.
- Enable USB debugging.
8. Specifications
Detailed hardware specifications for the Banana Pi BPI-M64:
| Feature | Detail |
|---|---|
| Processor | Allwinner A64 64-bit Quad Core ARM Cortex A53 1.2 GHz CPU |
| GPU | Dual core Mali 400 MP2 GPU |
| RAM | 2GB LPDDR3 SDRAM |
| Storage | MicroSD slot (up to 256GB expansion), 8GB eMMC flash (optional 16/32/64GB) |
| Network | 10/100/1000 Mb Ethernet, WiFi (802.11BGN), Bluetooth 4.0 |
| Video Input | CSI camera interface |
| Video Output | 4K x 2K HDMI port, DSI display interface |
| Audio Input | Onboard microphone |
| Audio Output | 3.5mm Stereo Output mini-jack, HDMI |
| USB Ports | 3x USB 2.0 Host, 1x USB OTG |
| Expansion | 40-pin GPIO header, IR Receiver |
| Power Source | DC 5V/2A via DC Power or Micro USB (OTG), Built-in 3.7V Lithium Battery Charging Circuit |
| Dimensions | 92mm x 60mm (3.62 x 2.36 x 0.39 inches) |
| Weight | 48g (3.84 ounces) |
| Operating Systems | Android, Linux (Debian, Ubuntu, Raspbian) |
9. Troubleshooting
- Board Not Powering On: Ensure the power adapter is correctly connected and provides 5V/2A. Check the power LED indicator.
- Display Issues: Verify HDMI cable connection. Ensure your monitor is set to the correct input source.
- OS Flashing Failure: If using PhoenixCard or similar tools, ensure you have the correct image file for your BPI-M64. Try a different brand or capacity of MicroSD card, as some cards may have compatibility issues during the flashing process.
- Network Connectivity Problems: Check Ethernet cable connection. For WiFi, ensure the antenna is properly connected and configured in the operating system.
- Peripheral Not Detected: Ensure USB devices are properly plugged in. Try different USB ports.
For further assistance, please visit the official Banana Pi forum:
10. Maintenance
- Cleaning: Use a soft, dry cloth to clean the board. Avoid liquids or abrasive cleaners.
- Firmware Updates: Regularly check the official Banana Pi Wiki and forum for operating system and firmware updates to ensure optimal performance and security.
- Storage: When not in use, store the board in an anti-static bag in a cool, dry environment.
11. Support & Warranty
For technical support and inquiries, please refer to the official Banana Pi resources:
For direct contact with WayPonDEV, you may reach out via the provided contact information:
- Email: monica@smartfire.cn
- Skype: monica_9122
Information regarding product warranty is typically provided at the point of purchase or on the official WayPonDEV website. Please consult your retailer or the manufacturer's website for specific warranty terms and conditions.


