1. Introduction
This manual provides detailed instructions for the proper operation, maintenance, and troubleshooting of the Yato Torque Wrench Display, model YT-07612. Please read this manual thoroughly before using the device to ensure safe and efficient operation.
The Yato YT-07612 is a precision instrument designed for accurate torque measurement and application. It features a 1/2" drive square and a torque range of 10 Nm to 60 Nm, with a total length of 415 mm.
2. Safety Instructions
Always observe the following safety precautions to prevent injury or damage to the tool:
- Read the Manual: Before operation, carefully read and understand all instructions in this manual.
- Wear Eye Protection: Always wear appropriate eye protection when using torque wrenches.
- Inspect Tool: Before each use, inspect the torque wrench for any signs of damage or wear. Do not use a damaged tool.
- Proper Application: Use the torque wrench only for its intended purpose of applying specific torque values. Do not use it as a breaker bar.
- Maintain Grip: Ensure a firm and stable grip on the wrench during operation.
- Avoid Over-Torquing: Do not exceed the maximum specified torque value (60 Nm) to prevent damage to the fastener or the tool.
- Storage: Store the torque wrench in its protective case in a dry, clean environment when not in use.
3. Product Components
The Yato Torque Wrench Display YT-07612 consists of the following main components:
- Drive Square: 1/2" (12.5 mm) square drive for attaching sockets.
- Torque Adjustment Mechanism: Allows setting the desired torque value.
- Scale Window: Displays the set torque value.
- Handle: Ergonomic grip for comfortable use.
- Ratchet Head: Reversible ratchet mechanism for tightening and loosening.

Figure 3.1: The Yato YT-07612 torque wrench stored in its durable black protective case. The case is designed to protect the tool from damage and keep it organized.
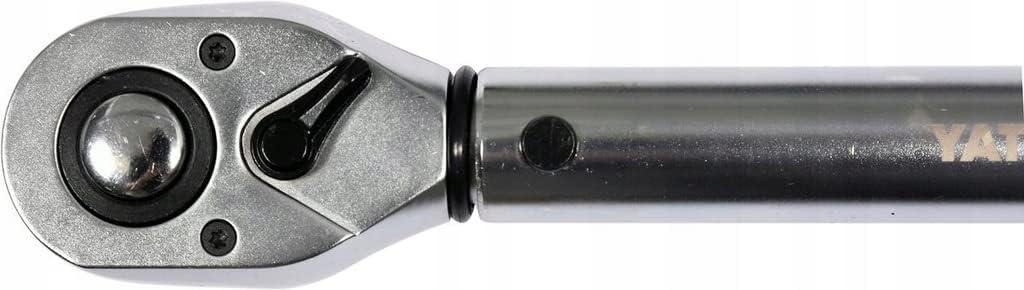
Figure 3.2: A detailed view of the ratchet head of the Yato YT-07612 torque wrench. This shows the 1/2" drive square and the reversible lever for changing direction.
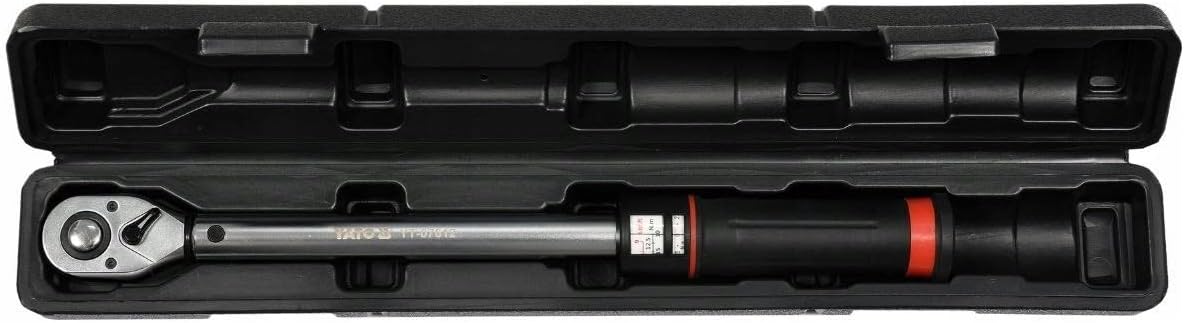
Figure 3.3: The Yato YT-07612 torque wrench showing its full length and the torque adjustment mechanism with the visible scale. The black handle with red accents is also prominent.

Figure 3.4: The Yato YT-07612 torque wrench resting securely within its open protective case. The custom-fit interior ensures the tool is held firmly in place during transport and storage.

Figure 3.5: A close-up view of the torque adjustment scale located on the handle of the Yato YT-07612 torque wrench. The scale shows markings for both Nm and Lbf.ft, allowing precise setting of the desired torque.
4. Setup
Before first use, ensure the torque wrench is clean and free from any debris. No assembly is required for the main unit.
4.1 Setting the Torque Value
- Locate the locking mechanism at the base of the handle.
- Unlock the handle by rotating the locking ring.
- Rotate the handle to adjust the main scale to the desired torque value. The main scale is marked in Newton-meters (Nm).
- Use the micro-scale on the handle to fine-tune the setting. Align the desired micro-scale mark with the main scale line.
- Once the desired torque is set, lock the handle by rotating the locking ring back into position. This prevents accidental changes during use.
Figure 4.1: Detailed view of the torque setting mechanism on the handle, showing the main and micro scales for precise adjustment.
5. Operating Instructions
5.1 Using the Torque Wrench
- Select the appropriate socket for your fastener and attach it firmly to the 1/2" drive square of the torque wrench.
- Set the desired torque value as described in Section 4.1.
- Place the socket onto the fastener.
- Apply steady, smooth pressure to the handle in the tightening direction. Do not use jerky movements.
- Continue applying pressure until you hear and feel a distinct "click" from the wrench. This indicates that the preset torque value has been reached.
- Stop applying pressure immediately after the click. Do not continue to turn the wrench.
- Remove the wrench from the fastener.
Note: For critical applications, it is recommended to check the torque with a calibrated torque tester periodically.
5.2 Reversing the Ratchet Direction
The ratchet head features a lever to change the direction of rotation. Simply flip the lever on the ratchet head to switch between tightening and loosening modes.
Figure 5.1: The ratchet head with its directional lever, allowing for easy switching between tightening and loosening.
6. Maintenance
Proper maintenance ensures the longevity and accuracy of your torque wrench.
- Cleaning: After each use, wipe the wrench clean with a soft, dry cloth. Do not use solvents or harsh chemicals, as they may damage the finish or internal components.
- Storage: Always return the torque wrench to its lowest torque setting (10 Nm) before storing it. This relieves tension on the internal spring mechanism, preserving its calibration accuracy. Store the wrench in its original protective case in a dry, cool, and clean environment.
- Lubrication: The internal mechanism is factory lubricated and generally does not require user lubrication. If the click mechanism feels stiff or inconsistent, professional servicing is recommended.
- Calibration: Torque wrenches are precision instruments and should be calibrated periodically, typically every 12 months or after 5,000 cycles, whichever comes first. Calibration should be performed by a qualified service center.
7. Troubleshooting
This section addresses common issues you might encounter with your Yato Torque Wrench Display YT-07612.
| Problem | Possible Cause | Solution |
|---|---|---|
| Wrench does not click at set torque. |
|
|
| Torque value seems inaccurate. |
|
|
| Handle is stiff or difficult to adjust. |
|
|
8. Specifications
| Feature | Detail |
|---|---|
| Model Number | YT-07612 |
| Brand | YATO |
| Drive Square | 12.5 mm (1/2") |
| Torque Range | 10 Nm - 60 Nm |
| Length | 415 mm |
| Material | Alloy Steel |
| Finish | Powder Coating |
| Weight | 100 g |
9. Warranty and Support
Yato products are manufactured to high standards and are designed for durability. For warranty information and support, please refer to the warranty card included with your product or visit the official Yato website.
For technical assistance or service inquiries, please contact your authorized Yato dealer or service center. Ensure you have your model number (YT-07612) and purchase details available when contacting support.
Return Policy: This product is subject to a 30-day refund/replacement policy from the date of purchase, as per the seller's terms. Please refer to your purchase documentation for specific details.


