
1. Introduction
This manual provides essential instructions for the safe and efficient operation of your Canglan Technology ZY-RM7-A Desktop Manual Pad Printer. This compact, manually operated pad printer is designed for precise ink printing on various materials and surfaces. Please read this manual thoroughly before setup and operation to ensure optimal performance and longevity of the machine.
The ZY-RM7-A is suitable for printing on plastics, metals, glass, ceramics, and other materials, accommodating flat, curved, or irregular surfaces. Its handle mechanism allows for precise control during the printing process.
2. Safety Instructions
- Always operate the printer on a stable, level surface.
- Keep hands and loose clothing clear of moving parts during operation.
- Use appropriate personal protective equipment (PPE) such as gloves and safety glasses when handling inks and cleaning solutions.
- Ensure adequate ventilation in the work area when using inks and solvents.
- Do not attempt to modify the machine. Use only genuine replacement parts.
- Store inks and solvents in a cool, dry place, away from open flames and out of reach of children.
- Disconnect the machine from any power source (if applicable, though this is manual) before performing maintenance or cleaning.
3. Package Contents
Upon unpacking, please verify that all components listed below are present and undamaged.
- ZY-RM7-A Desktop Manual Pad Printer Unit
- User Manual (this document)
- Ink (initial supply)
- Necessary Packaging materials
4. Setup
- Unpacking: Carefully remove the printer from its packaging. Retain packaging for future transport or storage.
- Placement: Place the printer on a sturdy, flat, and level workbench or table. Ensure sufficient space around the machine for operation and maintenance.
- Ink Cup Installation: Attach the ink cup to its designated position on the printer. Ensure it is securely fastened to prevent leaks.
- Printing Plate Installation: Secure the printing plate (cliché) onto the plate holder. Ensure the plate is clean and free of dust or debris.
- Pad Installation: Mount the silicone pad onto the pad arm. The pad should be clean and free of damage.
- Adjustments: Adjust the height and position of the pad and plate as needed to align with the product to be printed. Refer to the operating section for initial alignment guidance.

Figure 1: Close-up of the pad printing mechanism, illustrating the silicone pad in position for printing.

Figure 2: Detailed view of the ink cup and plate holder assembly, showing how the ink is contained and transferred to the plate.
5. Operating Instructions
- Prepare Ink: Pour the appropriate ink into the ink cup. Ensure the ink consistency is suitable for pad printing; thinners may be required.
- Load Product: Place the item to be printed onto the product fixture or printing surface. Ensure it is stable and correctly positioned.
- Ink Transfer: Using the handle, move the ink cup assembly over the printing plate. The doctor blade will scrape excess ink, leaving ink only in the etched image area.
- Image Pickup: Move the silicone pad down onto the inked printing plate. The pad will pick up the ink image.
- Image Transfer: Move the silicone pad over the product to be printed. Press the pad down onto the product, transferring the ink image.
- Repeat: Lift the pad and repeat the process for subsequent prints.
- Test Prints: Perform several test prints on scrap material to verify alignment, ink coverage, and print quality before printing on final products.
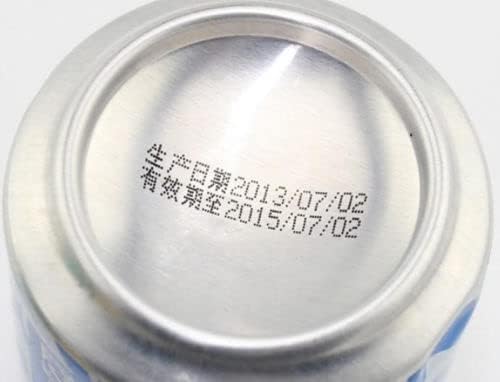
Figure 3: Example of a date code printed on the bottom of an aluminum can using a pad printer.

Figure 4: Example of a date code printed on the neck of a plastic bottle, demonstrating the printer's versatility on curved surfaces.
6. Maintenance
- Daily Cleaning: After each use, clean the ink cup, doctor blade, and printing plate thoroughly with appropriate cleaning solutions to prevent ink from drying and hardening.
- Pad Care: Clean the silicone pad gently with a soft cloth and mild solvent. Avoid abrasive materials that can damage the pad surface. Store pads properly to maintain their shape and elasticity.
- General Inspection: Regularly inspect all moving parts, screws, and fasteners for tightness. Lubricate moving components as necessary with light machine oil.
- Storage: When not in use for extended periods, ensure the machine is clean and stored in a dry, dust-free environment.
7. Troubleshooting
| Problem | Possible Cause | Solution |
|---|---|---|
| Poor print quality / Faded print | Ink too thick or too thin; Worn pad; Dirty plate; Incorrect pad pressure. | Adjust ink viscosity; Replace pad; Clean plate; Adjust pad pressure. |
| Incomplete image transfer | Insufficient pad pressure; Incorrect pad material; Ink drying too fast on plate. | Increase pad pressure; Use appropriate pad for surface; Adjust ink drying time with retarder. |
| Ink smudging | Excessive ink; Product moved during printing; Ink not drying fast enough. | Reduce ink amount; Secure product firmly; Use faster-drying ink or add accelerator. |
| Pad sticking to plate or product | Pad surface dirty or damaged; Ink too tacky. | Clean or replace pad; Adjust ink viscosity. |
8. Specifications
| Feature | Detail |
|---|---|
| Model | ZY-RM7-A |
| Brand | Canglan Technology |
| Speed | 10-50 prints/minute |
| Print Product Height | ≤380mm |
| Plate Size | 75mm x 100mm |
| Max. Print Area | 6mm x 22mm |
| Oil Cup Size | Φ30mm |
| Net Weight | 3.6 kg |
| Gross Weight | 4.3 kg |
| Machine Size (L x W x H) | 410mm x 190mm x 350mm |
| Package Size (L x W x H) | 350mm x 250mm x 380mm |
| Connectivity Technology | N/A (Manual Operation) |
| Printer Output | Monochrome |
| Print Media | Labels, various product surfaces |
9. Warranty and Support
For warranty information, please refer to the documentation provided at the time of purchase or contact Canglan Technology customer support directly.
If you encounter any issues not covered in the troubleshooting section or require further assistance, please contact Canglan Technology customer support.
- Manufacturer: Canglan Technology
- Website: Canglan Technology Store on Amazon (for general inquiries)
- Please note: Specific contact details for technical support may be found on the product packaging or a separate warranty card.