
1. Introduction and Overview
The Seeed Studio XIAO ESP32C3 is a compact and powerful microcontroller unit (MCU) board designed for Internet of Things (IoT) and Tiny Machine Learning (TinyML) applications. Built around the ESP32-C3 32-bit RISC-V chip, it offers Wi-Fi and Bluetooth Low Energy (BLE 5.0) connectivity, making it versatile for a wide range of projects. Its small form factor and rich interface, including multiple I/O ports and battery charging capabilities, make it ideal for wearables and embedded systems requiring low power consumption.

Figure 1.1: Top view of the Seeed Studio XIAO ESP32C3 development board.
2. Key Features
- ESP32-C3 RISC-V Development Board: Features the ESP32-C3 32-bit RISC-V chip (160MHz) with support for Arduino/CircuitPython and multiple development ports, suitable for IoT and edge AI projects.
- Outstanding RF & Long-Range Connectivity: Equipped with a U.FL antenna connector for stable Wi-Fi/BLE 5.0 communication over 100m, ensuring reliable IoT connectivity.
- Ultra-Low Power & Battery-Friendly: Supports 4 working modes, including deep sleep at 44µA. An onboard battery charge IC supports Li-ion/LiPo batteries, making it perfect for wearables and wireless IoT applications.
- Thumb-Sized & Production-Ready: Compact 21x17.5mm design with SMD/Breadboard-friendly layout. Single-sided component mounting allows for sleek integration into various devices.
- Rich I/O & Edge Computing: Provides 11 digital I/O (PWM) and 4 analog I/O (ADC), along with UART/IIC/SPI/IIS ports. Optimized for TinyML and edge AI applications.
3. Setup Guide
This section outlines the initial steps to set up your Seeed Studio XIAO ESP32C3 board for development.
3.1 Hardware Connection
- Connect USB-C Cable: Plug a USB-C cable into the board's USB-C port and connect the other end to your computer. This provides power and data communication.
- Optional: Solder Pins: For breadboard compatibility or custom connections, solder header pins to the designated pads on the board. Ensure proper alignment and secure soldering.
- Optional: Attach External Antenna: For enhanced Wi-Fi/BLE performance, connect a compatible U.FL antenna to the onboard connector.

Figure 3.1: Connecting the XIAO ESP32C3 via USB-C.

Figure 3.2: Soldering header pins for breadboard use.
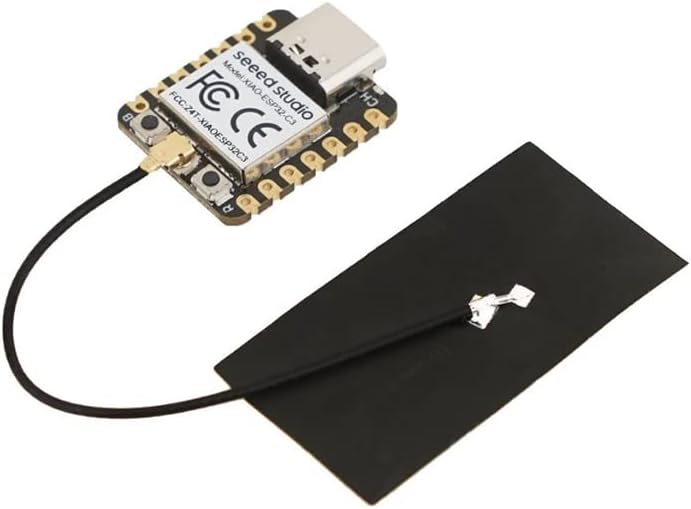
Figure 3.3: XIAO ESP32C3 with external antenna attached.
3.2 Software Setup
To program the XIAO ESP32C3, you will need to install the appropriate development environment and drivers.
- Install Arduino IDE or CircuitPython: The board supports both Arduino IDE and CircuitPython. Download and install your preferred environment from their official websites.
- Install ESP32C3 Board Support Package: Follow the instructions within your chosen IDE to install the necessary board support package for ESP32C3 microcontrollers. This typically involves adding a board manager URL and installing the package.
- Driver Installation: In most cases, the necessary USB-to-serial drivers will be automatically installed by your operating system. If not, refer to the official Seeed Studio documentation for manual driver installation.
Video 3.1: An overview of the Seeed Studio XIAO series, demonstrating setup and programming.
4. Operating Instructions
Once your development environment is set up, you can begin programming and operating your XIAO ESP32C3.
4.1 Basic Programming
- Select Board and Port: In your Arduino IDE or similar environment, select "XIAO ESP32C3" from the board menu and choose the correct serial port corresponding to your connected board.
- Upload Sketch/Code: Write or load your desired program (sketch) and click the upload button. The IDE will compile and transfer the code to the XIAO ESP32C3.
- Boot Mode: If you encounter issues uploading, you may need to manually put the board into bootloader mode. This typically involves holding down the "Boot" button while connecting the USB cable or pressing "Boot" then "Reset" quickly.
4.2 Power Management
The XIAO ESP32C3 features advanced power management capabilities for battery-powered applications.
- USB Power: The board can be powered directly via its USB-C port.
- Battery Power: Connect a 3.7V Li-ion/LiPo battery to the dedicated battery connector. The onboard charge IC will manage battery charging when USB power is available.
- Low Power Modes: Utilize the ESP32-C3's various low-power modes (e.g., Deep Sleep) in your code to significantly reduce power consumption for long-term, battery-operated projects.
5. Maintenance
Proper care and handling will ensure the longevity of your Seeed Studio XIAO ESP32C3 board.
- Handle with Care: Avoid dropping the board or subjecting it to physical shock.
- Static Electricity: Always handle the board in a static-safe environment, especially when connecting or disconnecting components. Use an anti-static mat or wrist strap if available.
- Keep Dry: Protect the board from moisture, humidity, and extreme temperatures.
- Cleanliness: Keep the board free from dust and debris. Use a soft, dry brush or compressed air for cleaning. Avoid using liquids or harsh chemicals.
- Storage: When not in use, store the board in its original packaging or an anti-static bag in a cool, dry place.
6. Troubleshooting
This section addresses common issues you might encounter with your XIAO ESP32C3.
6.1 Board Not Detected / Upload Errors
- Check USB Cable: Ensure you are using a high-quality USB-C data cable. Some cables are charge-only and do not support data transfer.
- Verify Port Selection: Double-check that the correct serial port is selected in your IDE.
- Boot Button: For some uploads, especially the first time or after a failed upload, you may need to hold down the "Boot" button on the board while connecting the USB cable, or press "Boot" then "Reset" quickly before uploading.
- Driver Issues: Confirm that the necessary USB-to-serial drivers are correctly installed on your computer.
6.2 Unexpected Behavior / Code Not Running
- Power Supply: Ensure the board is receiving stable power. If using a battery, check its charge level.
- Code Logic: Review your code for logical errors. Use serial debugging to print messages and variable values.
- Pin Assignments: Verify that your code uses the correct pin numbers for connected peripherals. Refer to the XIAO ESP32C3 pinout diagram.
- Heat: While normal operation may generate some heat, excessive heat could indicate a short circuit or component issue. Disconnect power immediately if the board becomes unusually hot.
7. Specifications
| Feature | Detail |
|---|---|
| Wireless Type | Bluetooth, Wi-Fi |
| Brand | seeed studio |
| Series | XIAO ESP32C3 |
| Item Model Number | ESP32-C3 |
| Operating System | Arduino / CircuitPython |
| Item Weight | 0.634 ounces |
| Product Dimensions | 1.97 x 1.57 x 1.18 inches |
| Color | ESP32C3 |
| Processor Brand | Espressif |
| Number of Processors | 1 |
| Manufacturer | seeed studio |
| Date First Available | August 9, 2022 |
| RAM Memory Installed Size | 0.4 MB |
| Memory Storage Capacity | 4 MB |
8. Warranty and Support
Seeed Studio products are designed for reliability and performance. For specific warranty details, please refer to the official Seeed Studio website or contact their customer support directly. General support and resources, including documentation, tutorials, and community forums, are available through the official Seeed Studio channels.
For further assistance, visit the Seeed Studio Store on Amazon or their official website.


