Product Overview
The YUHANUS Electric Strike Door Lock is designed to convert standard cylindrical locksets into an electronic access-controlled locking system. This model operates in Fail-Secure (NO Mode), meaning the lock remains locked when power is removed, providing enhanced security.

Image: Front view of the YUHANUS Electric Strike Door Lock, showcasing its stainless steel faceplate and black strike mechanism.
It is suitable for various door types including wooden, metal, and PVC doors, offering robust security with a 1,100-pound holding force. Its durable construction and simplified installation make it an ideal choice for access control systems.
Key Features
- Fail-Secure (NO Mode) Operation: The lock remains locked when power is removed, ensuring security during power outages.
- High Holding Force: Provides 1,100-pound (500KG) holding force/static strength for robust security.
- Durable Construction: Features a high-temperature painted finish and a stainless steel bolt structure, hardened to resist severe impact.
- Simplified Installation: Designed for easy integration with access control or egress devices, featuring non-polarized 2-contact connection.
- Versatile Application: Suitable for wooden, metal, and PVC doors.
- Reversible Design: Non-handed design fits both right- and left-handed doors.
- Long Lifespan: Tested to 1,000,000 cycles for extended reliability.

Image: Illustrates how the electric strike lock can convert a standard cylindrical lock into an electronic access-controlled system.
Package Contents
Please verify that all items listed below are included in your package:
- 1 x Electric Strike Lock (Fail-Secure Mode)
- 1 x Diode
- 1 x User Manual (this document)
- 4 x Screws for installation
Attention: A mechanical lock or cylindrical lockset is required for operation and is not included with this product.

Image: The electric strike lock shown with the included diode and four screws.
Specifications
| Feature | Specification |
|---|---|
| Faceplate Size | 5.83'' x 1.10'' x 0.12'' (148mm x 28mm x 3mm) |
| Structure Material | Zinc alloy |
| Finishing | Electroplating, High-Temperature Painted |
| Holding Strength | 500kg / 1100 pounds |
| Voltage | DC12V |
| Current | 240mA |
| Operating Mode | Fail-Secure (NO Mode - Locked when power is removed) |
| Suitable Door Types | Wooden Door, Metal Door, PVC Door |
| Suitable Temperature | -10℃~+55℃ (14℉-131℉) |
| Operating Humidity | 0~90% (non-condensing) |
| Function | Built-out MOV (Metal Oxide Varistor) for surge protection |
| Net Weight | 0.29kg / 0.64lb |
| Model Number | 769894490372 |

Image: Detailed dimensions of the electric strike lock, showing measurements in both millimeters and inches.

Image: Back view of the electric strike lock, revealing the internal components and product information labels.
Setup and Installation
Proper installation is crucial for the optimal performance and security of your electric strike lock. This device is designed for mortise mounting within the door frame.
1. Pre-Installation Check
- Ensure the door frame has sufficient space for mortise installation.
- Verify the door's swing direction (inswing/outswing) and handing (left/right) to plan the installation correctly. The strike is reversible.
- Confirm you have a compatible mechanical lock or cylindrical lockset (not included) that will interact with the electric strike.
- Prepare necessary tools: drill, chisel, screwdriver, measuring tape.
2. Mortise Installation
The electric strike requires a mortise cut into the door frame. Refer to the dimensions provided in the Specifications section and the diagram below for precise measurements.
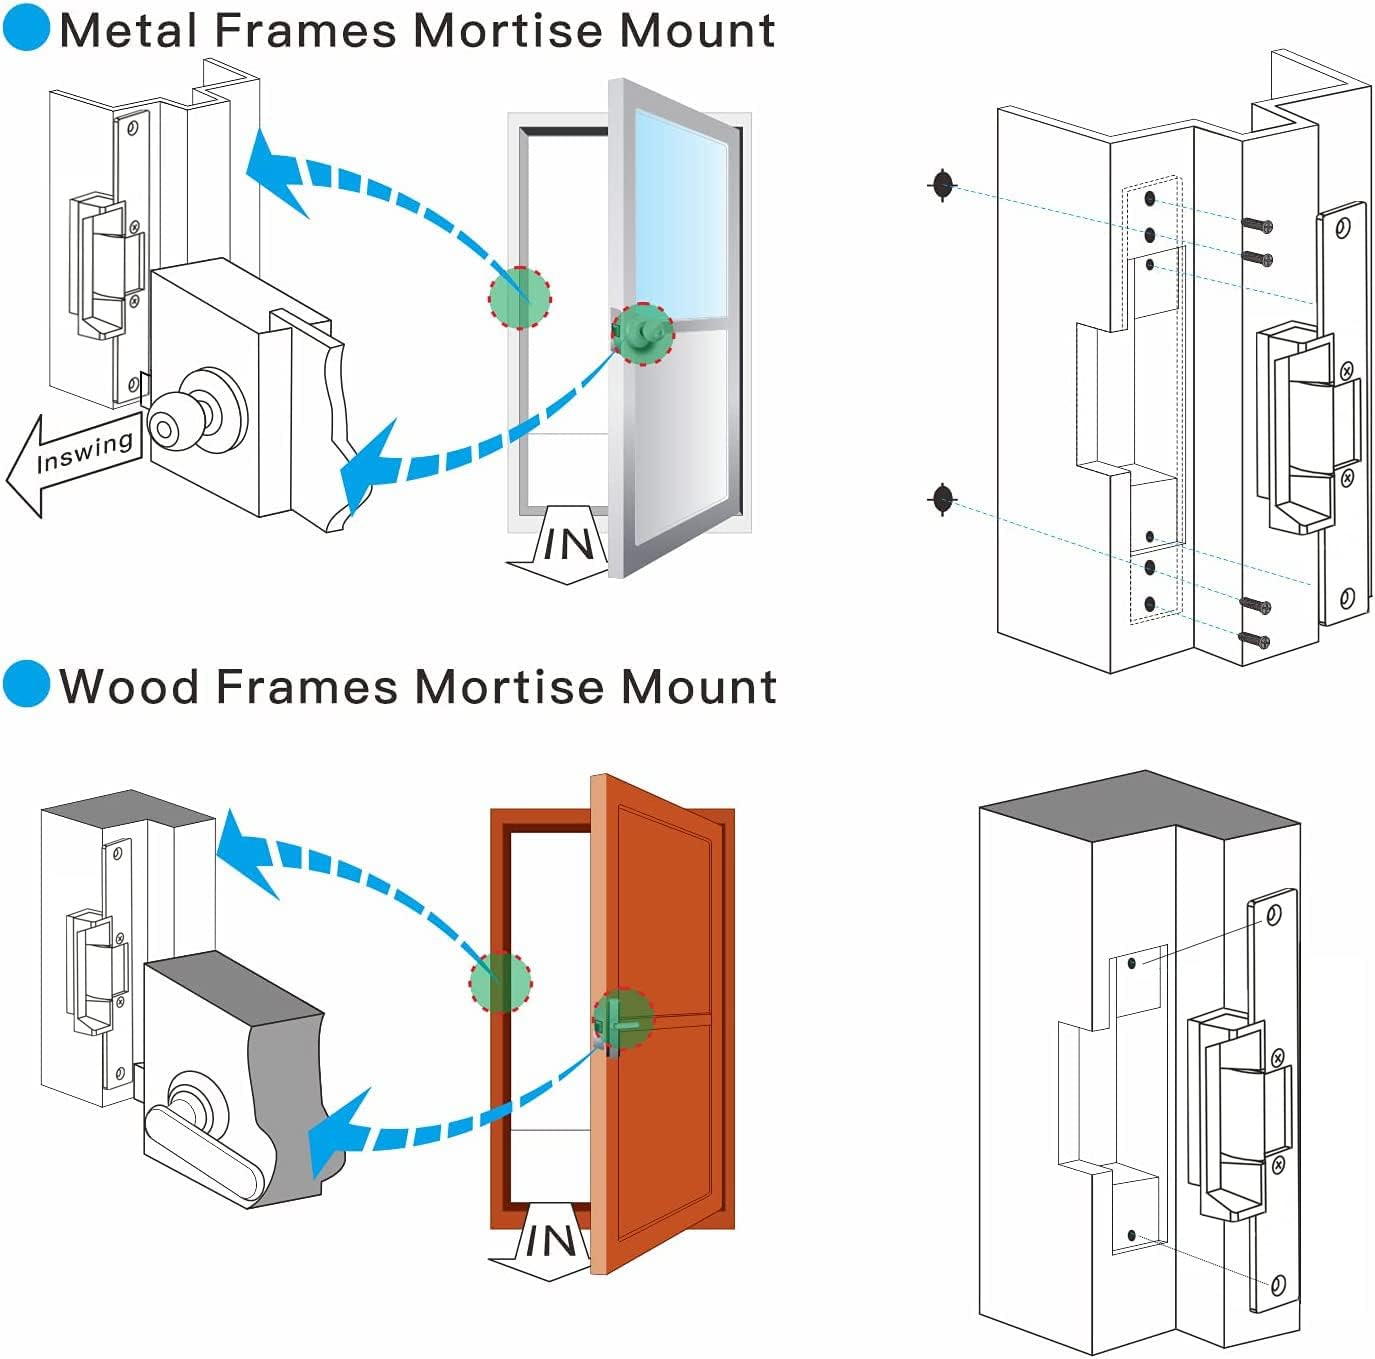
Image: Diagrams illustrating mortise installation for both metal and wood door frames, showing the placement of the electric strike and screws.
- Mark the Area: Position the electric strike on the door frame where the latch bolt of your mechanical lock will engage. Mark the outline of the strike's faceplate and the mortise depth.
- Cut the Mortise: Carefully chisel out the marked area to the required depth, ensuring a snug fit for the strike body.
- Drill Pilot Holes: Drill pilot holes for the mounting screws as indicated in the diagram.
- Insert Strike: Place the electric strike into the mortise. Ensure it sits flush with the door frame surface.
- Secure: Fasten the strike to the door frame using the provided screws.
3. Wiring Diagram (Fail-Secure NO Mode)
The electric strike features a non-polarized 2-contact connection for simplified wiring. Connect it to your access control system or egress device as shown in the diagram below. The included diode should be wired across the terminals to protect against back-EMF (electromotive force) when the lock is de-energized.

Image: Detailed wiring diagram showing connections for the electric strike lock (Fail-Secure NO Mode) to a power supply, access control keypad, and push-to-exit button. The diode connection is also illustrated.
- Connect the two wires from the electric strike to the appropriate output terminals of your 12V DC power supply or access control panel.
- Ensure the diode is correctly installed across the terminals of the strike, with the band on the diode matching the positive terminal of the power supply. This prevents damage to your control system.
- For Fail-Secure (NO Mode), the lock will be open (unlocked) when power is applied and closed (locked) when power is removed.
Operating Instructions
The YUHANUS Electric Strike operates in Fail-Secure (NO Mode). Understanding this mode is key to its operation.
- Locked State: In Fail-Secure (NO Mode), the electric strike is in its default locked state when no power is supplied to it. The door will remain secured.
- Unlocked State: To unlock the door, a 12V DC power signal must be applied to the electric strike. This energizes the solenoid, retracting the strike mechanism and allowing the door to be opened.
- Access Control Integration: When integrated with an access control system (e.g., keypad, card reader, biometric scanner), the system will momentarily apply power to the strike upon successful authentication, allowing entry.
- Egress: For exiting, a push-to-exit button or similar device connected to the access control system will also apply power to the strike, releasing the door.
- Power Interruption: In the event of a power failure, the electric strike will revert to its locked state, maintaining security.
Maintenance
Regular maintenance ensures the longevity and reliable operation of your electric strike lock.
- Cleaning: Periodically wipe the faceplate and visible parts with a soft, dry cloth. Avoid abrasive cleaners or solvents.
- Lubrication: Lightly lubricate the moving parts of the strike mechanism (e.g., the latch bolt receiver) with a silicone-based lubricant annually or as needed. Do not over-lubricate.
- Screw Tightness: Check all mounting screws periodically to ensure they are tight. Loose screws can affect performance and security.
- Wiring Inspection: Annually inspect wiring connections for any signs of wear, fraying, or corrosion. Ensure all connections are secure.
- Functionality Test: Regularly test the lock's operation with your access control system to ensure it unlocks and locks correctly.
Troubleshooting
If you encounter issues with your electric strike lock, refer to the following common problems and solutions:
| Problem | Possible Cause | Solution |
|---|---|---|
| Lock does not unlock when power is applied. |
|
|
| Lock remains unlocked (door can be opened) when power is removed. |
|
|
| Audible buzzing or humming from the strike. |
|
|
If the problem persists after attempting these solutions, please contact YUHANUS customer support for further assistance.
Warranty and Support
For warranty information and technical support, please refer to the contact details provided with your purchase or visit the official YUHANUS website. Please have your model number (769894490372) and purchase date ready when contacting support.
YUHANUS is committed to providing high-quality products and customer satisfaction. If you have any questions or require assistance, our support team is available to help.
Contact Information: Please refer to your purchase documentation or the manufacturer's website for the most current contact information.
