
LIGHTWISH HCT-326
Lightwish 2-Zone Sprinkler Timer Instruction Manual
Model: HCT-326
1. Introduction
Thank you for purchasing the Lightwish 2-Zone Sprinkler Timer. This device is designed to automate your watering schedule for gardens, lawns, and other outdoor areas, providing efficient and convenient irrigation. Please read this manual carefully before operation to ensure proper use and longevity of the product.
This timer features two independent outlets, allowing for separate watering schedules for different zones. Key features include automatic and manual watering modes, rain delay function, and a child lock for safety.

Figure 1: Front view of the Lightwish 2-Zone Sprinkler Timer, showing the LCD display and control buttons.
2. Product Features
- Dual Zone Control: Two independent outlets (Zone A and Zone B) for separate watering schedules.
- Programmable Schedules: Set start time, watering duration (1-59 seconds to 1-99 minutes), and frequency (1-23 hours or 1-15 days).
- Manual Watering: Allows temporary watering without interrupting preset programs.
- Rain Delay: Pause watering for a specified period (e.g., 24, 48, 72 hours) during rainy weather, automatically resuming the schedule afterward.
- Child Lock: Prevents accidental changes to settings.
- Large LCD Display: 2.2 x 1.7 inches screen for easy readability and setup.
- Durable Construction: Leakproof and waterproof design (IPX50 rated) with high-pressure resistance (0.02-0.8 Mpa).
- Easy Installation: 3/4" universal thread connector fits most hose fittings.
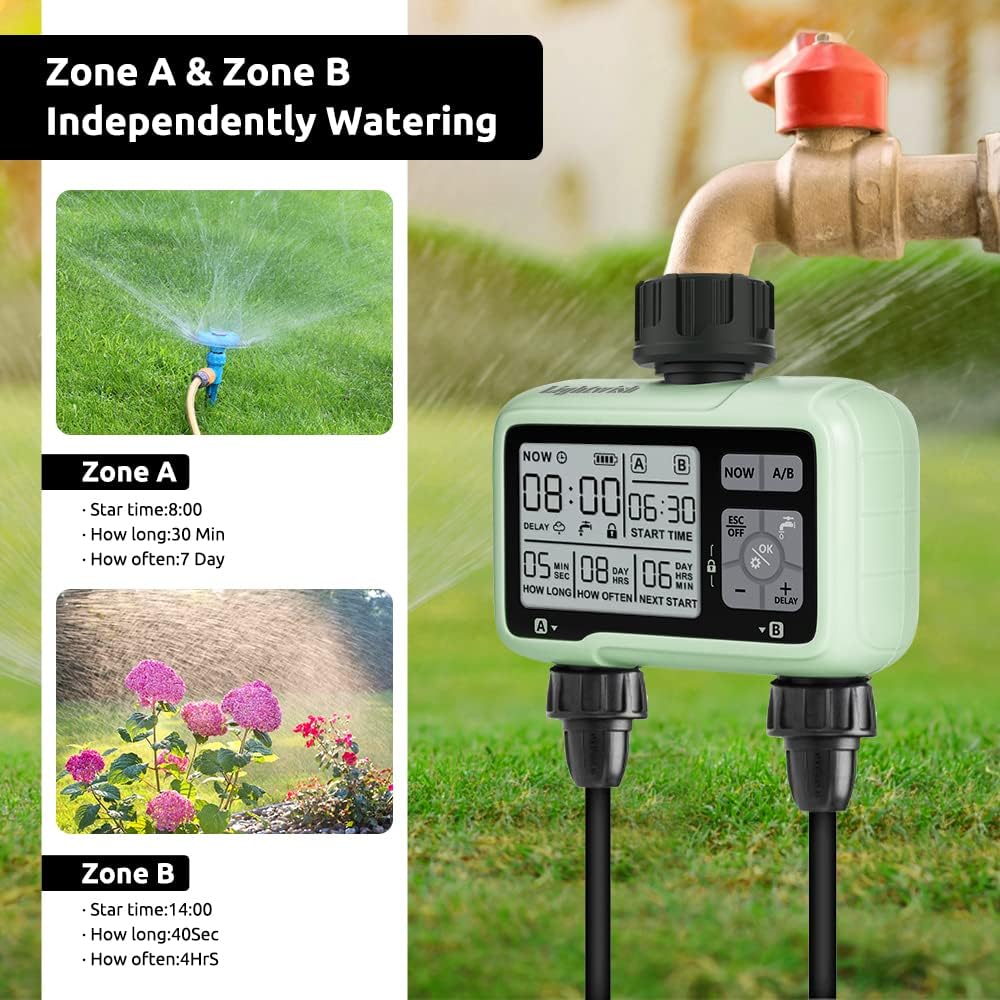
Figure 2: Illustration of independent watering for Zone A and Zone B.
3. Specifications
| Parameter | Value |
|---|---|
| Model | HCT-326 |
| Dimensions | 16.99 x 16.41 x 7.29 cm |
| Weight | 508 g (0.51 kg) |
| Material | Alloy Steel, Plastic |
| Water Pressure Range | 0.02 - 0.8 Mpa (2.9 - 116 Psi) |
| Water Inlet Thread | 3/4" Universal Thread |
| Water Outlet Thread | 3/4" External Thread |
| Power Supply | 2 x AAA 1.5V Alkaline Batteries (not included) |
| Waterproof Rating | IPX50 |
| Operating Temperature | 1 - 45 °C |

Figure 3: Product packaging displaying key specifications and model number HCT-326.
4. Setup and Installation
4.1 Battery Installation
- Locate the battery compartment on the back of the timer.
- Remove the battery cover by twisting or sliding it open.
- Insert two (2) new AAA 1.5V Alkaline batteries, ensuring correct polarity (+/-).
- Replace the battery cover securely to maintain the waterproof seal.

Figure 4: Battery compartment with seal ring for moisture isolation.
4.2 Connecting the Timer
- Ensure the water faucet is turned off.
- Screw the timer's inlet connector (top) onto your outdoor faucet. Hand-tighten only; do not overtighten.
- Connect your garden hoses or irrigation lines to the two independent outlets (Zone A and Zone B) at the bottom of the timer.
- Turn on the water faucet slowly to full pressure. Check for any leaks.

Figure 5: Sprinkler timer connected to a water faucet and two hoses.
5. Operating Instructions
5.1 Setting Current Time
Upon first use or after battery replacement, the timer will prompt you to set the current time.
- Press the "NOW" button. The hour digits will flash.
- Use the "+" or "-" buttons to adjust the hour.
- Press "OK" to confirm and move to minutes.
- Use "+" or "-" to adjust the minutes.
- Press "OK" to save the current time.
5.2 Programming Automatic Watering (Zone A/B)
The timer allows independent programming for Zone A and Zone B.
- Press the "A/B" button to select the zone you wish to program (A or B). The selected zone indicator will appear on the LCD.
- Press the "OK" button to enter programming mode. The "START TIME" will flash.
- Set Start Time: Use "+" or "-" to adjust the desired start time (hour and minute). Press "OK" to confirm each part.
- Set Watering Duration ("HOW LONG"): After setting the start time, the "HOW LONG" (minutes/seconds) will flash. Use "+" or "-" to set the watering duration (from 1 second to 99 minutes). Press "OK" to confirm.
- Set Watering Frequency ("HOW OFTEN"): The "HOW OFTEN" (hours/days) will flash. Use "+" or "-" to set the frequency (from 1 hour to 15 days). Press "OK" to confirm.
- The timer will display the "NEXT START" time. Your program is now saved for the selected zone.
- Repeat steps 1-6 for the other zone if desired.

Figure 6: Visual representation of setting watering duration and frequency.
5.3 Manual Watering
Manual watering allows you to water immediately without affecting your programmed schedules.
- Press and hold the "OK" button for 3 seconds. The manual watering icon will appear.
- The timer will start watering immediately.
- To stop manual watering, press and hold the "OK" button again for 3 seconds, or press "ESC/OFF".

Figure 7: Manual watering in progress, indicated by the faucet icon on the timer.
5.4 Rain Delay Function
The rain delay function pauses your watering schedule for a set period, preventing overwatering during rainy conditions.
- Press and hold the "+/DELAY" button for 3 seconds. The rain cloud icon will appear, and the delay time will flash.
- Use the "+" or "-" buttons to select the delay duration (e.g., 24H, 48H, 72H).
- Press "OK" to confirm the rain delay. The timer will resume its programmed schedule automatically after the delay period.

Figure 8: Timer display showing rain delay activated (left) and self-resuming (right).
5.5 Child Lock Function
To prevent accidental changes to your settings, activate the child lock.
- To activate: Press and hold the "ESC/OFF" and "-" buttons simultaneously for 3 seconds. A lock icon will appear on the display.
- To deactivate: Press and hold the "ESC/OFF" and "-" buttons simultaneously for 3 seconds. The lock icon will disappear.

Figure 9: Child lock icon visible on the timer display.
6. Maintenance
- Battery Replacement: Replace batteries when the low battery indicator appears on the LCD. Always use new AAA alkaline batteries.
- Cleaning: Wipe the timer with a soft, damp cloth. Do not use abrasive cleaners or solvents.
- Winter Storage: Before the first frost, disconnect the timer from the faucet and hoses. Drain any remaining water and store it indoors in a dry, frost-free location. Remove batteries if storing for extended periods.
- Filter Screen: Periodically check the filter screen inside the inlet connector for debris. Clean if necessary to ensure proper water flow.
7. Troubleshooting
| Problem | Possible Cause | Solution |
|---|---|---|
| Timer not turning on/LCD blank | Dead or incorrectly installed batteries. | Replace with new AAA alkaline batteries, ensuring correct polarity. |
| No water flow | Faucet is off; low water pressure; clogged filter screen; incorrect program settings. | Ensure faucet is fully open. Check water pressure. Clean the filter screen. Verify program settings (start time, duration, frequency). |
| Timer leaks from connections | Loose connection; worn washer; damaged thread. | Ensure connections are hand-tight. Check rubber washers for damage and replace if necessary. |
| Timer not watering at scheduled time | Incorrect time setting; program not saved; rain delay active; child lock active. | Verify current time. Re-enter and save program settings. Check if rain delay is active and deactivate if needed. Deactivate child lock. |
| Buttons unresponsive | Child lock active; internal malfunction. | Deactivate child lock. If issue persists, try removing and reinserting batteries. If still unresponsive, contact customer support. |
8. Warranty Information
Lightwish products are manufactured to high-quality standards. This product comes with a standard manufacturer's warranty against defects in materials and workmanship from the date of purchase. Please retain your proof of purchase for warranty claims.
The warranty does not cover damage caused by:
- Improper installation or use.
- Freezing temperatures or improper winterization.
- Abuse, neglect, or accidental damage.
- Unauthorized repairs or modifications.
For specific warranty terms and conditions, please refer to the warranty card included with your product or contact Lightwish customer support.
9. Customer Support
If you have any questions, require assistance, or encounter issues not covered in this manual, please contact Lightwish customer support:
- Website: Visit the LIGHTWISH Store on Amazon
- Email: Refer to product packaging or warranty card for contact email.
- Phone: Refer to product packaging or warranty card for contact phone number.
Please have your product model number (HCT-326) and purchase date ready when contacting support.
Ask a question about this manual
Ask about setup, troubleshooting, compatibility, parts, safety, or missing instructions. Manuals+ will review the question and use this page’s manual context to help answer it.