
YIYIBYUS AD106S
Andonstar AD106S Digital Microscope User Manual
Model: AD106S | Brand: YIYIBYUS
Introduction
This manual provides comprehensive instructions for the setup, operation, and maintenance of your Andonstar AD106S Digital Microscope. This device is designed for detailed observation and analysis, particularly suitable for applications such as SMD soldering, circuit board inspection, and general repair work. Please read this manual thoroughly before using the microscope to ensure proper function and longevity.
Safety Information
- Ensure the power source is 5V DC as specified. Using an incorrect power supply may damage the device.
- Do not expose the microscope to extreme temperatures, humidity, or corrosive substances.
- Avoid direct exposure of the LED lights to eyes.
- Handle the lens and screen with care to prevent scratches or damage.
- Keep the device away from children.
- Unplug the power adapter when the device is not in use or during cleaning.
Package Contents
Verify that all items listed below are present in your package:
- Andonstar AD106S Digital Microscope Unit (with 4.3-inch LCD screen)
- Adjustable Stand with Base
- USB Cable
- Wired Switch with 2 LED Lights
- Remote Control
- Calibration Ruler (if included)
- User Manual (this document)
- Other accessories (e.g., lens covers, adhesive pads)

Image showing the Andonstar AD106S Digital Microscope along with its various components and accessories, including the main unit, stand, cables, and remote control.
Product Overview
Familiarize yourself with the main parts of the Andonstar AD106S Digital Microscope:
- 4.3-inch LCD Screen: Displays the magnified image.
- Microscope Lens: Captures the image of the object.
- Focus Knob: Adjusts the clarity of the image.
- Built-in LED Lights: Eight integrated LEDs around the lens provide primary illumination.
- Adjustable Stand: Provides stability and allows for height adjustment of the microscope unit.
- Wired Switch with Auxiliary LED Lights: Two additional flexible LED lights for enhanced illumination, controlled by a wired switch.
- Control Buttons: Buttons on the unit for power, menu, mode, capture, and navigation.
- USB Port: For power supply and data transfer to a computer.
- MicroSD Card Slot: For storing captured images and videos (memory card not included).

Front view of the Andonstar AD106S Digital Microscope, highlighting the screen, lens, and main stand structure.

Back view of the Andonstar AD106S Digital Microscope, showing the ventilation and product information label.
Setup
- Assemble the Stand: Attach the microscope unit to the adjustable stand. Ensure it is securely fastened.
- Position Auxiliary Lights: Insert the two flexible LED lights into the designated slots on the base. Adjust their position to direct light onto the observation area.
- Connect Power: Connect the USB cable to the microscope's power input port and then to a 5V DC power adapter (not always included, but typically a standard USB charger) or a computer USB port.
- Insert MicroSD Card (Optional): If you plan to save images or videos, insert a MicroSD card (up to 32GB, not included) into the card slot on the side of the unit. Ensure it is inserted correctly until it clicks into place.
- Power On: Press and hold the power button on the microscope unit to turn it on. The LCD screen should illuminate.

Image illustrating the microscope unit, stand, auxiliary lights, and power connection components during setup.
Operating Instructions
Basic Operation
- Place Object: Position the object you wish to observe directly under the microscope lens on the base.
- Adjust Height: Use the height adjustment knob on the stand to bring the lens closer to or further from the object until it appears on the screen.
- Focus: Rotate the focus knob on the microscope unit until the image on the screen is clear and sharp. The focus range is typically 2cm to 10.5cm.
- Adjust Lighting:
- Use the built-in LED light control (if available via buttons) to adjust the brightness of the primary lights.
- Use the wired switch to turn on/off and adjust the brightness of the two auxiliary LED lights. Position these flexible lights to eliminate shadows and provide optimal illumination.
- Magnification: The microscope offers continuous magnification up to 220 times. Adjusting the height of the microscope unit relative to the object will change the magnification level.
Capturing Images and Videos
Ensure a MicroSD card is inserted before attempting to capture.
- Photo Mode: Press the "Mode" button to switch to photo mode (indicated by an icon on the screen). Press the "OK" or "Capture" button to take a still image. Images are saved in JPEG format.
- Video Mode: Press the "Mode" button to switch to video recording mode. Press the "OK" or "Capture" button once to start recording and again to stop. Videos are saved in 1080FHD or 720HD resolution.
- Playback: Use the "Mode" button to navigate to playback mode to review captured photos and videos. Use the navigation buttons to browse.
Connecting to a Computer
The microscope can be connected to a computer for live viewing or file transfer.
- Connect the microscope to your computer using the provided USB cable.
- The microscope may appear as a webcam or a mass storage device.
- For live viewing, use compatible software such as AMCAP (as mentioned in product description) or other webcam software.
- To access files, open the microscope's storage drive on your computer.
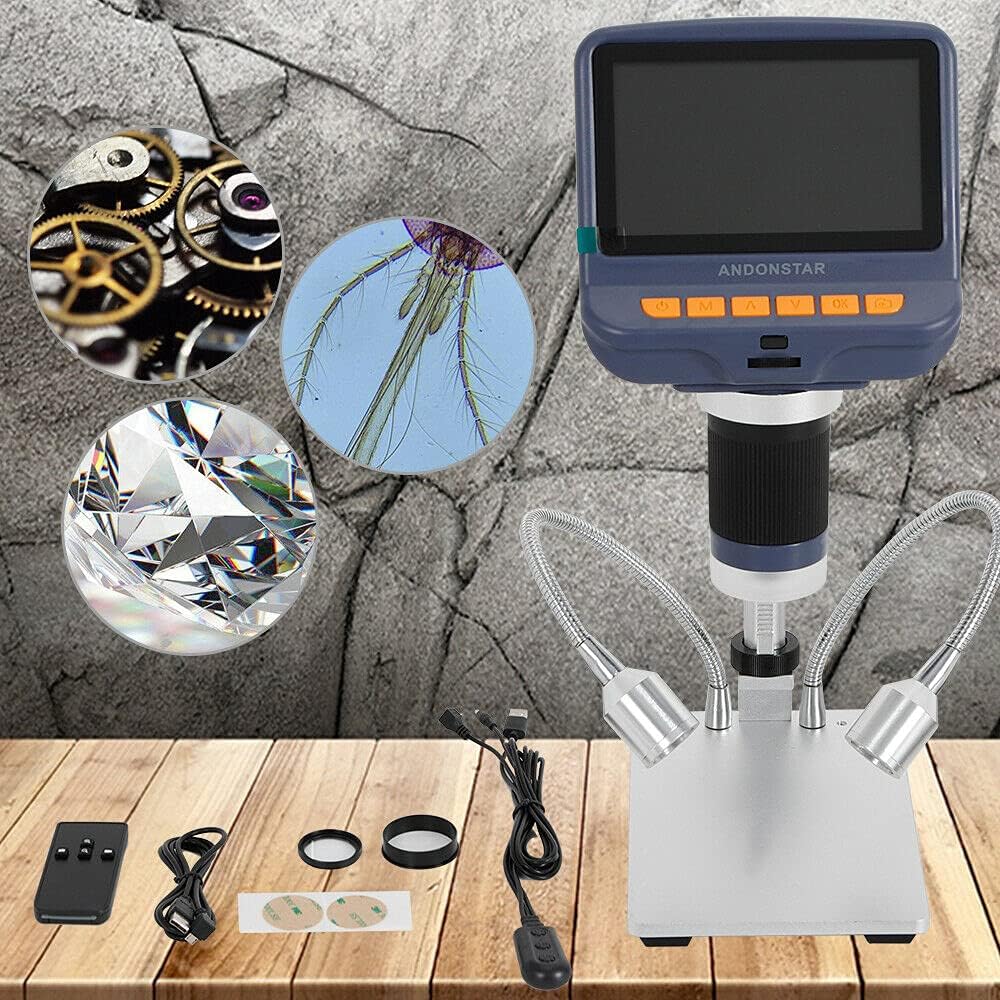
The digital microscope in operation, demonstrating its capability to observe small details such as watch gears, insect parts, and diamond facets.
Maintenance
- Cleaning the Lens: Use a soft, lint-free cloth specifically designed for optical lenses. Do not use abrasive cleaners or excessive force.
- Cleaning the Screen: Wipe the LCD screen gently with a soft, dry cloth. For stubborn smudges, use a screen cleaning solution applied to the cloth, not directly to the screen.
- General Cleaning: Wipe the body of the microscope and stand with a slightly damp cloth. Ensure the device is unplugged before cleaning.
- Storage: Store the microscope in a clean, dry, and dust-free environment when not in use.
Troubleshooting
| Problem | Possible Cause | Solution |
|---|---|---|
| No image on screen / Device won't power on |
|
|
| Image is blurry / Cannot focus |
|
|
| Image is too dark or too bright |
|
|
| Cannot save images/videos |
|
|
Specifications
| Feature | Detail |
|---|---|
| Image Sensor | High Quality HD Sensor |
| Magnification | Up to 220 times (continuous) |
| Focus Range | 2 cm to 10.5 cm |
| Frame Rate | Max 30f/s under 600 Lus Brightness |
| Power Source | 5V DC (Corded Electric) |
| Light Source | 8 built-in LED + 2 auxiliary LED lights |
| Screen Size | 4.3 inch LCD |
| Stand Size | 16 cm x 10 cm x 19.5 cm (approx. 6.3 x 3.9 x 7.7 inches) |
| Software Compatibility | AMCAP (for PC connection) |
| Picture Format | JPEG |
| Picture Resolution Ratio | 1280*720p - 4032*3024p |
| Storage | Extended memory up to 32GB (MicroSD card not included) |
| Video Output | 1080(FHD), 720(HD) |
| Model Number | AD106S |
| UPC | 733835976898 |

Diagram showing the approximate dimensions of the Andonstar AD106S Digital Microscope, including height, base width, and depth.
Warranty and Support
For warranty information, technical support, or service inquiries, please refer to the contact information provided by your retailer or the manufacturer, YIYIBYUS. Keep your purchase receipt as proof of purchase for warranty claims.
For further assistance, you may visit the official product page or contact the seller directly through the platform where the purchase was made.
Ask a question about this manual
Ask about setup, troubleshooting, compatibility, parts, safety, or missing instructions. Manuals+ will review the question and use this page’s manual context to help answer it.