
1. Introduction
This manual provides essential information for the safe and efficient operation of your PowMr MPPT Solar Charge Controller. Please read this manual thoroughly before installation and use to ensure optimal performance and longevity of your solar power system.
2. Key Features
- 30A solar charge controller, 12V/24V automatic system voltage detection.
- Supports 60-720W solar panels with a maximum PV open circuit voltage (VOC) of 75V.
- Compatible with 12V/24V Lithium or lead-acid batteries (AGM, Gel, Flooded) with preset charging parameters.
- Advanced MPPT (Maximum Power Point Tracking) technology with tracking efficiency no less than 99.5%.
- Charging maximum conversion efficiency can reach 97%.
- Excellent heat sink design for reliable performance.
- Multiple load control modes: 24 Hours Working, Light Control, Light+Time Control.
3. Safety Precautions
- Ensure all connections are correct and secure before operation.
- Always connect the battery to the controller first, then the solar panel. Disconnect in reverse order.
- Do not short-circuit the solar panel or battery terminals.
- Install the controller in a well-ventilated area, away from direct sunlight, high temperatures, and water.
- Use appropriate wire gauges for all connections to prevent overheating.
- Consult a qualified electrician if you are unsure about any installation steps.
4. Product Overview
The PowMr MPPT Solar Charge Controller features a compact design with an intuitive LCD display and clearly labeled connection terminals.

The LCD display provides real-time information about your system's status, including battery voltage, charging current, and load status. Control buttons allow for easy navigation through menus and parameter adjustments.

5. Setup and Installation
Follow these steps for proper installation of your solar charge controller. Ensure all power sources are disconnected before making any connections.
5.1. Mounting Location
- Choose a vertical surface protected from direct sunlight, high temperatures, and water.
- Ensure good ventilation. Maintain at least 3.94 inches (100mm) clearance above the controller and 7.87 inches (200mm) below for optimal airflow.
5.2. Wiring Steps
Connect components in the following order to prevent damage:
- Connect the Battery: Connect the battery wires to the controller's battery terminals (+ and -). Ensure correct polarity.
- Connect the Solar Panel: Connect the solar panel wires to the controller's PV terminals (+ and -). Ensure correct polarity.
- Connect the Load (Optional): Connect your DC load to the controller's load terminals (+ and -).
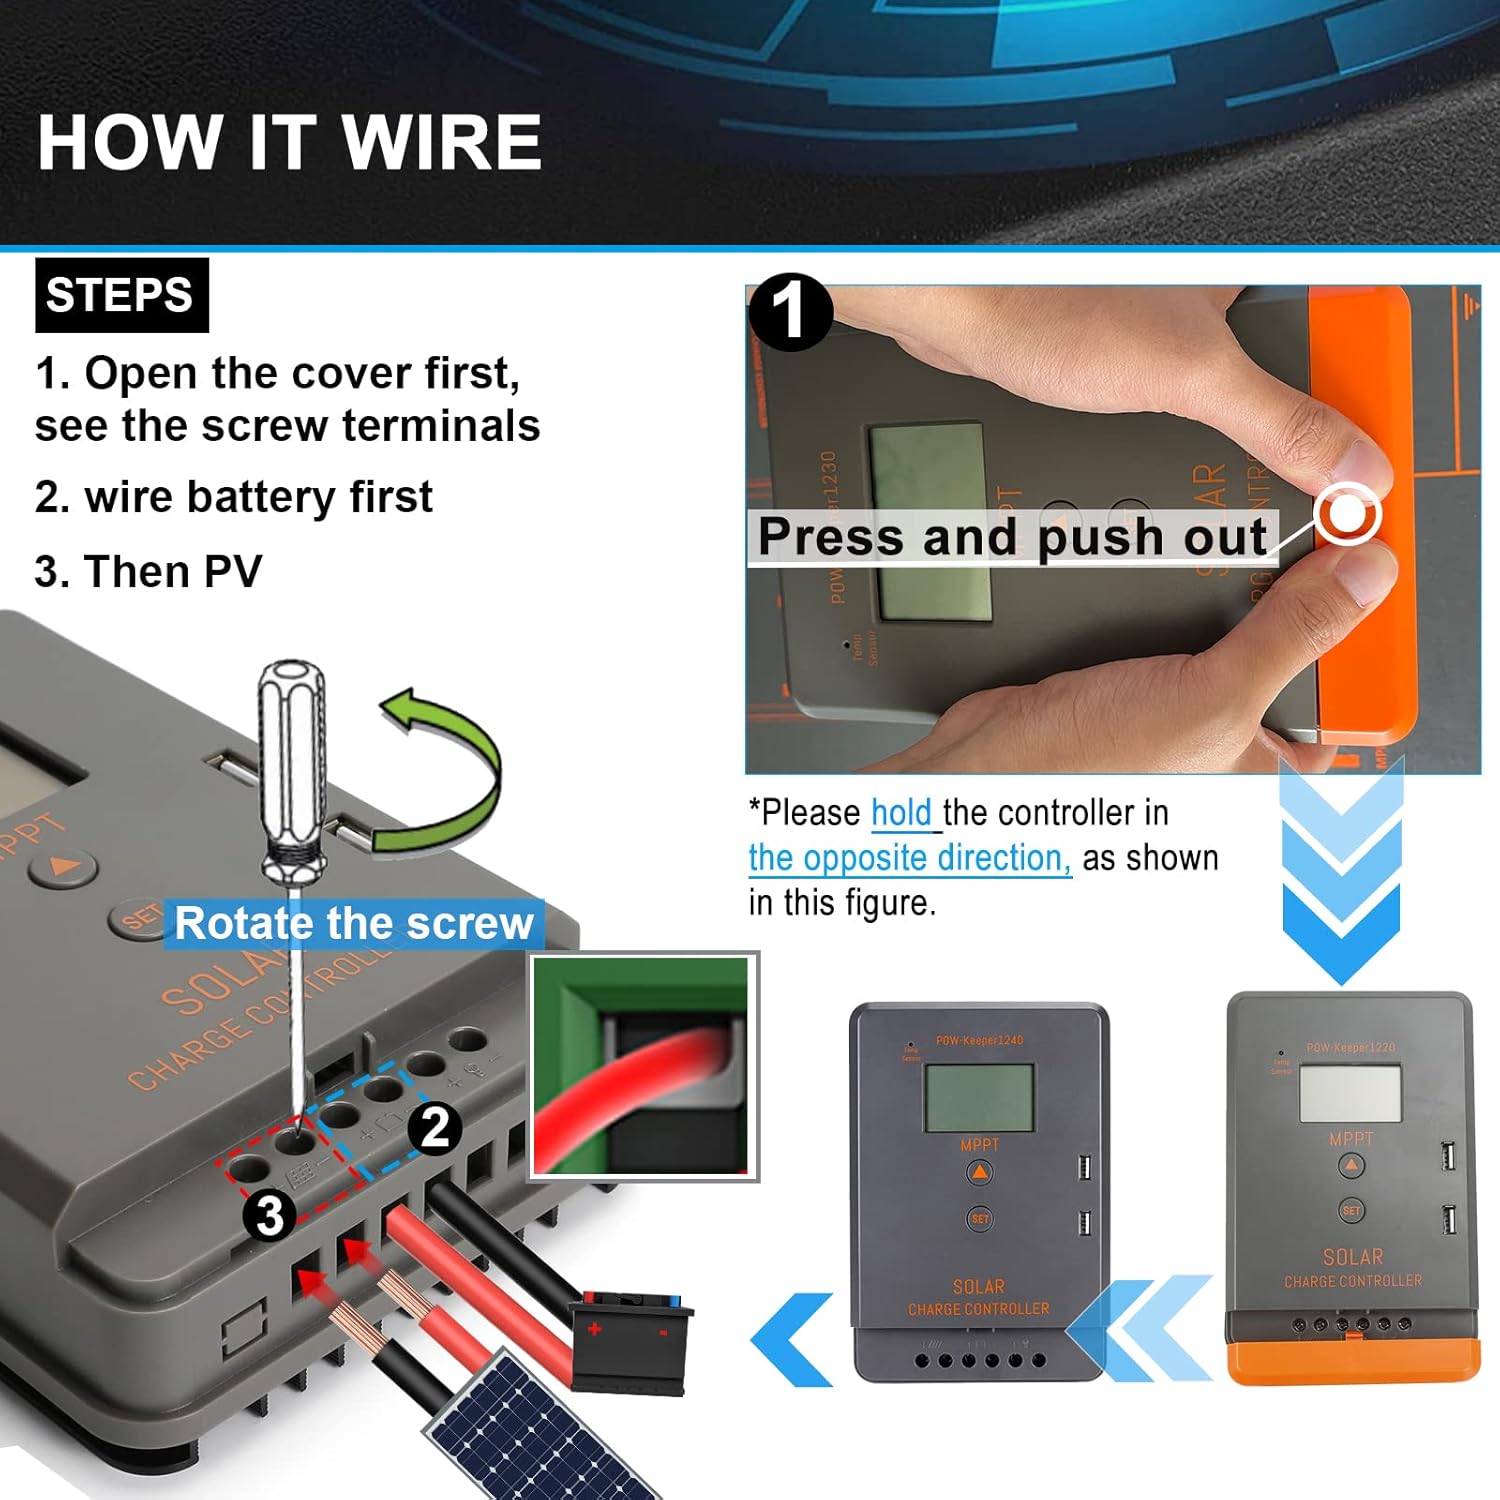

For a quick visual guide on wiring, please refer to the video below:
6. Operating Modes
The controller supports various battery types and offers flexible load control options.
6.1. Battery Type Selection
The controller automatically detects 12V or 24V systems and allows selection of battery types for optimized charging.

6.2. Load Control Modes
The controller offers multiple modes for managing the connected DC load:
- Manual Mode (24H): Load is continuously on.
- Light Control Mode: Load turns on at sunset and turns off at sunrise.
- Light + Time Control: Load turns on at sunset and stays on for a set number of hours, then turns off.

For a general overview of the controller's features and operation, watch this video:
7. Specifications
| Feature | Detail |
|---|---|
| Model Number | Keeper1230 |
| System Voltage | 12V/24V Auto |
| Rated Charge Current | 30A |
| Max. PV Open Circuit Voltage (VOC) | 75V |
| Max. PV Input Power (12V Battery) | 240W |
| Max. PV Input Power (24V Battery) | 720W |
| Battery Type Support | AGM, Gel, Flooded, Lithium |
| Display Type | LCD |
| Operating Temperature | Up to 55°C |
| Product Dimensions | 5.24 x 7.68 x 2.17 inches |
| Item Weight | 2.05 pounds |
8. Maintenance
Regular maintenance ensures the optimal performance and longevity of your solar charge controller:
- Periodically check all wiring connections for tightness and corrosion.
- Clean the controller's exterior with a dry cloth to remove dust and debris.
- Ensure adequate ventilation around the controller to prevent overheating.
- Monitor the LCD display for any error codes or unusual readings.
9. Troubleshooting
If you encounter issues with your solar charge controller, refer to the following basic troubleshooting steps:
- No Display/Power: Check battery connections and ensure the battery has sufficient voltage.
- No Charging: Verify solar panel connections, ensure adequate sunlight, and check for any shading on the panels. Confirm correct battery type selection.
- Load Not Working: Check load connections, ensure the load is within the controller's current limits, and verify the selected load control mode.
- Unusual Voltage Readings: Double-check all wiring for correct polarity and secure connections.
For more detailed troubleshooting, consult the full product manual or contact customer support.
10. Warranty and Support
For warranty information and technical support, please refer to the documentation included with your product or visit the official PowMr website. Keep your purchase receipt for warranty claims.