
1. Safety Information
Please read all instructions carefully before operating this device. Failure to follow these instructions may result in personal injury or damage to the device or vehicle.
- Installation: Professional installation is recommended. Incorrect wiring can cause damage to the vehicle's electrical system or the unit.
- Power Supply: Connect the unit only to a 12V DC power supply with a negative ground.
- Driving Safety: Do not operate the unit's functions that require prolonged attention while driving. Always prioritize road safety.
- Volume Level: Keep the volume at a level where you can still hear outside traffic sounds.
- Moisture: Do not expose the unit to moisture or water to prevent electric shock or fire.
- Temperature: Avoid extreme temperatures. The unit is designed for typical automotive environments.
- California Proposition 65 Warning: This product contains chemicals known to the State of California to cause cancer and birth defects or other reproductive harm.
2. Product Overview
The Nippon Audiodrift KM7500TA is a double DIN car stereo receiver designed to enhance your in-car entertainment and connectivity. It features a 7-inch touchscreen display, Android/iPhone Mirrorlink, Bluetooth for wireless music streaming and hands-free calling, USB connectivity, and AM/FM radio.
2.1 Front Panel

Figure 1: Front view of the Audiodrift KM7500TA unit. This image shows the 7-inch touchscreen display, along with physical buttons on the left side for Microphone (MIC), Infrared (IR) sensor, Mode (MOD), Volume Up (VOL+), Volume Down (VOL-), Mute, and Reset (RES). A USB port is also visible at the bottom left.
2.2 Remote Control

Figure 2: Included remote control for the Audiodrift KM7500TA. It features buttons for power, mute, menu, mode, USB/SD selection, band/AMS, volume control, track navigation, and numeric keypad for direct input or radio presets, along with call answer/end buttons.
2.3 Rear Panel Connections
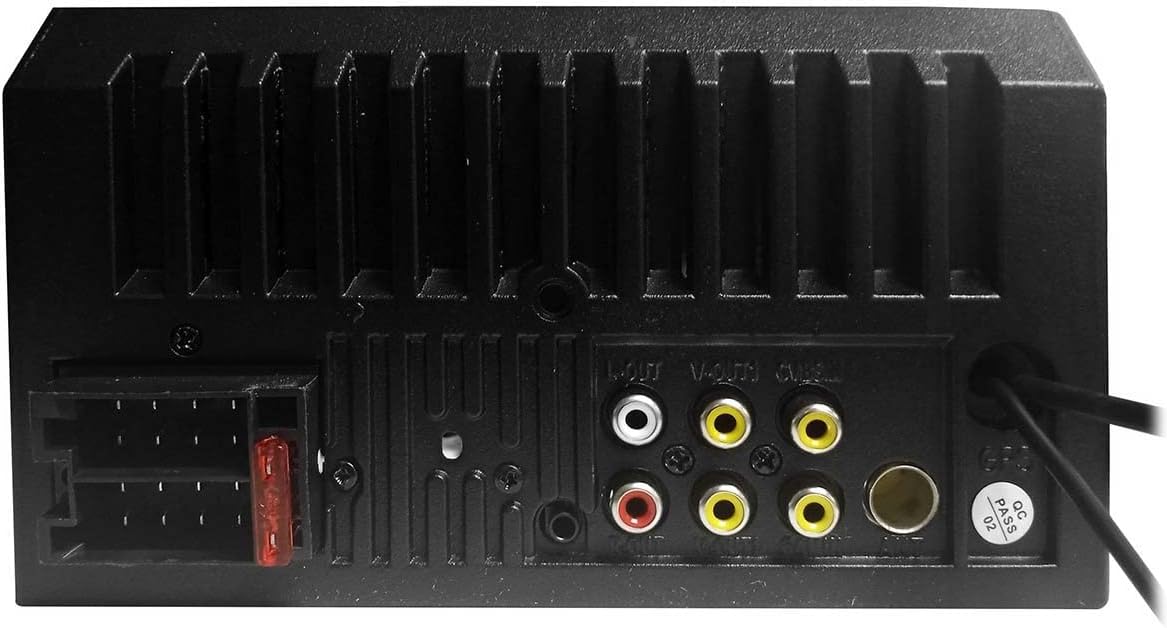
Figure 3: Rear view of the Audiodrift KM7500TA showing various input and output connections. This includes the main wiring harness connector, antenna input, RCA audio/video outputs (V-OUT, V-OUT2), and RCA audio inputs (AUX-IN L/R).
3. Setup
3.1 Installation
Due to the complexity of automotive electrical systems, professional installation is highly recommended. Ensure the vehicle's battery is disconnected before beginning installation to prevent electrical shorts or damage.
- Wiring Harness: Connect the provided wiring harness to the corresponding wires in your vehicle. Refer to your vehicle's wiring diagram for correct connections.
- Power Connections:
- Yellow (Constant 12V): Connect to a constant 12V power source.
- Red (Accessory 12V): Connect to a switched 12V power source (ignition).
- Black (Ground): Connect to a clean chassis ground point.
- Speaker Connections: Connect speaker wires to the appropriate positive (+) and negative (-) terminals. Ensure correct polarity for optimal sound.
- Antenna: Connect the vehicle's radio antenna to the unit's antenna input.
- RCA Connections: If using external amplifiers or monitors, connect RCA cables to the respective output/input jacks on the rear panel.
- Mounting: Secure the unit into the double DIN opening using the provided mounting hardware.
3.2 Initial Power On
After installation, reconnect the vehicle's battery. Turn on the vehicle's ignition. The unit should power on automatically or by pressing the power button on the front panel or remote control. Follow any on-screen prompts for initial setup, such as language selection.
4. Operating Instructions
4.1 Basic Controls
- Power On/Off: Press the Power button on the remote or the MOD button on the front panel (long press) to turn the unit on or off.
- Volume Control: Use the VOL+ and VOL- buttons on the front panel or remote to adjust the volume.
- Mode Selection: Press the MOD button on the front panel or remote to cycle through available sources (Radio, USB, Bluetooth, Mirrorlink, AUX).
- Mute: Press the MUTE button on the front panel or remote to mute/unmute audio.
4.2 Radio Operation (AM/FM)
- Select Radio Mode: Press the MOD button until "Radio" or "Tuner" is displayed.
- Band Selection: Press the BAND/AMS button on the remote or touch the "Band" icon on the screen to switch between FM1, FM2, FM3, AM1, AM2.
- Manual Tuning: Touch the << or >> icons on the screen to fine-tune frequencies.
- Automatic Scan: Long press the << or >> icons to automatically search for the next strong station.
- Store Presets: To store a station, tune to the desired frequency, then long press one of the preset numbers (1-6) on the screen or remote until you hear a beep.
4.3 Bluetooth Connectivity
The unit supports Bluetooth for hands-free calling and wireless audio streaming.
- Enable Bluetooth: Ensure Bluetooth is enabled on your mobile device.
- Select Bluetooth Mode: Press the MOD button until "Bluetooth" is selected.
- Pairing: On your mobile device, search for Bluetooth devices and select "KM7500TA" (or similar name). Enter "0000" if a PIN is required.
- Hands-Free Calling: Once paired, you can make and receive calls through the unit. Use the Green Phone button to answer and Red Phone button to end calls on the remote.
- Audio Streaming: Play music from your paired device, and it will stream wirelessly to the car stereo.
4.4 USB Playback
Insert a USB flash drive containing audio or video files into the USB port on the front panel. The unit will automatically switch to USB mode and begin playback. Use the on-screen controls or remote to navigate files and control playback.
4.5 Mirrorlink (Android/iPhone)
Mirrorlink allows you to display and control your smartphone's screen on the unit's display. This feature requires a compatible smartphone and a USB connection.
- Connect Phone: Connect your Android or iPhone to the unit's USB port using a high-quality USB cable.
- Select Mirrorlink Mode: Press the MOD button until "Mirrorlink" or "PhoneLink" is selected.
- Follow On-Screen Prompts: The unit will guide you through the necessary steps to establish the Mirrorlink connection. This may involve installing a specific app on your phone or granting permissions.
- Control: Once connected, your phone's screen will be mirrored, and you can often control it directly from the unit's touchscreen.
4.6 Audio Settings
Access the audio settings menu (usually via a "Settings" or "EQ" icon on the touchscreen) to adjust:
- Equalizer (EQ): Adjust bass, treble, and other frequency bands, or select from preset EQ modes.
- Balance/Fader: Adjust audio distribution between left/right and front/rear speakers.
- Loudness: Boost bass and treble at low volumes.
5. Maintenance
- Cleaning the Screen: Use a soft, lint-free cloth to wipe the touchscreen. For stubborn smudges, dampen the cloth slightly with water or a screen cleaner designed for electronics. Do not use abrasive cleaners or solvents.
- General Cleaning: Wipe the unit's exterior with a soft, dry cloth.
- Fuse Replacement: If the unit does not power on, check the fuse located on the rear of the unit (refer to Figure 3). Replace it with a fuse of the same amperage rating only.
- Software Updates: Periodically check the manufacturer's website for any available software or firmware updates for improved performance and features.
6. Troubleshooting
| Problem | Possible Cause | Solution |
|---|---|---|
| No power | Incorrect wiring; Blown fuse; Loose connection | Check power and ground connections. Verify fuse. Ensure ignition is on. |
| No sound | Volume too low; Mute activated; Incorrect speaker wiring; Source not selected | Increase volume. Deactivate mute. Check speaker connections. Select correct audio source. |
| Poor radio reception | Antenna not connected; Weak signal; Damaged antenna | Ensure antenna is securely connected. Try a different location. Inspect antenna for damage. |
| Bluetooth not pairing | Bluetooth not enabled on phone; Incorrect pairing mode; Device already paired | Ensure phone's Bluetooth is on and discoverable. Select Bluetooth mode on unit. Forget previous pairings on phone. |
| Mirrorlink not working | Incompatible phone; Faulty USB cable; App not installed/configured | Verify phone compatibility. Use a high-quality USB cable. Ensure required apps are installed and permissions granted. |
| Unit freezes or is unresponsive | Temporary software glitch | Press the RES (Reset) button on the front panel using a thin object (e.g., paperclip). |
7. Specifications
| Feature | Detail |
|---|---|
| Model Number | KM7500TA |
| Product Dimensions | 9 x 6 x 4 inches |
| Connectivity Technology | Bluetooth, USB |
| Controller Type | Android (compatible) |
| Special Feature | Touchscreen |
| Compatible Devices | Smartphone, Speaker |
| Total HDMI Ports | 1 (Note: This might be an error in the source data, as car stereos typically don't have HDMI. Assuming it refers to A/V input capability if not a typo.) |
| Connector Type | 3.5mm Jack, USB |
| Audio Output Mode | Stereo, Surround |
| Surround Sound Channel Configuration | 4.0 |
| Color | Black |
| Manufacturer | NIPPON |
8. Warranty and Support
For warranty information and technical support, please refer to the documentation included with your purchase or visit the official Nippon website. Keep your proof of purchase for warranty claims.
For further assistance, you may contact the retailer where the product was purchased.