
1. Introduction
This manual provides instructions for the safe and efficient operation of your GorillaRock Semi-Automatic Cup Sealing Machine. This commercial-grade electric sealer is designed for securely sealing various beverage cups, including milk tea, juices, jellies, and ice cream, with a capacity of 300-500 cups per hour. It is compatible with plastic and paper cups of 3.7 inches (95 mm) diameter and a maximum height of 6.7 inches (170 mm).
Please read this manual thoroughly before initial use to ensure proper setup, operation, and maintenance, and to prevent potential hazards.

Figure 1: GorillaRock Semi-Automatic Cup Sealing Machine. This image shows the overall machine with several sealed cups of beverages next to it, demonstrating its function.
2. Safety Information
WARNING: To reduce the risk of fire, electric shock, or injury, read and understand all instructions before using this appliance.
- Always ensure the machine is connected to a grounded 110V AC power outlet.
- Do not operate the machine with wet hands or in wet conditions.
- Keep hands and loose clothing away from moving parts during operation.
- Exercise caution around the heating element. It becomes very hot during operation.
- Unplug the machine before cleaning or performing any maintenance.
- Do not attempt to modify or repair the machine yourself. Contact qualified service personnel.
- Ensure proper ventilation around the machine during use.

Figure 2: Caution label near the sealing area. This image highlights the caution sticker on the machine, warning users about sharp and hot surfaces when the power supply is connected.
3. Setup Instructions
3.1 Unpacking
- Carefully remove the machine from its packaging.
- Inspect the machine for any signs of damage during transit. Report any damage to the supplier immediately.
- Remove all packing materials, including protective films and ties.
3.2 Placement
- Place the machine on a stable, level, and heat-resistant surface.
- Ensure adequate clearance around the machine for ventilation and operation.
- Position the machine near a grounded 110V AC power outlet.
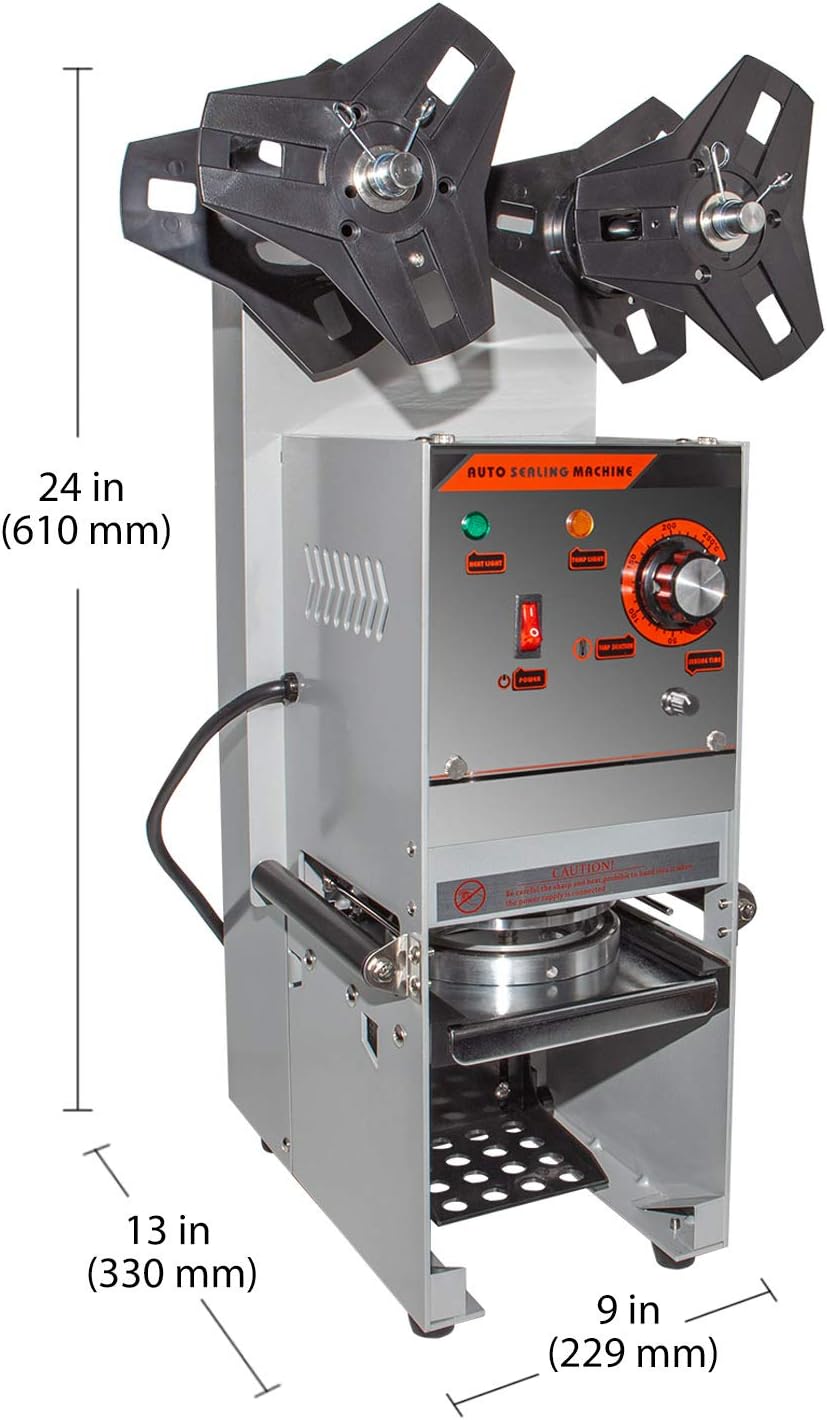
Figure 3: Machine dimensions. This image illustrates the physical dimensions of the cup sealing machine, showing its height (24 inches / 610 mm), width (9 inches / 229 mm), and depth (13 inches / 330 mm).
3.3 Power Connection
- Connect the power cord to the machine and then plug it into a grounded 110V AC outlet.
- Verify that the power switch is in the OFF position before plugging in.

Figure 4: Power connection. This image displays the rear view of the machine, highlighting the power cord and a standard 3-prong US power outlet for connection.
3.4 Film Roll Installation
- Locate the film roll holders at the top of the machine.
- Carefully place the sealing film roll onto the holders, ensuring it is correctly oriented for unwinding.
- Thread the film through the designated guides and over the sealing plate according to the machine's internal diagram (if available).

Figure 5: Film roll installation. This image shows a close-up of the film roll holders at the top of the machine, where the sealing film is mounted.
4. Operating Instructions
4.1 Control Panel Overview

Figure 6: Control Panel. This image provides a detailed view of the machine's control panel, featuring the power switch, heat light, temperature light, temperature selection knob (0-250°C), and sealing time knob (0.1-3 seconds).
- Power Switch: Turns the machine ON/OFF.
- Heat Light (Green): Indicates the heating element is active.
- Temp Light (Orange): Indicates the machine is heating up or maintaining temperature.
- Temp Selection Knob: Adjusts the sealing temperature (0-250°C).
- Sealing Time Knob: Adjusts the duration of the sealing process (0.1-3 seconds).
4.2 Initial Power On and Heating
- Turn the Power Switch to the ON position. The Heat Light and Temp Light will illuminate.
- Set the Temp Selection Knob to the desired temperature. A common starting point for plastic cups is around 170-180°C, and for paper cups, it might be slightly higher. Adjust as needed based on cup material and film.
- Allow the machine to preheat until the Temp Light turns off, indicating the set temperature has been reached. This may take several minutes.
4.3 Sealing a Cup
- Place a filled cup into the cup holder tray. Ensure the cup is centered and stable.
- Push the cup holder tray inward until the cup is positioned directly under the sealing head.
- Pull the operating lever down firmly and hold for the duration set by the Sealing Time Knob.
- Release the lever and pull the cup holder tray outward to retrieve the sealed cup.
- Inspect the seal for completeness and adjust temperature or sealing time if necessary.

Figure 7: Cup in sealing tray. This image shows a cup filled with a beverage placed correctly in the machine's sliding tray, ready for the sealing process.
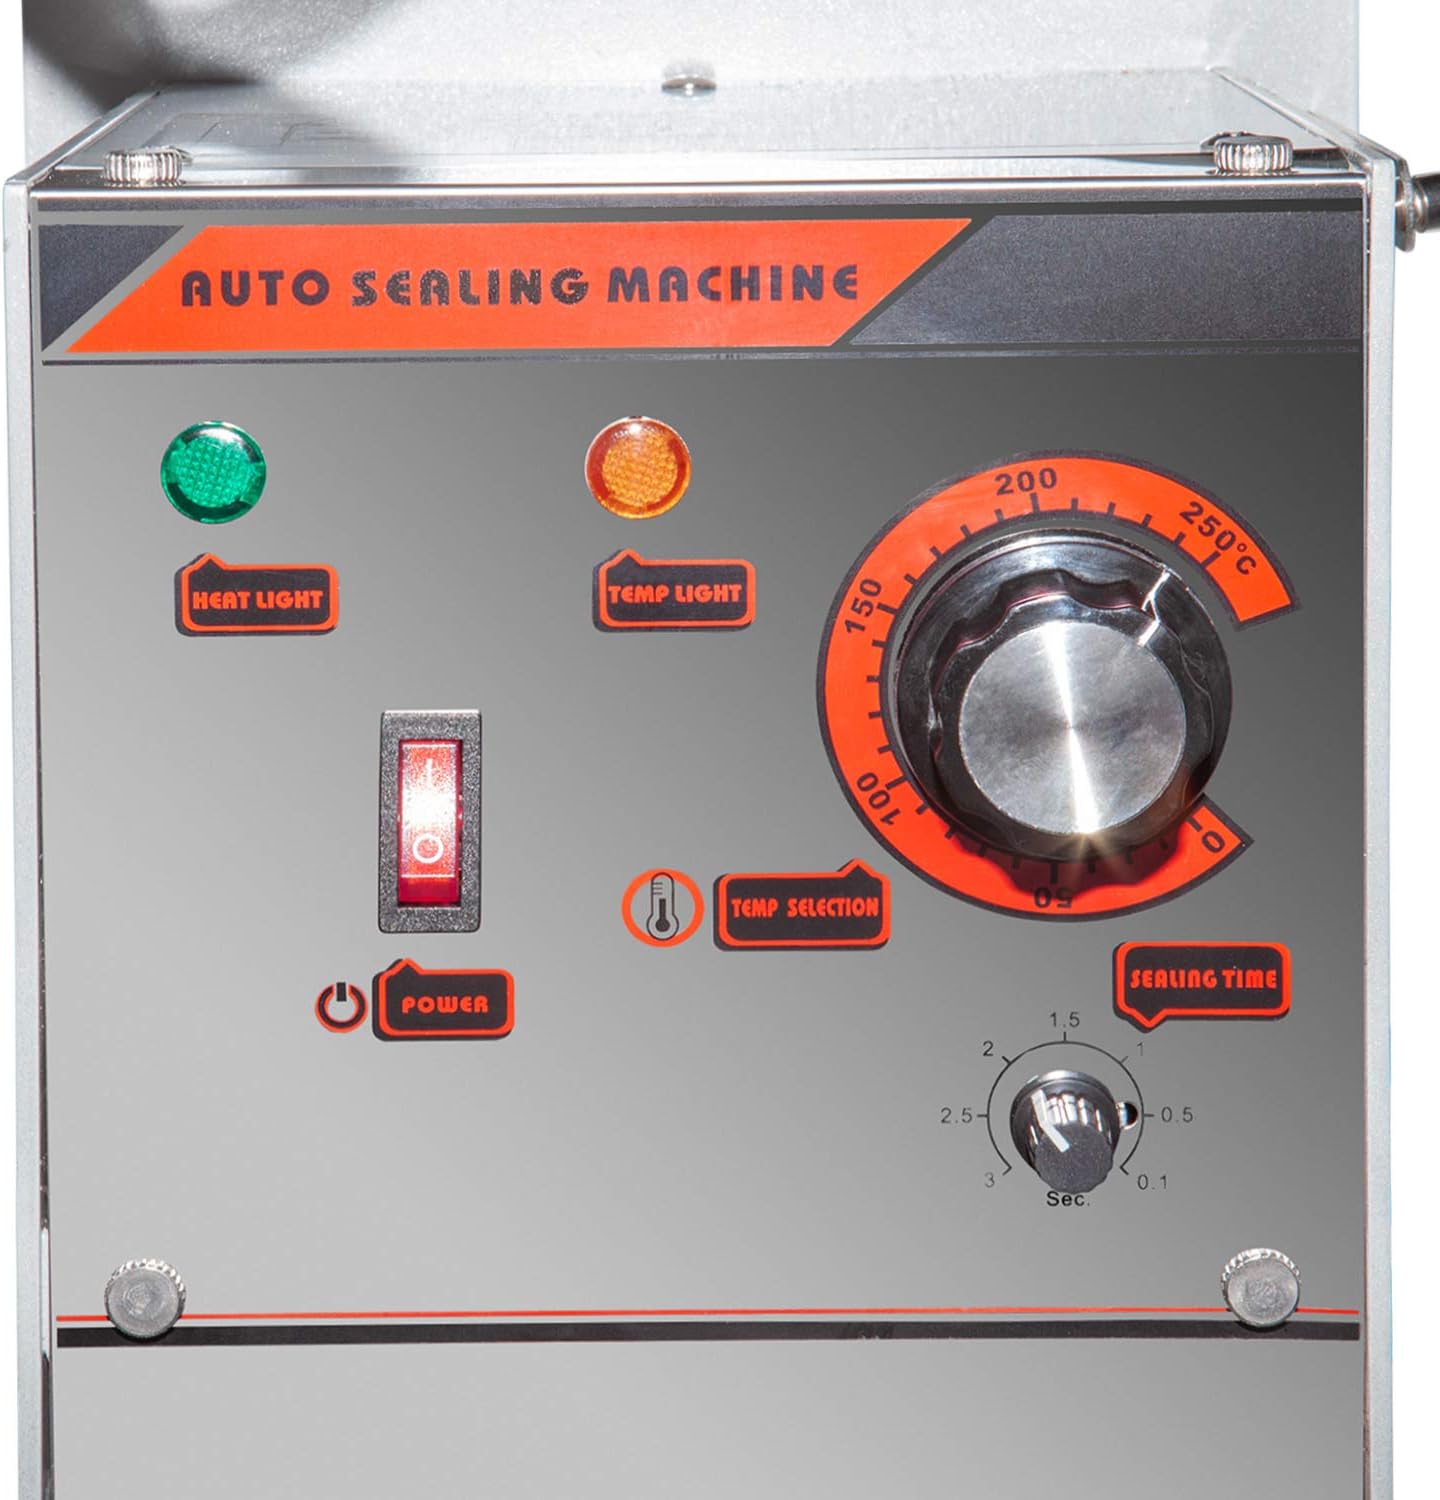
Figure 8: Cup holder detail. This image provides a close-up of the cup holder mechanism, showing the ring that secures the cup during sealing.
5. Maintenance
5.1 Cleaning
- Always unplug the machine and allow it to cool completely before cleaning.
- Wipe down exterior surfaces with a damp cloth and mild detergent. Avoid abrasive cleaners.
- Clean the sealing plate and cup holder tray regularly to prevent residue buildup.
- Ensure no liquids enter the electrical components.
5.2 Film Roll Replacement
- When the film roll is depleted, turn off and unplug the machine.
- Remove the empty core from the holders.
- Install a new film roll following the instructions in Section 3.4.
6. Troubleshooting
| Problem | Possible Cause | Solution |
|---|---|---|
| Machine does not power on. | No power supply; Power switch off. | Check power cord connection; Ensure power switch is ON. |
| Poor seal quality (leaking, incomplete). | Incorrect temperature; Insufficient sealing time; Wrong film type; Cup not centered. | Adjust temperature (increase for stronger seal); Increase sealing time; Ensure correct film for cup material; Center cup properly. |
| Film does not advance properly. | Film incorrectly installed; Film jammed; Film roll depleted. | Re-thread film correctly; Clear any obstructions; Replace film roll. |
| Machine overheats. | Poor ventilation; Prolonged continuous use. | Ensure adequate space around machine; Allow machine to cool down periodically. |
7. Specifications
| Feature | Detail |
|---|---|
| Brand | GorillaRock |
| Model | Semi-Automatic |
| Operation Mode | Manual |
| Material | Stainless Steel |
| Power Source | AC |
| Voltage | 110 Volts |
| Wattage | 350 watts |
| Production Capacity | 300-500 cups/hour |
| Compatible Cup Diameter | 3.7 inches (95 mm) |
| Max Cup Height | 6.7 inches (170 mm) |
| Item Weight | 42 Pounds |
| Package Dimensions | 27 x 15 x 12 inches |
| UPC | 761571997532 |
8. Warranty and Support
GorillaRock is committed to customer satisfaction. This product comes with a quality guarantee. For any issues, questions, or support needs, please contact your retailer or GorillaRock customer service.
Information regarding flexible return policies and money-back guarantees can be obtained from your point of purchase.