
1. Introduction
This manual provides comprehensive instructions for the setup, operation, maintenance, and troubleshooting of your Easyfone T300 4G Unlocked Big Button Flip Cell Phone. Designed with seniors in mind, this phone features large buttons, clear and loud sound, hearing aid compatibility, and an essential SOS button for emergencies. Please read this manual thoroughly to ensure proper use and to maximize the phone's features.
2. What's Included
Upon opening the package, please verify that all the following items are present:
- Easyfone T300 Flip Phone
- 1500mAh Battery
- Charging Set (with Charging Dock)
- User Manual (this document)
- SpeedTalk 3-in-1 SIM Card Kit (may vary by region/bundle)
- USB Cable
- Lanyard

Figure 2.1: Package Contents of the Easyfone T300.
3. Setup Guide
3.1. Battery Installation
- Gently remove the back cover of the Easyfone T300.
- Insert the 1500mAh battery into the compartment, ensuring the gold contacts align with those in the phone.
- Replace the back cover, pressing firmly until it clicks into place.
3.2. SIM Card Installation
The Easyfone T300 requires a SIM card for cellular service. It is compatible with T-Mobile, SpeedTalk, and Tello Mobile networks. Please note, it is NOT compatible with AT&T, Cricket, or any CDMA Networks like Verizon, Sprint, and Boost Mobile.
- With the phone powered off and battery removed, locate the SIM card slot(s).
- Insert your activated SIM card into the designated slot. Ensure it is correctly oriented as indicated by the diagram near the slot.
- Reinstall the battery and back cover.

Figure 3.1: SIM Card Activation and Insertion Process.

Figure 3.2: Compatible Network Carriers.
3.3. Initial Charging
Before first use, fully charge your Easyfone T300.
- Connect the charging dock to the power adapter using the USB cable.
- Place the Easyfone T300 onto the charging dock. Ensure it is seated correctly. The phone will indicate charging status on its screen.
- A full charge takes approximately 1.5 hours.

Figure 3.3: Easyfone T300 in Charging Dock.

Figure 3.4: Phone Charging in a Home Environment.
4. Operating Instructions
4.1. Basic Phone Functions
- **Power On/Off**: Press and hold the Power button.
- **Answer/End Calls**: Simply flip the phone open to answer an incoming call and close it to end a call.
- **Big Buttons**: The large, clearly labeled buttons are designed for easy dialing and navigation.
- **Dual HD Display**: The phone features a 2.4" HD main display and a 1.44" external colorful HD screen, both showing large fonts and icons for easy viewing.
- **Clear and Loud Sound**: Optimized for older users, the phone provides clear and loud audio, and is compatible with hearing aid devices.

Figure 4.1: Large Keypad Buttons for Easy Use.

Figure 4.2: Internal Display with Photo Speed Dial.
4.2. Photo Speed Dial
The Easyfone T300 allows you to set up to 8 photo speed dial contacts for quick and easy calling.
- **Save Contacts**:
- From the main screen, press "Contact".
- Select "Add contact" then "Phone".
- Edit necessary information: "Add Photo", "Name", and "Mobile" number.
- Select "SAVE".
- **Add to Speed Dial List**:
- Select the target contact from your contact list.
- Press "Option" and then "Add to Speed Dial".
- Select a number (1-8) for the contact. Press "OK".
- **Using Photo Speed Dial**:
- From the main page, press the dedicated Photo Speed Dial shortcut button.
- Use the "up" and "down" navigation buttons to switch between contacts.
- Press the Call button to initiate a call to the displayed contact.
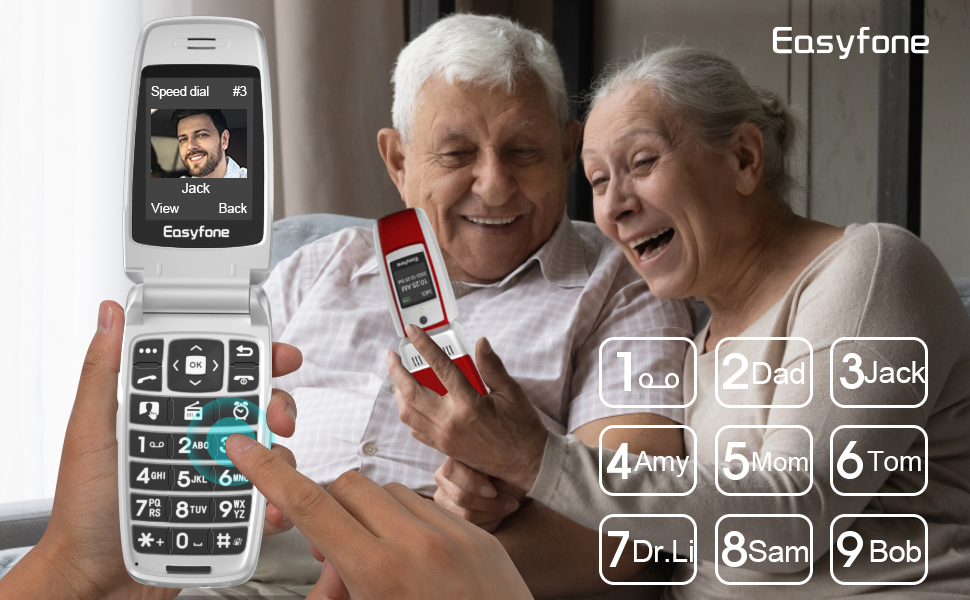
Figure 4.3: Photo Speed Dial in Use.
4.3. SOS Emergency Button
The SOS button provides a critical safety feature, allowing you to quickly contact pre-set emergency numbers.
- **Set SOS Emergency Contact Numbers**:
- From the main screen, press "Menu".
- Navigate to "SOS settings".
- Select "SOS numbers". You can save up to 5 SOS emergency contact numbers.
- Press "Option" and then "Add from contacts" to select contacts from your phonebook.
- Ensure "SOS active" is set to "On" in the SOS settings.
- **Activating SOS**:
- From the main page, press and hold the SOS button (located on the back of the phone) for 3 seconds.
- The phone will automatically call the saved emergency contacts in a loop until one of the calls is answered.
- Simultaneously, an SOS message ("I need help, Please contact me immediately!") will be sent to each emergency contact.

Figure 4.4: SOS Emergency Feature Overview.
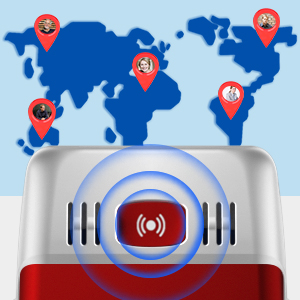
Figure 4.5: Location of the SOS Button.
4.4. Official Product Video: Photo Speed Dial & SOS Function
Video 4.1: A detailed guide on how to set up and use the Photo Speed Dial and SOS emergency functions on the Easyfone T300.
4.5. Dedicated Shortcut Buttons
The Easyfone T300 includes three dedicated shortcut buttons for quick access to frequently used features:
- **FM Radio**: Quickly access the built-in FM radio.
- **Alarm Clock**: Set and manage alarms.
- **Photo Speed Dial**: Directly access your photo speed dial contacts.
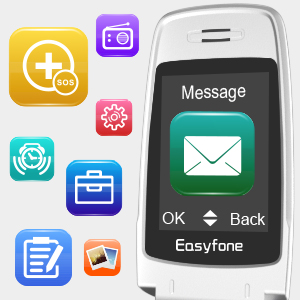
Figure 4.6: Menu Icons for Various Functions.
5. Maintenance
To ensure the longevity and optimal performance of your Easyfone T300, follow these maintenance guidelines:
- **Cleaning**: Use a soft, dry cloth to clean the phone's exterior. Avoid using harsh chemicals or abrasive materials.
- **Battery Care**:
- Charge the battery regularly, even if the phone is not in frequent use, to maintain battery health.
- Avoid exposing the battery to extreme temperatures.
- If the phone will not be used for an extended period, charge the battery to about 50% before storing.
- **Storage**: Store the phone in a cool, dry place away from direct sunlight and moisture.
- **Protection**: While durable, avoid dropping the phone or subjecting it to strong impacts.
6. Troubleshooting
This section addresses common issues you might encounter with your Easyfone T300.
| Problem | Possible Cause | Solution |
|---|---|---|
| Phone not powering on | Low or no battery charge; improperly installed battery. | Charge the phone using the provided charging dock. Ensure the battery is correctly installed. |
| Cannot make or receive calls/texts | No SIM card, inactive SIM, incompatible network, poor signal. | Ensure SIM card is properly inserted and activated. Verify network compatibility (T-Mobile, SpeedTalk, Tello). Move to an area with better signal. Restart the phone. |
| Keypad buttons unresponsive or skipping | Software glitch, physical damage, dirt/debris under buttons. | Restart the phone. Gently clean around the buttons. If issue persists, contact customer support. |
| Poor call quality (unclear/low sound) | Low signal, speaker/microphone obstruction, volume settings. | Check signal strength. Ensure speaker and microphone are not covered. Adjust call volume. |
| Phone not charging | Improper placement on dock, faulty charger/cable/dock. | Ensure phone is correctly seated on the charging dock. Check if the charger and cable are securely connected and undamaged. Try a different power outlet. |
7. Specifications
| Feature | Detail |
|---|---|
| Model Name | T300 |
| Product Dimensions | 4.11 x 2.06 x 0.9 inches |
| Item Weight | 4 ounces |
| Operating System | Nucleus OS |
| RAM | 1 GB |
| Screen Size | 2.4 Inches (main display) |
| Resolution | 320 x 240 |
| Wireless Communication | Bluetooth, Cellular (4G) |
| Human Interface Input | Buttons |
| Audio Jack | 3.5 mm |
| Form Factor | Foldable Case |
| Color | Red |
| Battery Capacity | 1500 mAh |
| Charging Time | 1.5 Hours |
| Special Features | Dual HD display, charging dock support, Big buttons, Photo speed dial, SOS button |
| Manufacturer | Shen Zhen Yixun Electronic Technology Co., Ltd |
| Country of Origin | China |
| Date First Available | July 28, 2022 |
8. Warranty and Support
For warranty information and customer support, please refer to the documentation included with your purchase or contact Easyfone customer service directly. You can also visit the Easyfone Store on Amazon for additional resources.
A PDF version of the user manual is available for download: User Manual (PDF).


