1. Introduction
This manual provides comprehensive instructions for the installation, operation, and maintenance of your AXLAHA 2009-2018 Dodge Ram Headlight Assembly. Please read this manual thoroughly before installation and use to ensure proper function and safety.

Image 1: AXLAHA 2009-2018 Dodge Ram Headlight Assembly (Driver and Passenger Side)
This image displays both the driver and passenger side headlight assemblies, showcasing their chrome housing and amber reflector design.
2. Safety Information
- Always disconnect the vehicle's battery before performing any electrical work.
- Wear appropriate personal protective equipment, including safety glasses and gloves.
- Ensure the vehicle is parked on a level surface with the parking brake engaged.
- If you are unsure about any step, consult a qualified automotive technician.
- Headlights can become hot during operation. Allow them to cool before handling.
3. Package Contents
The package includes the following items:
- 1x Driver Side Headlight Assembly
- 1x Passenger Side Headlight Assembly
Bulbs are not included. This assembly uses HB3 for high beam and H11 for low beam bulbs.
4. Vehicle Compatibility
This headlight assembly is compatible with the following vehicles:
- 2009-2018 Dodge Ram 1500 (with Quad style Halogen headlights)
- 2010-2018 Dodge Ram 2500/3500 (with Quad style Halogen headlights)
- 2019-2022 Ram 1500 Classic (with Quad style Halogen headlights)
Note: Not compatible with 2010-UP RAM models with factory projector LED style headlights.

Image 2: Compatibility Guide for Headlight Types
This image illustrates the difference between incompatible (single hole for high/low beam) and compatible (two holes for high and low beam) headlight types, emphasizing the "Quad Beam Style" requirement.

Image 3: Example of Headlight Assembly on a Compatible Dodge Ram
A visual representation of the headlight assembly installed on a Dodge Ram, highlighting its fitment and appearance.
5. Installation Instructions (Setup)
Follow these steps for proper installation:
- Preparation: Park the vehicle on a level surface, engage the parking brake, and turn off the engine. Disconnect the negative terminal of the battery.
- Access: Depending on your vehicle model, you may need to remove the front grille and/or fender liner to access the headlight assembly mounting bolts.
- Remove Old Headlight: Disconnect the electrical connectors from the existing headlight bulbs and turn signal. Unscrew any retaining bolts or clips holding the old headlight assembly in place. Carefully remove the old assembly.
- Install New Headlight: Transfer your existing HB3 high beam and H11 low beam bulbs (if not already installed) into the new AXLAHA headlight assembly. Connect the electrical wiring to the new assembly. Position the new headlight assembly into the vehicle's housing and secure it with the retaining bolts/clips.
- Reconnect and Test: Reconnect the vehicle's battery. Turn on the headlights and check all functions (low beam, high beam, turn signal).
- Adjustment: Perform headlight aiming as described in the "Operation" section.
- Final Assembly: Reinstall the grille and fender liner if they were removed.
Video 1: AXLAHA Headlight Installation Overview for 2009-2018 Dodge Ram
This video provides a visual guide to the installation process for the AXLAHA headlight assembly on compatible Dodge Ram models, including steps for removal and replacement.
6. Operation
6.1 Headlight Functions
- Low Beam: Provides illumination for general driving, designed to not blind oncoming traffic.
- High Beam: Provides maximum illumination for driving in dark conditions, should be used when no oncoming traffic is present.
- Turn Signal Light: Indicates your intended turning direction.

Image 4: Front View of Headlight Assembly with Labeled Components
This image highlights the clear lens, low beam, high beam, and safety reflector components on the front of the headlight assembly.
Video 2: AXLAHA Headlight Functionality Demonstration
This video demonstrates the low beam, high beam, and turn signal functions of the AXLAHA headlight assembly, showing the light output and operation.
6.2 Headlight Adjustment
The headlight assembly features a vertical adjustment function. Horizontal adjustment is not available.
- Locate Adjuster: The vertical beam adjuster is located on the back of the headlight assembly.
- Aiming Procedure: Park your vehicle on a level surface approximately 25 feet from a wall. Measure the height of your headlight's center from the ground. Mark this height on the wall. The top of the low beam cut-off should be at or slightly below this mark.
- Adjust: Use a Phillips head screwdriver to turn the adjuster screw. Turning clockwise typically raises the beam, and counter-clockwise lowers it. Adjust until the beam is properly aimed.
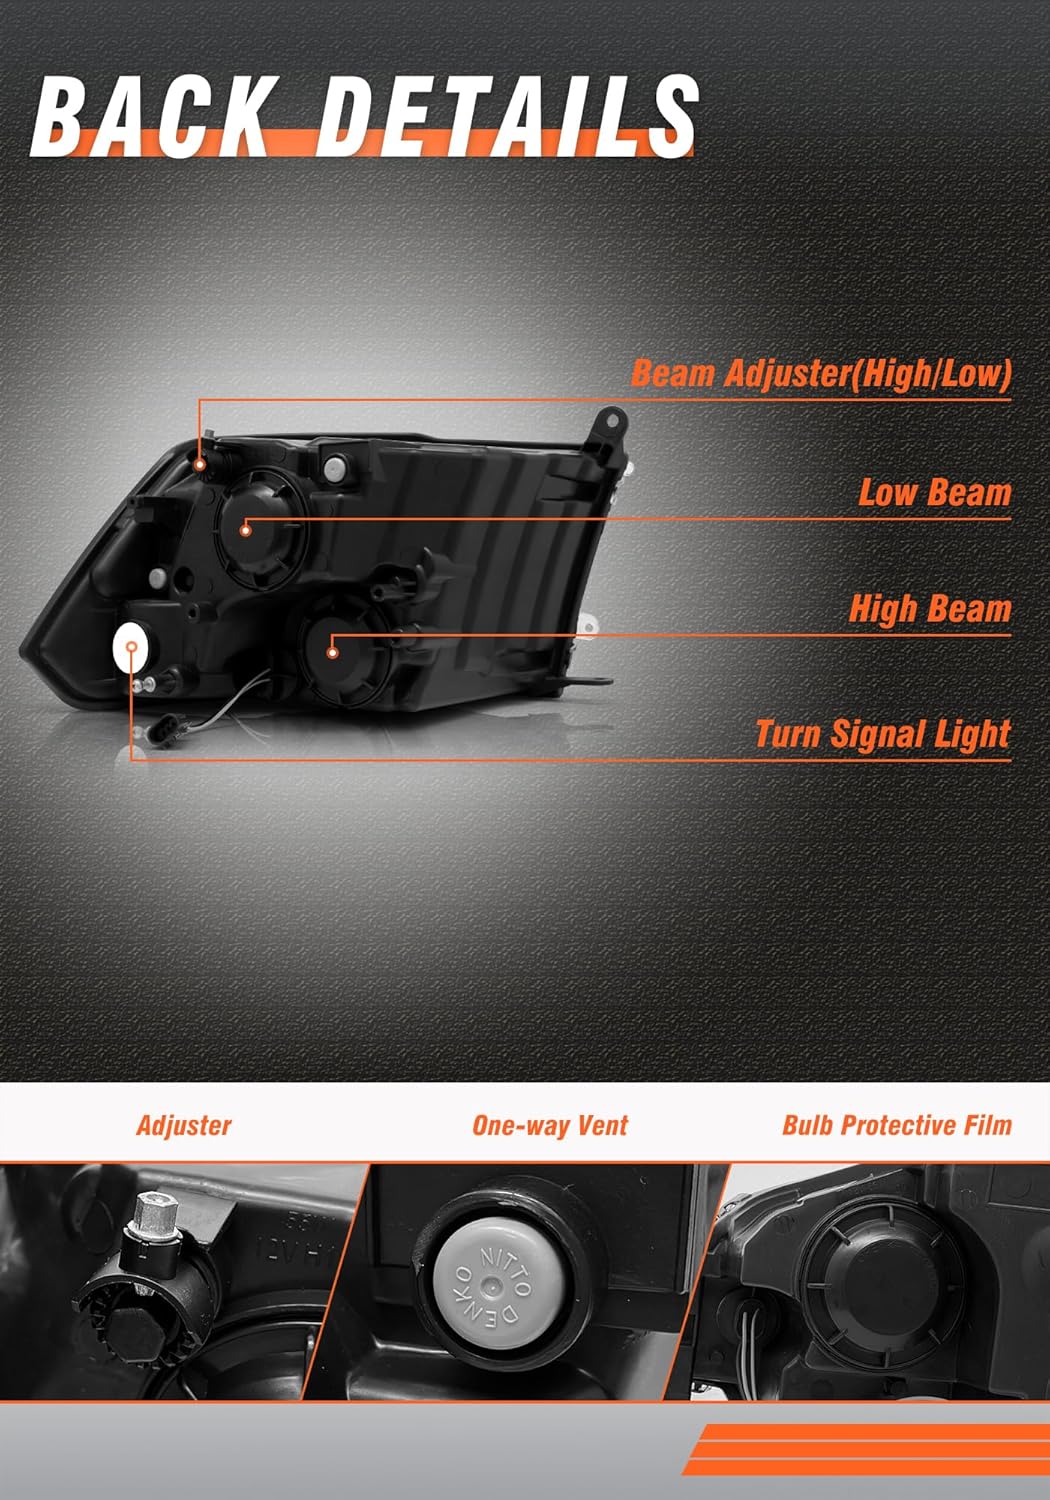
Image 5: Rear View of Headlight Assembly Highlighting Adjuster and Vent
This image shows the rear of the headlight assembly, pointing out the beam adjuster for high/low beams and the one-way vent for moisture regulation.
7. Maintenance
- Cleaning: Clean the headlight lenses regularly with a soft cloth and mild soap and water. Avoid abrasive cleaners or harsh chemicals that can damage the UV coating.
- Inspection: Periodically inspect the headlight assembly for any signs of damage, cracks, or moisture intrusion. Ensure all electrical connections are secure.
- Bulb Replacement: If a bulb burns out, replace it with the correct type (HB3 for high beam, H11 for low beam) to maintain optimal performance.

Image 6: Headlight Assembly Demonstrating IP68 Waterproof Rating
This image visually represents the headlight assembly's waterproof capabilities, showing water splashing over it to indicate its resilience against rain, snow, and dust.

Image 7: Explanation of UV Block Clear Coat
This image explains the UV coating feature, which helps prevent yellowing and cracking of the headlight lens over time, ensuring long-term clarity and performance.
8. Troubleshooting
| Problem | Possible Cause | Solution |
|---|---|---|
| Headlight not working | Loose electrical connection, blown bulb, faulty wiring. | Check connections, replace bulb, inspect wiring for damage. |
| Dim or flickering light | Weak electrical connection, aging bulb, insufficient power. | Ensure secure connections, replace bulb, check vehicle's electrical system. |
| Moisture inside headlight | Condensation (normal in some conditions), seal compromise. | Small amounts of condensation should dissipate. If persistent or excessive, contact support. Ensure one-way vent is clear. |
| Improper beam aim | Incorrect adjustment after installation. | Refer to Section 6.2 for headlight adjustment instructions. |
9. Specifications
- Brand: AXLAHA
- Model Number: AX-DPU20009885
- OEM Part Numbers: 68001484AG, 68001485AG
- Partslink Numbers: CH2502217, CH2503217
- Color: Chrome Housing, Amber Reflector
- Lens Material: Polycarbonate
- Lens Color: Crystal Clear
- Wattage: 65 watts
- Special Features: Waterproof (IP68), UV Coating
- Vehicle Service Type: 2009-2018 Dodge Ram 1500 (Quad style Halogen), 2010-2018 Dodge Ram 2500/3500 (Quad style Halogen), 2019-2022 Ram 1500 Classic (Quad style Halogen)
- Item Weight: 13.82 pounds (pair)
- Package Dimensions: 23 x 18.6 x 11.8 inches
- UPC: 784529183436
10. Warranty and Support
AXLAHA products come with a 5-year warranty. If you encounter any issues or have questions regarding your headlight assembly, please contact our customer service team.
Customer Service Email: info@axlaha.com / service@axlaha.com
Our after-sales team is dedicated to resolving issues promptly and ensuring your satisfaction.


